This week is a short follow-up on last week. While last week was all about configuring the authentication on Azure file shares, with the best user experience, this week is about automatically mapping those Azure file shares, for an even better user experience, on Windows devices. And to be really honest, that doesn’t really differ from mapping any other network drive. That doesn’t mean that it’s not a good moment to walk through the options for mapping (Azure) file shares. This post will briefly discuss the main different configuration options, followed with the steps to actually easily configure network mappings. That will be achieved by using the easiest most straight forward option, followed with the user experience.
Note: When the authentication for the Azure file share is configured (for example by using Azure AD Kerberos authentication), mapping an Azure file share is similar as mapping any other network drive.
Looking at the most obvious options for mapping Azure file shares
When looking at the most obvious options for mapping Azure file shares, it comes down to a few options for mapping network drives. That being said, out-of-the-box Microsoft Intune doesn’t provide a method for mapping network drives. It does, however, provide IT administrators with different frameworks that can be used for mapping network drives. The most obvious options – by also relying on existing community efforts – are the.following:
- PowerShell script: A PowerShell script can be used – either directly, or wrapped in a Win32 app – that runs
New-PSDrive -Name {YourDriveLetter} -PSProvider FileSystem -Root "{YourFileShare}" -Persistto map a nework drive. That network drive can also be an Azure file share. The easiest method to generate a PowerShell script to map the required network drives, is by using the Intune Drive Mapping Generator created by Nicola Suter. - ADMX template: An ADMX template can be used to map a network drive. And that network drive can also be an Azure file share. It does, however, require a custom ADMX template. The easiest method is by relying on this ADMX template created by Mark Thomas. That includes the required ADMX-file and ADML-file that can be easily imported.
Note: From a management perspective, the ADMX template is the easiest method to configure and to understand. That’s also why it will be used as an example in this post for mapping the Azure file share location.
Configuring the Azure files shares on Windows devices
When looking at the easiest method for configuring Azure file shares on Windows devices, it’s probably using the ADMX template method. Especially with the latest addition to Microsoft Intune that enables IT administrators to import ADMX templates. That addition includes importing custom ADMX templates. As long as it’s inline with the requirements for importing ADMX templates and the required admx and adml files are available (see also this post).
Importing custom ADMX template
Now let’s start by looking at the actions to perform the import of the ADMX-file. The downloaded ADMX templates don’t have any dependencies on other ADMX templates that should be inplace. Importing the ADMX-files for mapping network drives, can be achieved by importing the DriveMapping.adml and DriveMapping.admx files. The following four steps walk throug that process of importing the required ADMX templates.
- Open the Microsoft Endpoint Manager admin center portal and navigate to Devices > Configuration profiles
- On the Import ADMX tab, select Import to start the process of importing the ADMX-file and ADML-file
- On the ADMX file upload page, as shown in Figure 1, provide the following information and click Next
- ADMX file: Select the
DriveMapping.admxfile to import - ADML file for the default language: Select the
DriveMapping.admlfile to import - Specify the language of the ADML file: At this moment English is selected and grayed out
- ADMX file: Select the

- On the Review + create page, click Create
Note: The required ADMX-files are available for download here.
Configuring settings of the imported custom ADMX template
After importing the custom ADMX-file and ADML-file, the available settings within those files become available for configuration. Those settings can be used by relying on the new configuration template named Imported Administrative templates. That configuration template provides direct access to any succesfully imported ADMX-file. The following eight steps walk through the process of configuring the network mappings for the Azure file share.
- Open the Microsoft Endpoint Manager admin center portal and navigate to Devices > Windows > Configuration profiles
- On the Windows | Configuration profiles page, click Create profile
- On the Create a profile blade, provide the following information and click Create
- Platform: Select Windows 10 and later
- Profile type: Select Templates > Imported Administrative templates
- On the Basics page, provide a unique name and click Next
- On the Configuration settings page, as shown in Figure 2, configure the required drive mappings and click Next
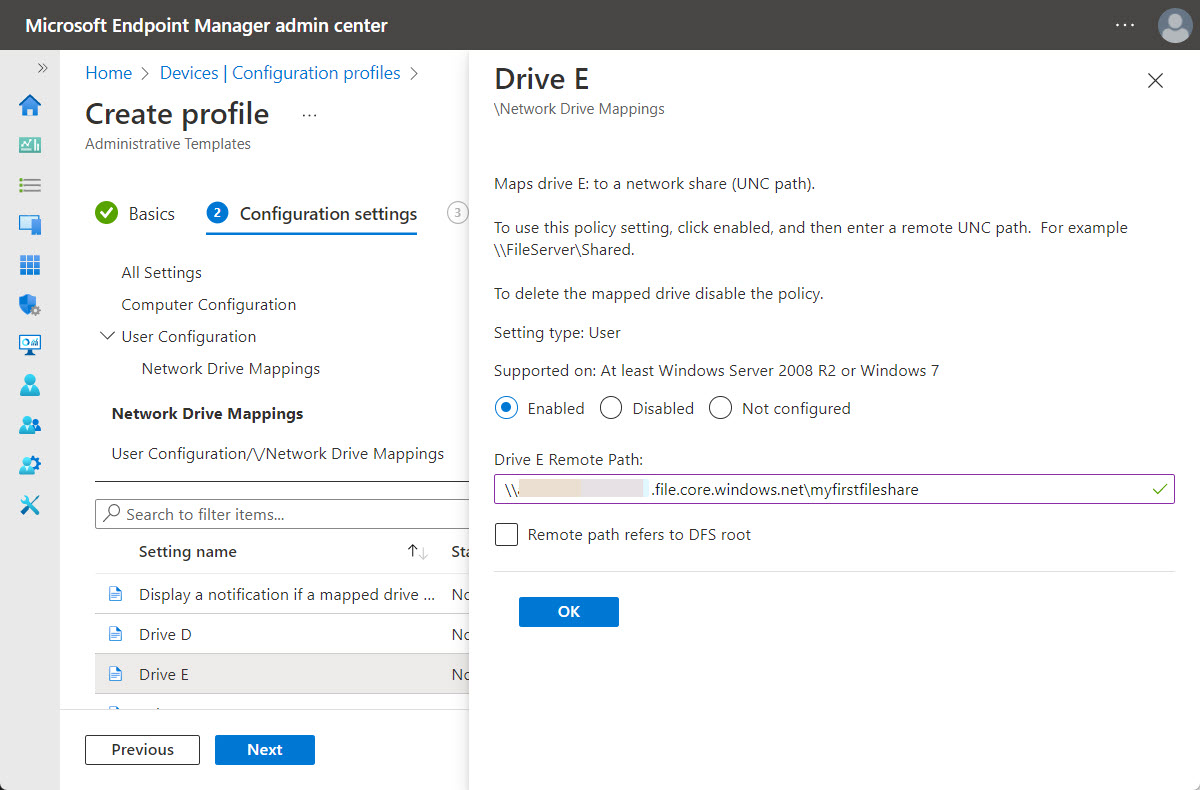
- On the Scope tags page, configure the require scope tags and click Next
- On the Assignments page, configure the required assignment and click Next
- On the Review + create page, verify the configuration and click Create
Note: The settings are available under User Configuration > Network Drive Mappings. That basically provides an overview of all available drive letters that can be used for configuring a network drive mapping.
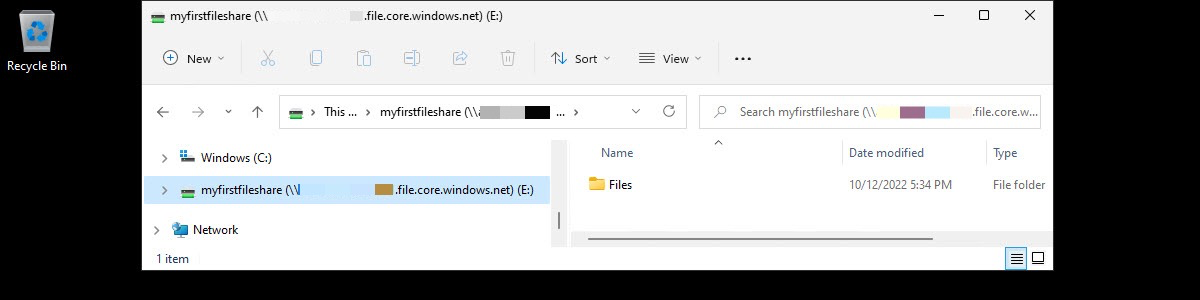
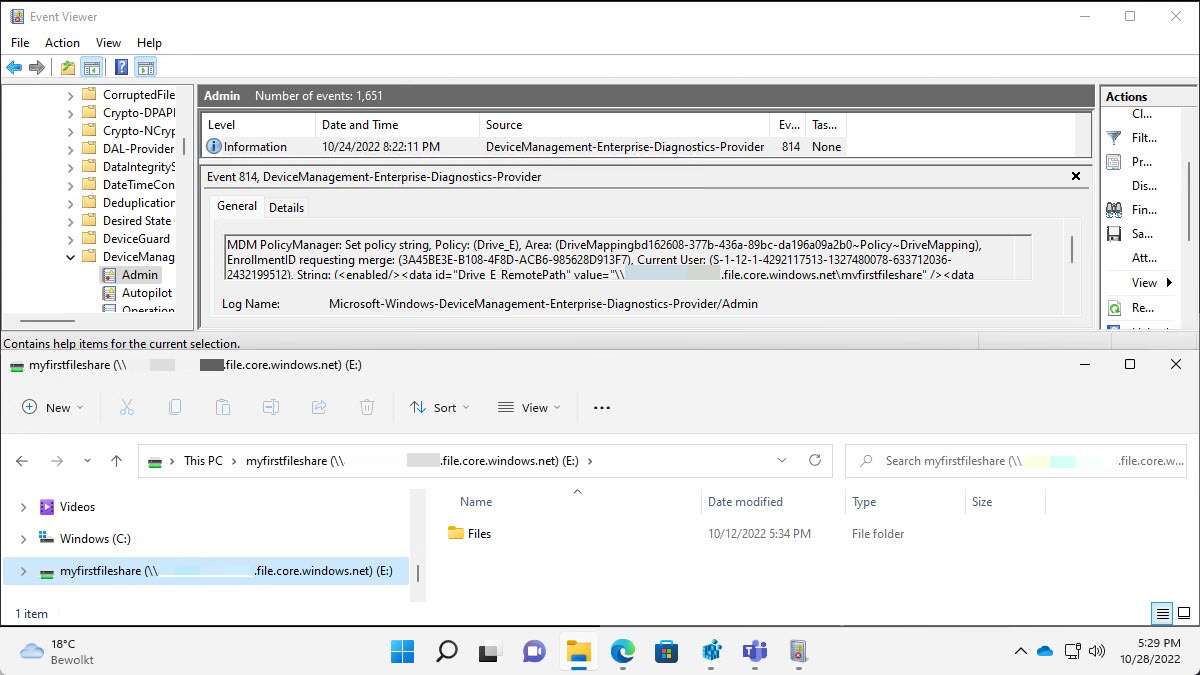
Experiencing the automatically mapped Azure file shares
When the ADMX-files are imported and the drive mappings are configured, it’s time to have a look at the user experience. And to be honest, when everything works as experience there is nothing really to experience. Besides that, it just works. Below, in Figure 3, is an overview of an automatically successfully mapped Azure file share. Besides that, it also shows the successful configuration in the Event Viewer.
More information
For more information about Azure File shares and authentication, refer to the following docs.
- Introduction to Azure Files | Microsoft Learn
- Use Azure Active Directory to authorize access to Azure files over SMB for hybrid identities using Kerberos authentication (preview) | Microsoft Learn
- Use ADMX templates on Windows 10/11 devices in Microsoft Intune | Microsoft Learn
- Import custom and third party partner ADMX templates in Microsoft Intune | Microsoft Learn
Hi thanks for the walk through. I’m getting an error with the ADMX file.
Error Details
ADMX file referenced not found NamespaceMissing:Microsoft.Policies.Windows. Please upload it first.
Something you have seen before?
I found the solution, needed to upload Windows.admx and .adml first to Endpoint Manager.
That’s great to hear Aron!
Can you elaborate as to where in Endpoint Manager you uploaded the files first? I received the same error message.
Hi Juan,
The same method as to upload/import the other ADMX-files.
Regards, Peter
I uploaded the files and created the configuration profile; however, it just sits there stuck on loading for Computer Configuration and User Configuration. I went ahead and created the profile, then went back into it and it does load, but it’s just the same settings as admin templates.
The “Network Drive Mappings” is not there.
Hi Joe,
Is it still loading without any error message? If so, I would suggest to contact support about that.
Regards, Peter
I’ve created the whole thing, and it creates a mapping when you look through Net Use, except it shows; not available. Running a net use to the same path shows the mapping in explorer with an OK status. It looks like the mapping is being created in the background using a system account or something.
Hi Jeroen,
Are you saying that it’s not actually mapping the drive for you?
Regards, Peter
Can this be targeted to specific groups inside this config profile?
Or do I have to create per group configuration for every mapped drive that allows specific group access?
There is no configuration within this configuration.
Regards, Peter
Anyone having issue with copy files when Acces-based Enumeration is turned on ?
It seems it cannot find the share when this is turned on, it show the drive and the files within but i cannot copy anything to this drive mapping.
Hi Rob,
To be honest, I don’t know what the latest status is of using ABE with Azure File shares…
Regards, Peter
Hey Peter,
We are doing exactly this, I have some success with it mapping but eventually users get the Restoring Network Connection error.
An error occurred while reconnecting W: to \\mystorageaccount\.file.core.windows.net\my-fileshare-01
Microsoft Windows Network: The filename, directory name, or volume label syntax is incorrect.
This connection has not been restored.
Any ideas?
Nate
Hi Nathan,
When are you seeing this bahavior?
Regards, Peter
Really strange behaviour, I think it’s a user specific configuration that is causing the problem, potentially something that has carried over from Group Policy. Our production machines were domain joined and we went through the process of removing from domain and AADJ/Intune them.
Prior to production rollout I deployed it to an up-to-date Win11 and Win10 VM from my home IP and confirmed all was working as expected. I knew that in the production environment port 445 would be blocked so I allowed this out of the firewall and confirmed it was working before mapping drives to users’ machines.
I cannot explain why I’m having these issues but the original error pertaining to syntax error can be resolved by creating a new user profile (if I sign in with another test user it works fine, this is how I came to this conclusion) – I can manually access the UNC path in explorer and I can manually map it to a drive letter (although this removes itself after a reboot presumably because I’m using ADMX imported method for pushing drive maps to Intune managed devices) so for the user that can currently access it OK (running Win10) after getting a new profile I have had to resort to adding a network location which seems to persist without issue.
The user that cannot access it and currently getting syntax error (running Win11) I am going to configure a new user profile this morning which I expect will resolve the issue – assuming it does I might go back to attempting to map via Intune.
I think the most frustrating part at the moment is I have no idea what configuration could be causing it to require a new profile and am not sure where to look and to make matters worse I cannot replicate the issue in my test environment, everything works as expected there.
That’s always challenging, Nathan!
Especially when you might be dealing with old configurations that are still hanging around. Are you not seeing anything strange in logs or something like that?
Regards, Peter
Hi Peter,
This works great. Thank you for posting. Question, can I map just a network share without a drive letter?
Thanks
Hi Phil,
Not with this method.
Regards, Peter
Hello Peter,
We used ADMX template to map network drive, for testing purpose we deployed it to 3 devices, it got automatically mapped within 8 hours post policy applied (was not instant to be frank) but suddenly from next day drives are disappeared and I dont see them visible now, tried to sync device many times, rebooted device but stil drives are not coming back automatically. We dint make any changes in the policy but still such sudden behavior of ADMX is worrying. Do you have any idea on this ? If I manually map the drive then its working but not from ADMX now.
Hi Suraj,
No, I haven’t experienced that behavior. I do know that this is more sensitive for having connectivity during applying the network mappings. If you want something more flexible, you’ve got to look at scripting.
Regards, Peter
Hello colleagues,
Even this thread is a bit old but still popular 🙂
I hope someone could help me in the following scenario:
For some reason the removing network drive mapping doesn’t work for me.
I tried it on few Windows 11 machines and the outcome is the same – drives stays mapped and visible in Explorer.
The registry values (Computer\HKEY_CURRENT_USER\Network\) were set to NULL strings or 0 rather than deleting them.
https://i.imgur.com/LgNrAgy.png
Also it doesn’t work if I have a manually mapped network drive, which I need to remove (substitute) with another UNC path.
Thanks in advance!
Regards,
Andriy
Hi Andriy,
Are you saying that you can’t remove a mapped network drive on Windows 11? Even if that was mapped manually?
Regards, Peter
Hi Peter,
Looks like I managed to mitigate the issue.
And at the end it’s not an issue 🙂
So in order to see the changes (like – drive mappings or new drive that was mapped instead of the existing one) user have to log off and log in again. Unfortunately, just restart of explorer.exe doesn’t work.
Regards,
Andriy
Thank you for the update!
Regards, Peter
Also another weird behavior:
On some computers (mainly hybrid joined) I do not see the drives mapped.
Even the policy is properly applied (according to Intune console and Event Viewer), but I do not see the reg keys created in Computer\HKEY_CURRENT_USER\Network and there are no drives mapped.
Does anyone have the same? What are the possible troubleshooting steps?
Thanks!
Hi Andriy,
Are all the problematic devices hybrid joined?
Regards, Peter
Hi Peter,
Not really. I saw couple of them purely Entra ID joined.
Is that for specific users, or for all users on a specific devices?
Regards, Peter
For specific users but I couldn’t trace the difference between users 🙁
Ah, that makes it really challenging to troubleshoot. Did you also try different methods for mapping those drives?
Regards, Peter
No, only one method described in this article
In that case you might want to see if maybe a scripted solution is more reliable in your case.
Regards, Peter
This method will save us a lot of time!
Thanks for sharing.
I did come across a weird issue with this when accessing a server based file share on a non domain joined, Azure only device.
The drive mapping appears but has a red x on it and the path cannot be found. If I manually add the same drive mapping as the user it seems to work ok. When I looked under the registry, the drives are created correctly. I am currently looking into finding a fix for this as it sounds like at least one other person here had this issue. If I find a work around or fix I’ll post it here.
Thank you for that, Vince. The red cross could be a timing issue. If you sign-out and sign back in, is it then better?
Regards, Peter
I am testing with this too, and have the same issue. When I manually open the unc path it opens just fine, but the mapped drive says the share is not available.
This is on W11 azure only too
On all devices, or on specific devices and for specific users?
Regards, Peter
Hello,
We are trying to set this up, but i have one quenstion about the Storage account key. How does this ADMX template have access to the Azure File share without the storage account Key?
Regards Chris
The ADMX doesn’t need to have access to the file share. The user must have access.
Regards, Peter