This week is a follow-up on last week. Last week was about Windows 365 Enterprise in its simplest form, while this week will be about the more advanced networking forms of Windows 365 Enterprise. In other words, the different options of the Azure network connections and what it brings to Cloud PCs. For a quick introduction about Cloud PCs in its simplest form, with a Microsoft hosted network connection, have a look at that previous post. The more advanced networking connections enable organizations to create a connection with an on-premises environment. That on-premises environment can be an environment running in Azure, or an environment running in any datacenter. As long as it’s connected. The idea of this post is to provide the basics around the Azure networking options and to show how easy it is to get started. And when the prerequisites are in place, it’s still a few minutes of work. The following subjects will be addressed in this post:
- Introducing Azure network connections for Windows 365 Cloud PC
- Creating an Azure network connection
- Creating and assigning a provisioning policy
- Assigning a license to users
- (Optional) Creating and assigning user settings
- Experiencing Windows 365 Cloud PC
Note: In some areas this post has some overlap with the previous post. For the completeness of this post, those areas are reused in this post. That provides the reader with single post for all required configurations.
Introducting Azure network connections for Windows 365 Cloud PC
When looking past the Microsoft hosted network connection for Cloud PCs, the Azure network connections come into the picture. Azure network connections (ANCs) are objects in Microsoft Endpoint Manager admin center that describes the required information to connect to network-based resources and those objects can be used in provisioning profiles. That enables the provisioning of Cloud PCs with a connection to network-based resources. Those ANCs are used during the initial provisioning of a Cloud PC and during the periodically check of the connection. When looking at the configuration of ANCs, there are basically two forms of ANCs based on their join type that both let traffic of the Cloud PCs access network-based resources.
- Hybrid Azure AD Join: This join type describes the required virtual network information and the required Active Directory domain information (used for joining the domain).
- Azure AD Join: This join type only describes the required virtual network information.
During the provisioning of a Cloud PC, the virtual network information is used to create a virtual network interface card (vNIC) that is injected into the provided virtual network (vNet). That provides the Cloud PC with access to the network-based resources. When a hybrid Azure AD join is required, the Cloud PC is also joined to the provided Active Directory domain during the provisioning.
Note: Keep in mind that the hybrid Azure AD join requires the hybrid Azure AD join prerequisites to be configured.
Creating an Azure network connection
For the more advanced network connections there are some additional configurations required, compared to the simple configuration when using a Microsoft hosted network. That requires an ANC, as described in the introduction. This section will describe the configurations of an ANC for Azure AD joined and hybrid Azure AD joined devices.
Azure network connection for Azure AD joined devices
The simplest form of an ANC, is an ANC for Azure AD joined devices. That only requires a network connection with access to the different endpoints needed for the proviosing and management of the Cloud PC. That would enable an organization to have an Azure AD joined device with access to network-based resources. The following four steps walk through the required steps for creating that ANC.
- Open the Microsoft Endpoint Manager admin center portal and navigate to Devices > Windows 365 > Azure network connection
- On the Azure network connection page, click Create > Azure AD Join
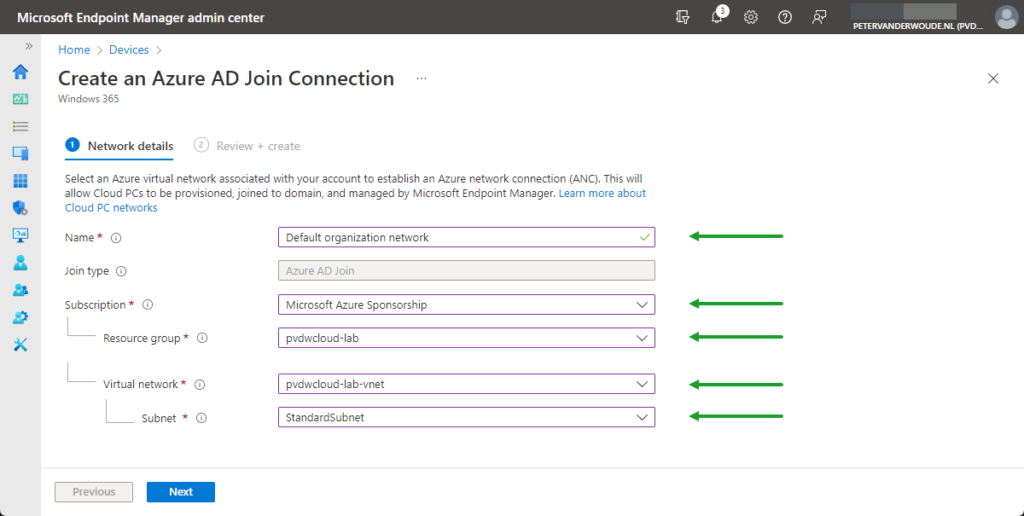
- On the Network details page, as shown in Figure 1, provide the following information and click Next
- Name: Provide a name for the network connection to distinguish it from other similar connections
- Join type: (Grayed out) Azure AD Join is selected based on the selection during the creation of the connection
- Subscription: Select the Azure subscription that contains the virtual network that is connected to the required network
- Resource group: Select the Resource group that contains the virtual network that should be used as the network
- Virtual network: Select the Virtual network that should be attached to the Cloud PCs
- Subnet: Select the Subnet of which the Cloud PCs will receive an IP address
- On the Review + create page, verify the configuration and click Create
Azure network connection for Hybrid Azure AD joined devices
The more challenging form of an ANC, is an ANC for hybrid Azure AD joined devices. That requires a network connection with access to the different endpoints needed for the proviosing and management of the Cloud PC, and more. It also requires the Active Directory domain to be available via DNS, credentials to perform an Activite Directory domain join, and the hybrid Azure AD join configuration to be available within the domain (a check is done for the SCP-record). That would enable an organization to have an hybrid Azure AD joined device with access to network-based resources. The following five steps walk through the required steps for creating that ANC.
- Open the Microsoft Endpoint Manager admin center portal and navigate to Devices > Windows 365 > Azure network connection
- On the Azure network connection page, click Create > Hybrid Azure AD Join
- On the Network details page, as shown in Figure 2, provide the following information and click Next
- Name: Provide a name for the network connection to distinguish it from other similar connections
- Join type: (Grayed out) Hybrid Azure AD Join is selected based on the selection during the creation of the connection
- Subscription: Select the Azure subscription that contains the virtual network that is connected to the domain controller
- Resource group: Select the Resource group that contains the virtual network that should be used as the network
- Virtual network: Select the Virtual network that should be attached to the Cloud PCs
- Subnet: Select the Subnet of which the Cloud PCs will receive an IP address

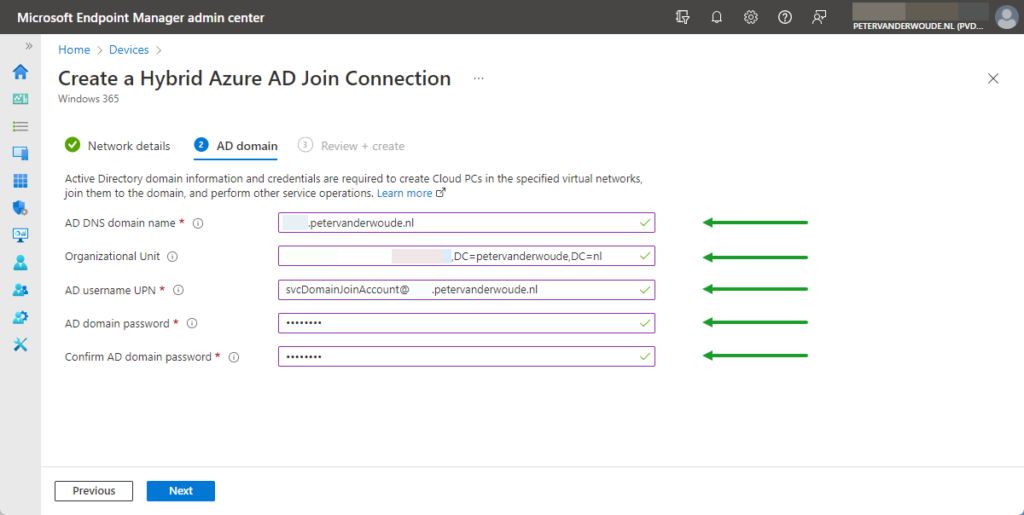
- On the AD domain page, as shown in Figure 3, provide the following information and click Next
- AD DNS domain name: Provide the FQDN of domain that the Cloud PCs should join
- Organizational Unit: Provide the distinguished name of the OU location for the Cloud PCs
- AD username UPN: Provide the UPN of a user account with sufficient permissions to join the Cloud PCs to the domain
- AD domain password: Provide the password that belongs to the domain join user account
- Confirm AD domain password: Confirm the password that belongs to the domain join user account
- On the Review + create page, verify the configuration and click Create
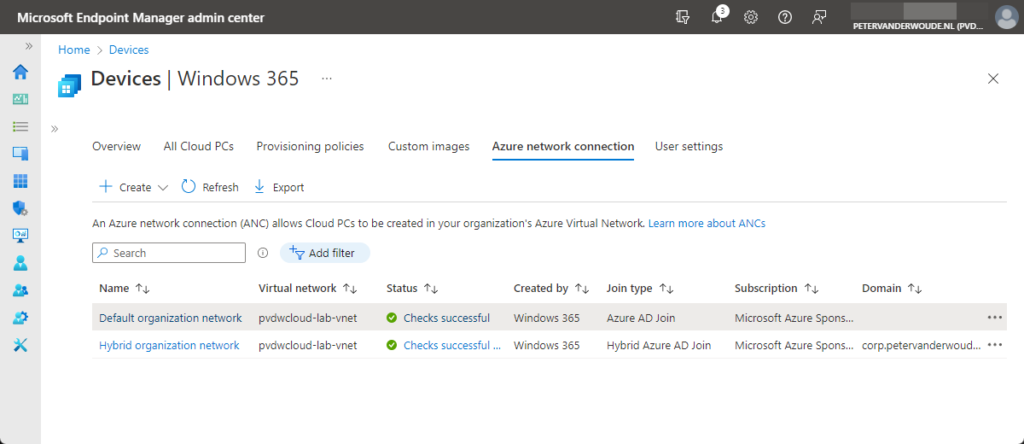
After the creation of an ANC, the object is shown in the admin center portal. That provides an overview of the created ANCs, with the most important properties and the status. The status will be checked after the creation and periodically. All to make sure that the provisioning will be a success, at any time. An overview of the earlier created objects is shown below in Figure 4.
Creating and assigning a provisioning policy
Once the required ANC is created, the next step is to create the provisioning policy. That is similar to creating a provsioning policy for the simplest form of providing a Cloud PC to a user. That policy will make sure that Cloud PCs are created, with the correct configuration, for the licensed users. In this more advanced form, a Cloud PC can be created as an hybrid Azure AD joined device or an Azure AD join device. Depending on that choice the related ANC must be used. That configuration will make sure that the provisioning policy can be used to get users a Cloud PC that’s running the latest version of Windows 11, including Microsoft 365 apps. The following seven steps walk through the required steps for a hybrid Azure AD joined Cloud PC.
- Open the Microsoft Endpoint Manager admin center portal and navigate to Devices > Windows 365 > Provisioning policies
- On the Provisioning policies tab, click Create policy
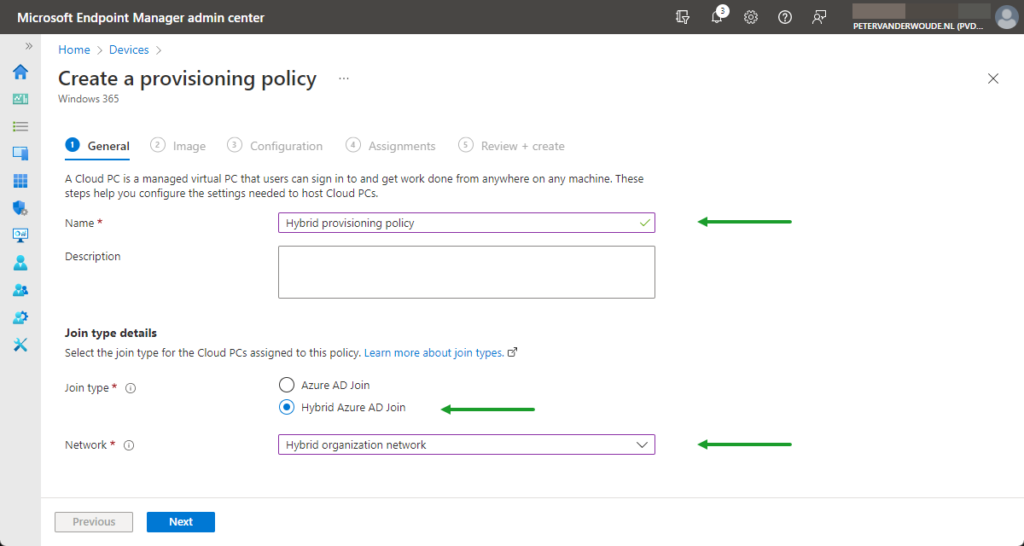
- On the General page, as shown in Figure 3, provide the following information and click Next
- Name: Provide a name for the provisioning policy to distinguish it from other similar policies
- Description: (Optional) Provide a description for the provisioning policy to add additional details
- Join type: Select Hybrid Azure AD join to make sure that the Cloud PC will be hybrid Azure AD joined
- Network: Select the earlier created ANC to make sure that the connection with Active Directory domain is available
- On the Image page, provide the following information and click Next
- Image type: Select Gallery image to rely on a standard image for the Cloud PC
- Select Windows 11 Enterprise + Microsoft 365 Apps as image to rely on the latest available platform
- On the Configuration page, provide the following information and click Next
- Language & Region: Select the required language to relate the Cloud PC to the country
- Select a service: Select the service to provide additional services to common management tasks on the Cloud PC
- On the Assignments page, select the group of user that should receive a Cloud PC and click Next
- On the Review + create page, verify the configuration and click Create
Note: The steps for Azure AD joined devices are similar with only differences in step 3, regarding join type and ANC.
Assigning a license to users
When the provisioning policy is created, users can get a Cloud PC once a license is assigned. Once that license is assigned the provisioning of the Cloud PC will immediately start, The following two steps provide some guidance to easily assign the required license, based on a group in Azure AD.
- Open the Microsoft Entra admin center portal and navigate to Billing > Licenses
- Select the Windows 365 Enterprise license > Licensed groups and Assign the group with Cloud PC users
Note: From a management perspective, the easiest would be to use the same group for licensing and provisioning
Creating and assigning user settings
Optionally, it’s also possible to configure some user specific settings that define various settings for the user. At this moment, those user settings can only be used to configure local administrator privileges and to configure the restore service. The nice thing about these user settings is that, besides that it’s optional, it can be applied before or after the assignment of a Cloud PC. As the settings are user settings, it applies to all assigned Cloud PCs and take effect when the user logs on. The following five steps walk through the process of creating and assigning the user settings.
- Open the Microsoft Endpoint Manager admin center portal and navigate to Devices > Windows 365 > User settings
- On the User settings tab, click Add
- On the General page, provide the following information and click Next
- Name: Provide a name for the user settings to distinguish it from other similar policies
- Select Enable Local admin to provide the user with local administrator privileges on the Cloud PC
- Select Allow user to initiate restore service to provide the user with option to restore the Cloud PC
- Frequency of restore-point service: Select the interval of how often a restore point of the Cloud PC will be created
- On the Assignments page, select the group of user that should receive a Cloud PC and click Next
- On the Review + create page, verify the configuration and click Create
Experiencing Windows 365 Cloud PC
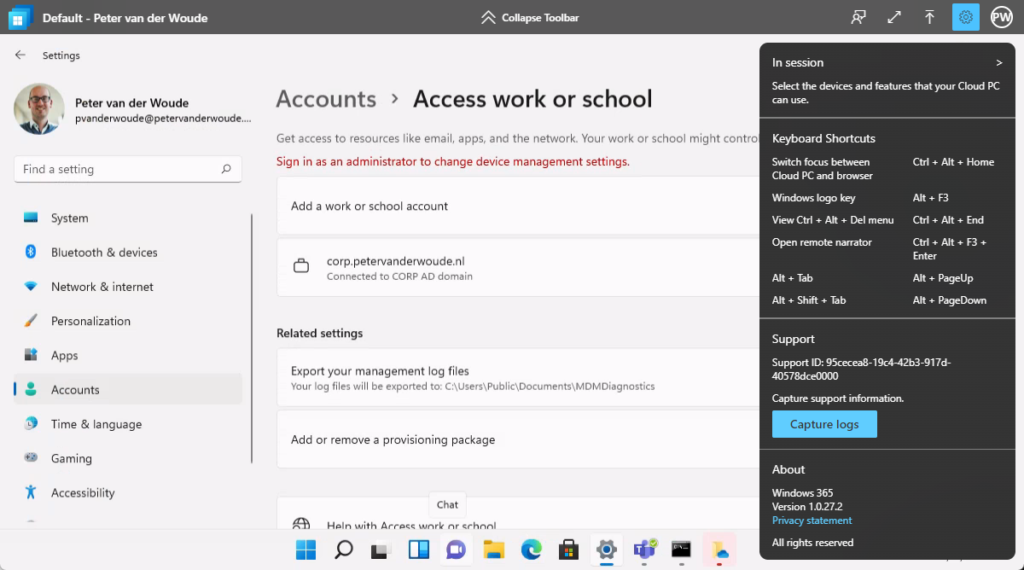
After getting the configurations in place to provision the Cloud PC, it’s time to experience this Cloud PC as a user. The management experience is similar to any other device that is managed via Microsoft Intune. The only difference is in the actions that the administrator can perform. The user can go to Windows 365 (microsoft.com) to access their Cloud PCs and to manage their Cloud PCs. After connecting to the Cloud PC, the user is prompted to configure the features that the Cloud PC can use of the device, followed with a sign-in prompt. Once signed in, the user can be productive and has an hybrid Azure AD joined device (as shown below in Figure 6).
More information
For more information about Windows 365 Enterprise Cloud PC, refer to the following docs.
- What is Windows 365 Enterprise? | Microsoft Docs
- Windows 365 architecture | Microsoft Docs
- Windows 365 planning guide | Microsoft Docs
- Assign licenses for Windows 365 | Microsoft Docs
- Create provisioning policies for Windows 365 | Microsoft Docs
- Assign user as a local admin for Windows 365 | Microsoft Docs

1 thought on “Getting started with Windows 365 Enterprise using an Azure Network Connection”