This week is not about something totally new, but it is about something that really deserves a place on this blog. It’s all about Windows 365 Enterprise. More specifically, Windows 365 Enterprise in its simplest form, in a Microsoft Hosted Network. Windows 365 Enterprise is a cloud-service provided by Microsoft that will automatically create Windows virtual machines (a.k.a. Cloud PCs) for licensed users. A very straight forward method to provide users with a personal PC from the cloud (a.k.a. Cloud PC). It combines the strengths of different Microsoft products by relying on Microsoft Endpoint Manager for management, by relying on Azure AD for identity and access control and by relying on Azure Virtual Desktop for remote connectivity. The idea of this post is to provide the basics around Windows 365 and to show how easy it is to get started. That in its simplest form, it’s literally a few minutes of work. The following subjects will be addressed:
- Introducing Windows 365 Enterprise
- Creating and assigning a provisioning policy
- Assigning a license to users
- (Optional) Creating and assigning user settings
- Experiencing Windows 365 Cloud PC
Note: Keep in mind that users need to be licensed for Windows, Microsoft Intune, Azure AD and Windows 365.
Introducing Windows 365 Enterprise
The idea of the Windows 365 service is that a Cloud PC is assigned to an individual user as a dedicated Windows device. That Cloud PC is automatically provisioned when a license is assigned to the user. That is achieved by using a provisioning policy. A provisioning policy defines some important characteristics of the Cloud PC that should be provisioned for the user. Those characteristics include the join type (should the device be Azure AD joined, or hybrid Azure AD joined), the network (is the Microsoft hosted sufficient, or is connection to an Azure network required), the image (a Gallery image, or a custom image) and some Windows settings and additional services.
In its simplest form, the infrastructure that is required for a Cloud PC is completely managed by Microsoft and running in a subscription of Microsoft. That really simplifies the management. From a management perspective, that makes a Cloud PC similar to any other laptop or desktop that is used by a user. It requires monthly windows updates and might require app installations. That the infrastructure is managed by Microsoft, also comes with a different licensing and cost model. No variable compute and storage costs, but a per-user per-month cost model.
Note: For more advanced scenarios, the infrastructure is still managed by Microsoft.
Creating and assigning a provisioning policy
When looking at the simplest form of providing a Cloud PC to a user, it all starts with the provisioning policy, That policy will eventually make sure that Cloud PCs are created, with the correct configuration, for the licensed users. In its simplest form, a Cloud PC is created as an Azure AD join device with a Microsoft hosted network configuration. That also means that the provisioning policy is the only required configuration to get users a Cloud PC that’s running the latest version of Windows 11, including Microsoft 365 apps. The following seven steps walk through the required steps for that Cloud PC.
- Open the Microsoft Endpoint Manager admin center portal and navigate to Devices > Windows 365 > Provisioning policies
- On the Provisioning policies tab, click Create policy
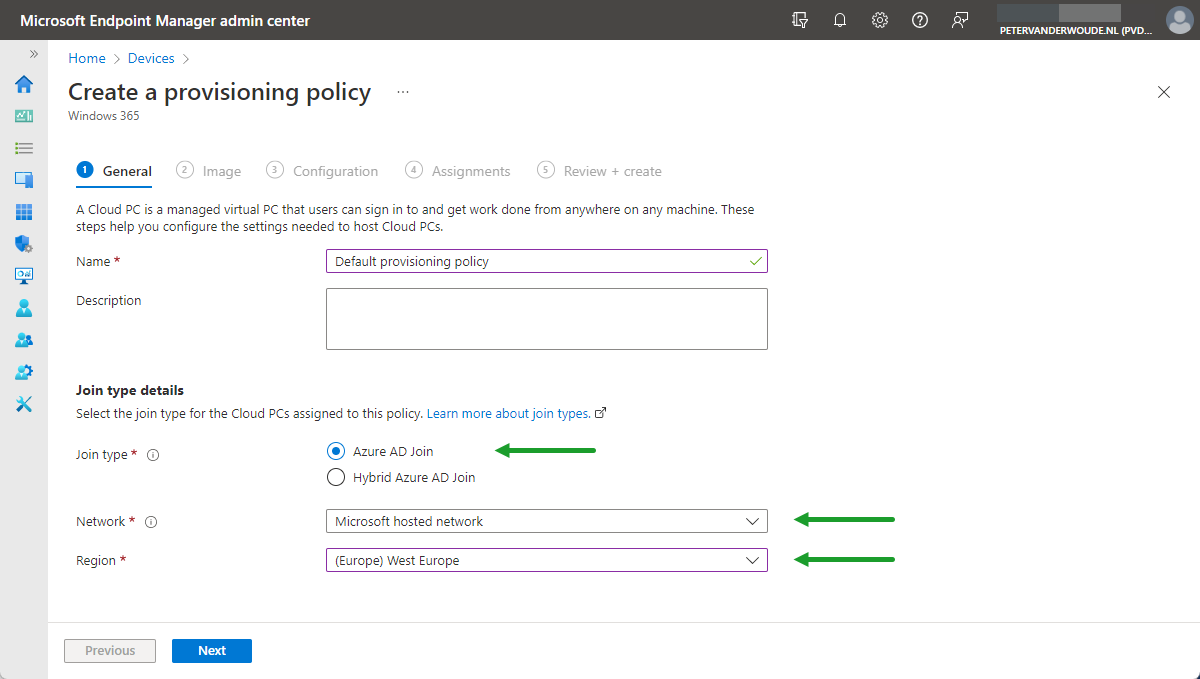
- On the General page, as shown in Figure 1, provide the following information and click Next
- Name: Provide a name for the provisioning policy to distinguish it from other similar policies
- Description: (Optional) Provide a description for the provisioning policy to add additional details
- Join type: Select Azure AD join to make sure that the Cloud PC will join Azure AD
- Network: Select Microsoft hosted network to rely on the default network configuration
- Region: Select the required region to make sure that the Cloud PC is in the right region
Note: For more advanced scenarios that would require a hybrid Azure AD join, or a custom network connection, make sure to first create a Azure network connection.
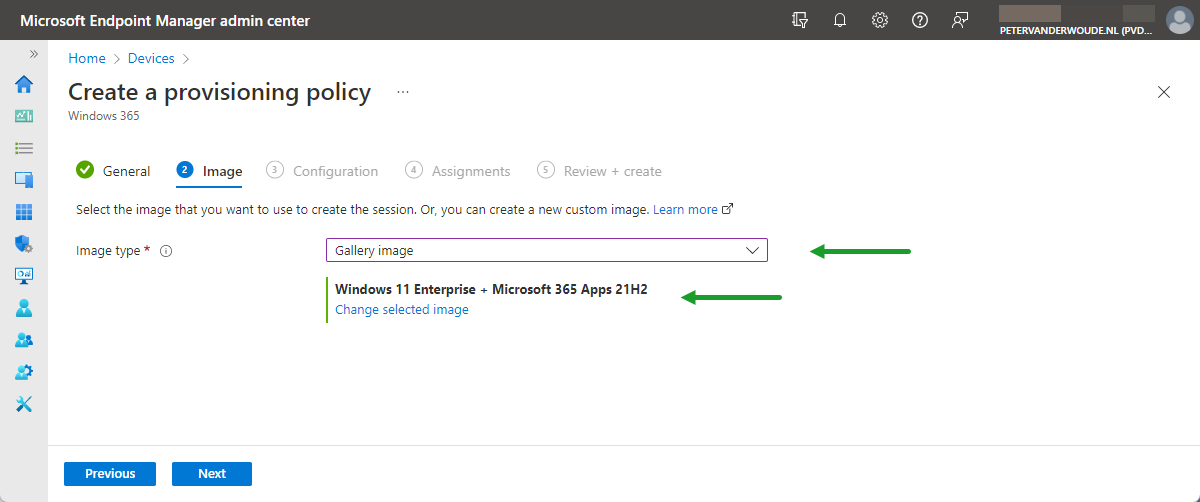
- On the Image page, as shown in Figure 2, provide the following information and click Next
- Image type: Select Gallery image to rely on a standard image for the Cloud PC
- Select Windows 11 Enterprise + Microsoft 365 Apps as image to rely on the latest available platform
Note: For more advanced scenarios that would require a custom image, make sure to first add Custom images.
- On the Configuration page, as shown in Figure 3, provide the following information and click Next
- Language & Region: Select the required language to relate the Cloud PC to the country
- Select a service: Select the service to provide additional services to common management tasks on the Cloud PC

Note: At this moment only Windows Autopatch can be added as an additional service, when licenses are available.
- On the Assignments page, select the group of user that should receive a Cloud PC and click Next
- On the Review + create page, verify the configuration and click Create
Assigning a license to users
When the provisioning policy is created, users can get a Cloud PC once a license is assigned. Once that license is assigned the provisioning of the Cloud PC will immediately start, The following two steps provide some guidance to easily assign the required license, based on a group in Azure AD.
- Open the Microsoft Entra admin center portal and navigate to Billing > Licenses
- Select the Windows 365 Enterprise license > Licensed groups and Assign the group with Cloud PC users
Note: From a management perspective, the easiest would be to use the same group for licensing and provisioning
Creating and assigning user settings
Optionally, it’s also possible to configure some user specific settings that define various settings for the user. At this moment, those user settings can only be used to configure local administrator privileges and to configure the restore service. The nice thing about these user settings is that, besides that it’s optional, it can be applied before or after the assignment of a Cloud PC. As the settings are user settings, it applies to all assigned Cloud PCs and take effect when the user logs on. The following five steps walk through the proces of creating and assigning the user settings.
- Open the Microsoft Endpoint Manager admin center portal and navigate to Devices > Windows 365 > User settings
- On the User settings tab, click Add
- On the General page, as shown in Figure 4, provide the following information and click Next
- Name: Provide a name for the user settings to distinguish it from other similar policies
- Select Enable Local admin to provide the user with local administrator privileges on the Cloud PC
- Select Allow user to initiate restore service to provide the user with option to restore the Cloud PC
- Frequency of restore-point service: Select the interval of how often a restore point of the Cloud PC will be created

- On the Assignments page, select the group of user that should receive a Cloud PC and click Next
- On the Review + create page, verify the configuration and click Create
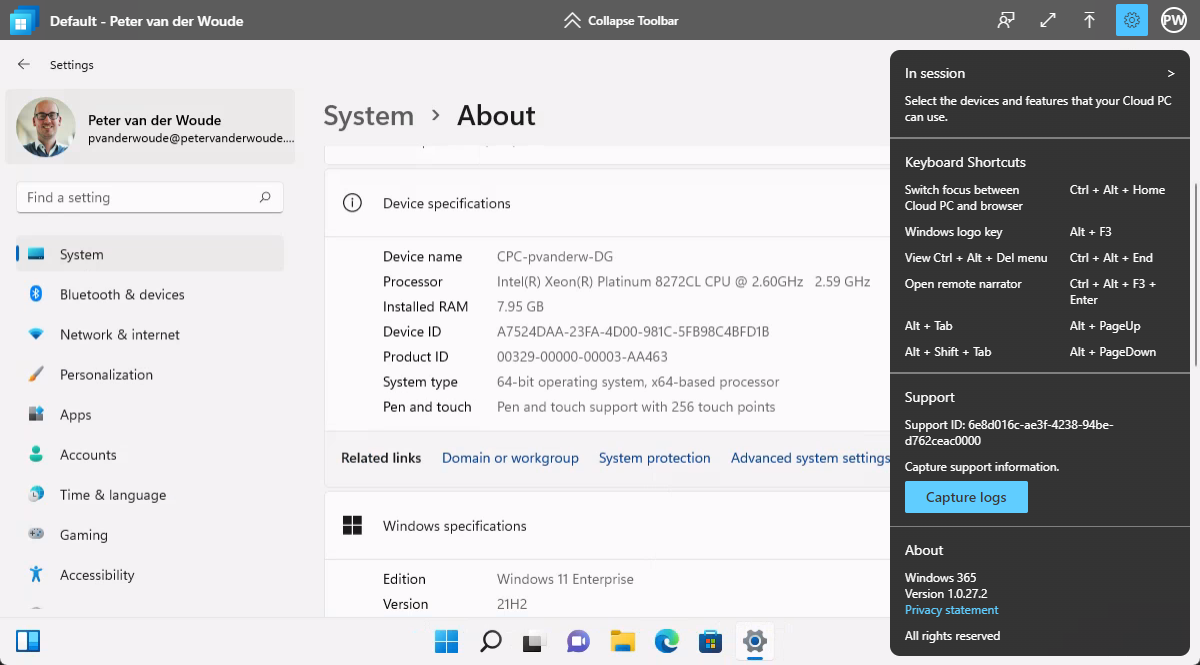
Experiencing Windows 365 Cloud PC
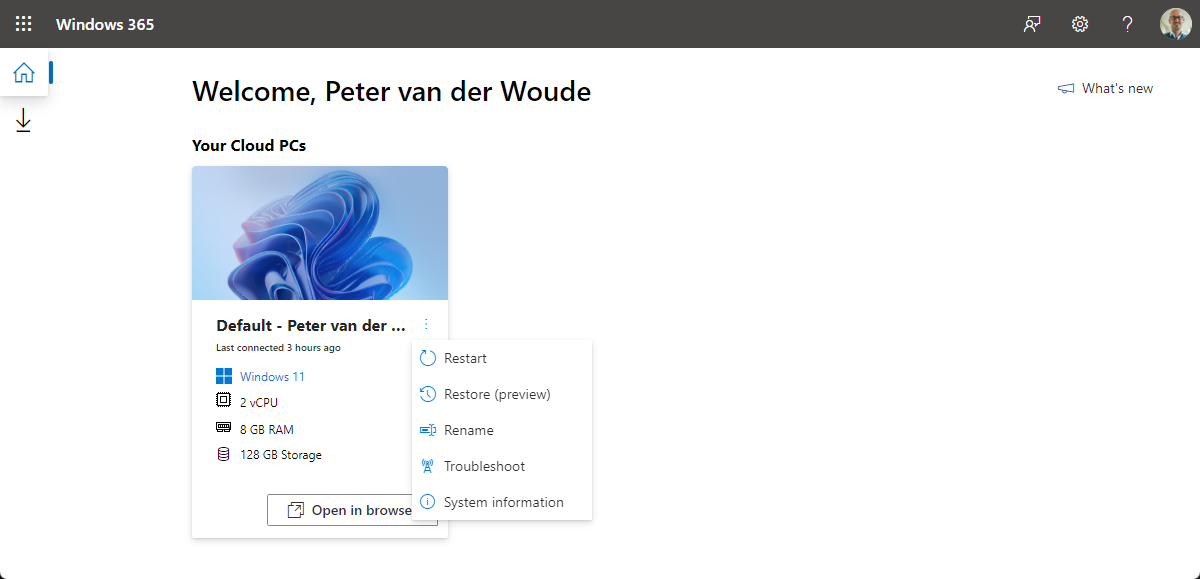
After getting the basic configurations in place to create a Cloud PC in its simplest form, it’s time to experience the Cloud PC as a user. The management experience is similar to any other device that is managed via Microsoft Intune. The only difference is in the actions that the administrator can perform. The user can go to Windows 365 (microsoft.com) to access their Cloud PCs and to manage their Cloud PCs. Besides using Open in browser, to open the Cloud PC in a new browser tab, the user can perform the following actions (as shown below in Figure 5):
- Restart: This action can be used to restart the Cloud PC and the action will be logged in the Microsoft Endpoint Manager admin center portal
- Restore: This action is only available when allowed via the user settings, can be used to restore the Cloud PC to a selected point in time and will be logged in the Microsoft Endpoint Manager admin center
- Rename: This action can be used to rename the Cloud PC in this list and not the actual device name
- Troubleshoot: This action can be used to troubleshoot connectivity issues of the Cloud PC
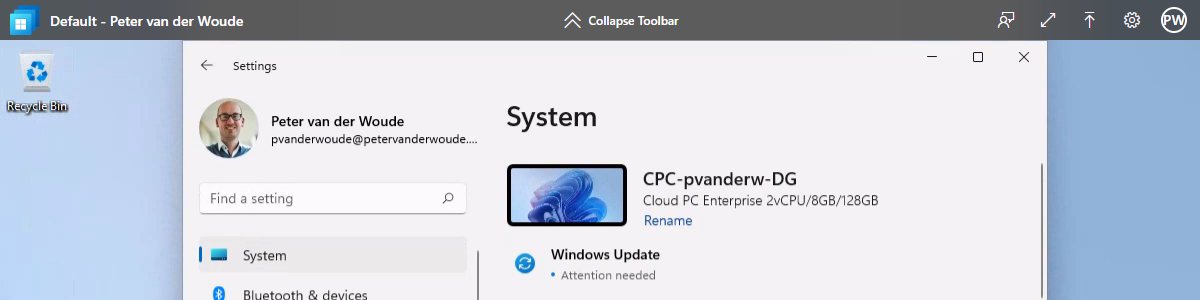
- System information: This action can be used to show the system information of the Cloud PC that includes the Device name, Cloud PC name, License and Last sign-in
After connecting to the Cloud PC, the user is prompted to configure the features that the Cloud PC can use of the device (Printer, Microphone, Clipboard), followed with a sign-in prompt. Once signed in, the user can be productive and has some interactive options with the Cloud PC (as shown below in Figure 6). The option to provide feedback, use full screen, upload files, view settings and view account information.
More information
For more information about Windows 365 Enterprise Cloud PC, refer to the following docs.
- What is Windows 365 Enterprise? | Microsoft Docs
- Windows 365 architecture | Microsoft Docs
- Windows 365 planning guide | Microsoft Docs
- Assign licenses for Windows 365 | Microsoft Docs
- Create provisioning policies for Windows 365 | Microsoft Docs
- Assign user as a local admin for Windows 365 | Microsoft Docs
Hi
what is the use of Windows 365 Enterprise PC.
Hi Siva,
There are many specific use-cases. An often used example is that of contracters. They bring their own device and get easy access via a Cloud PC.
Regards, Peter