This week is al about Microsoft Universal Print. Not, however, about the concept, the connectors, the printers, or the printer shares. Just about the configuration, via Microsoft Intune, on Windows devices. And in particular, at this moment, Windows 11 devices. Windows 11 devices now contain the UniversalPrint CSP that can be used to easily configure Universal Print printers on Windows devices. That replaces the existing Universal Print printer provisioning tool and provides a direct configuration (and integration) option with Microsoft Intune. Based on the provided configurations it retrieves the required printer information from the Universal Print service and installs the printer on the Windows device. This post will go through the available settings in the UniversalPrint CSP and the configuration via Microsoft Intune.
Important [Updated: 16-08-22]: Eventually this CSP was added in both, the Windows 11 and the Windows 10 21H2 July 2022 update KB5015807.
Note: Applying the provided configuration requires a Microsoft Intune license and the usage of Universal Print requires a Universal Print license. Both licenses are also part of a Microsoft 365 E3 or greater license.
Introducing the Universal Print printer settings
When looking easily mananing Universal Print printer settings on Windows devices, the focus goes to the UniversalPrint CSP. That CSP contains the setting that can be used for configuring Universal Print printer settings. The root node of the Universal Print provisioning settings is ./Vendor/MSFT/PrinterProvisioning and it currently only contains the UPPrinterInstalls node as setting. That setting can be used to install the specified printer to specified users. The table below provides an overview of the printer provisioning related settings in that node and how those reflect to Microsoft Intune.
| Node | Setting | Value | Description |
|---|---|---|---|
| Install | Action (User) | Select the Install action | Specifies the action to install the Universal Print printer. |
| CloudDeviceID | Cloud Device ID (User) | Specify the Printer ID (see number 2 in Figure 1) | Specifies the Printer ID that is used to identify the Universal Print printer. |
| PrinterSharedID | Printer Shared ID (User) | Specify the Share ID (see number 3 Figure 1) | Specifies the Share ID that is used to identify the Universal Print printer. |
| PrinterSharedName | Printer Shared Name (User) | Specify the Share Name (see number 4 in Figure 1) | Specifies the Share Name is used to identify the Universal Print printer. |
Important: The assigned users must have access rights to the specified printer and to the Universal Print service.
The required values that are needed to specify the information to identify the Universal Printer printer, can be found in the Universal Printer portal. An overview of that information can be found below in Figure 1.

Configuring the Universal Print printers on Windows devices
When looking at easily applying the Universal Printer printer settings on Windows devices, the focus goes to the Settings Catalog. The Settings Catalog now also contains settings that can be used to easily apply the Universal Print printer settings. The following eight steps walk through configuring of the Universal Print printer settings by using the available settings in the Settings Catalog. It requires all the settings that were explained earlier.
- Open the Microsoft Endpoint Manager admin center portal and navigate to Devices > Windows > Configuration profiles
- On the Windows | Configuration profiles blade, click Create profile
- On the Create a profile blade, provide the following information and click Create
- Platform: Select Windows 10 and later to create a profile for Windows 10 devices
- Profile: Select Settings catalog to select the required setting from the catalog
- On the Basics page, provide the following information and click Next
- Name: Provide a name for the profile to distinguish it from other similar profiles
- Description: (Optional) Provide a description for the profile to further differentiate profiles
- Platform: (Greyed out) Windows 10 and later
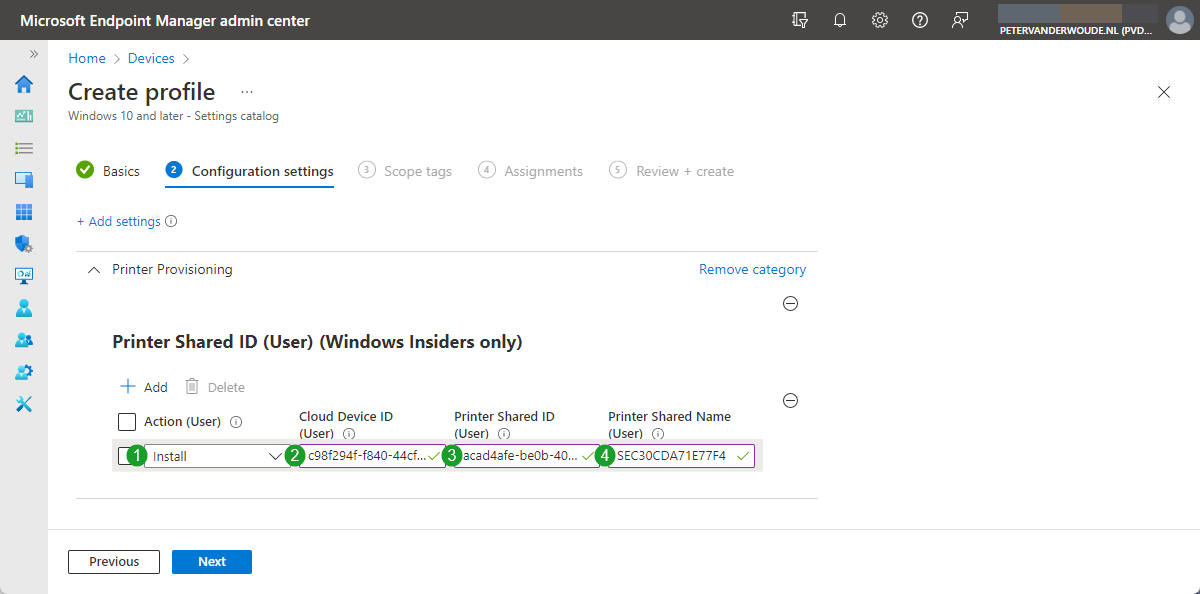
- On the Configuration settings page, as shown below in Figure 2, perform the following actions and click Next
- Click Add settings and perform the following in Settings picker
- Select Printer Provisioning as category
- Select Printer Shared ID (User) as setting
- Configure the selected setting with the following values
- Select with Action (User), number 1, the Install option from the list
- Provide with Cloud Device ID (User), number 2, the value of the printer id as shown with number 2 in Figure 1
- Provide with Printer Shared ID (User), number 3, the value of the share id as shown with number 3 in Figure 1
- Provide with Printer Shared Name (User), number 4, the value of the share name as shown with number 4 in Figure 1
- On the Scope tags page, configure the required scope tags and click Next
- On the Assignments page, configure the assignment and click Next
- On the Review + create page, verify the configuration and click Create
Note: The Universal Print printer settings are currently only available for Windows 11. That could be used as a filter.
Experiencing the configuration of Universal Print printers
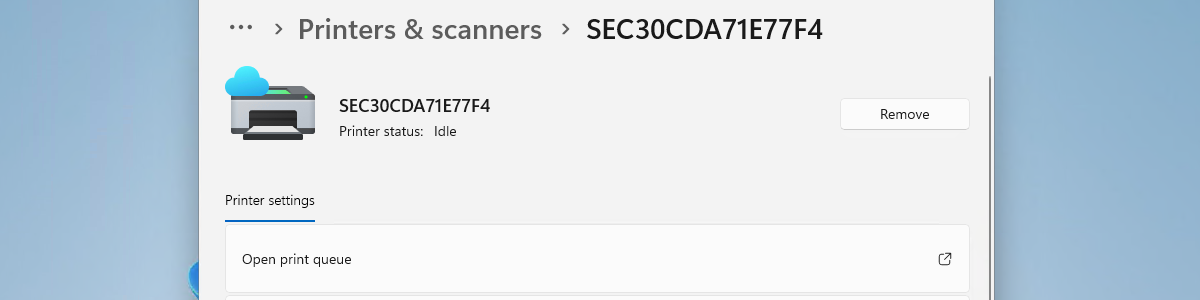
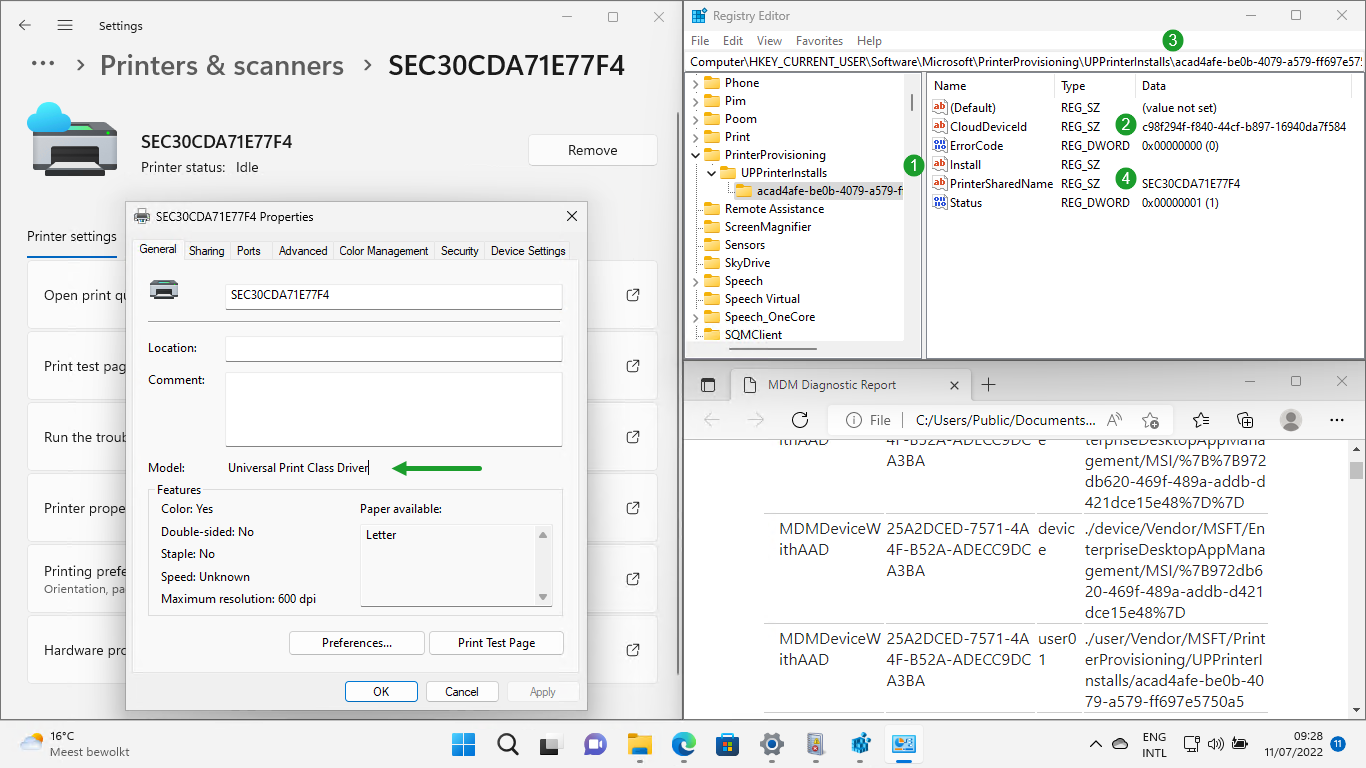
Once the configuration of the Universal Print printers is applied to Windows devices, the behavior can be easily experienced. The printer will be installed for the user and will show as an available printer, with a nice cloudy icon, in the Settings app. That experience is shown below in Figure 3 on the left. The applied configuration can be found in the registry and the MDM Diagnostic Report, as shown below in Figure 3 on the right. For the sake of simplicity, the information in the registry is shown including the numbers that correspond to the information that is shown in previous figures.
Note: The Universal Print printer settings will not be successful or will fail, when the printer was removed, when the user had no access, or when the printer information was incorrect.
More information
For more information about configuring Universal Print printers, refer to the following docs.
It is now available to windows 10 !
“This CSP was added in Windows 11 and in Windows 10 21H2 July 2022 update KB5015807”
Thank you, Patrick!
Do I have to be a Windows Insider for this setting to work? It’s failing for me, and in the registry my status is giving me an error code 4.
Hi Matthew,
It should now be available within the July updates for Windows 10 21H2 and Windows 11.
Regards, Peter
I just tried running first an Uninstall of the old Universla Print win32 package.
The assigne my test user the new profile.
Action (User)
Error
-2140930032
The rest is succeding
Hi Jimmy,
Did the logs provide some more details about the exact error?
Regards, Peter
I just checked everything and realised that because of me already having the old universal print app install the printer with the same name the issue happened. As soon as i removed the printer rebooted i could add the printer manually and everything worked again but it would not mount automatically. But this is not an issue for me as this was only a test device, i did not dive deeper into the issue.
Thank you for writing this amazing blog
That is great to hear, Jimmy!