
This week is a follow-up on a series of blog post of last year about Windows 365 Enterprise that started here. In the meantime, Microsoft announced many nice upcoming features with Windows 365 App, Windows 365 Boot, Windows 365 Offline and Windows 365 Switch and even a great licensing enhancement with Windows 365 Frontline. In other words, definitely time for a new blog post. This week is all about the introduction of Windows 365 Boot. Windows 365 Boot enables administrators to simplify the sign-in process for users on Windows 11 devices, by taking away the sign-in to their physical device and enabling the sign-in directly to their Windows 365 Cloud PC. So, basically turning the physical device into some sort of a thin client. Signing out of the Windows 365 Cloud PC, will bring the physical device back to the login screen. That makes Windows 365 Boot a great feature – especially in combination with Windows 365 Frontline – for users that work in shifts and share their device. This post will look at the configuration of Windows 365 Boot, followed with the fancy user experience.
Important: To state the obvious again – and to be absolutely clear – Windows 365 Boot requires a physical device.
Note: Keep in mind that at the moment of writing, Windows 365 Boot is still in Public Preview and still relies on Windows Insider Preview builds in the Beta Channel.
Configuring Windows 365 Boot
When looking at Windows 365 Boot, it all starts with the configuration. For the configuration, Microsoft provided a guided scenario in Microsoft Intune that walks the administrator through the required steps for configuring Windows 365 Boot. At this moment, that guided scenario won’t restrict access to the physical device. That makes it important to further tune the configuration of that physical device, to prevent access to the physical device.
Walking through the guided scenario for Windows 365 Boot
The configuration of Windows 365 Boot starts with walking through the guided scenario. That guided scenario will make sure that the physical devices can be identified and can be configured with the minimal required settings for using Windows 365 Boot. Those configurations include the Autopilot configuration, Windows update settings, VPN profile, Wi-Fi profile, language settings, and even a group assignment for all applicable configurations.
Note: Windows 365 Boot requires the physical device to be running Windows 11 Pro, or Windows 11 Enterprise.
- Open the Microsoft Intune admin center portal and navigate to Devices > Windows 365
- On the Devices | Windows 365 page, on the Overview tab (under Windows 365 Guides), click Windows 365 Boot
- On the Introduction page, read the information about the guided scenario and click Next : Basics
- On the Basics page, as shown in Figure 1, provide the following information and click Next : Endpoint updates
- In the Autopilot device name template section, configure the applicable Autopilot naming template
- Select the checkbox with Apply device name template, to enable the custom device naming template
- Specify a custom device naming template with Device name template, to apply an actual naming template
- In the Resource name prefix section, configure the required resource name prefix
- Specify a custom prefix with Resource prefix name, to apply a custom naming prefix to all resources

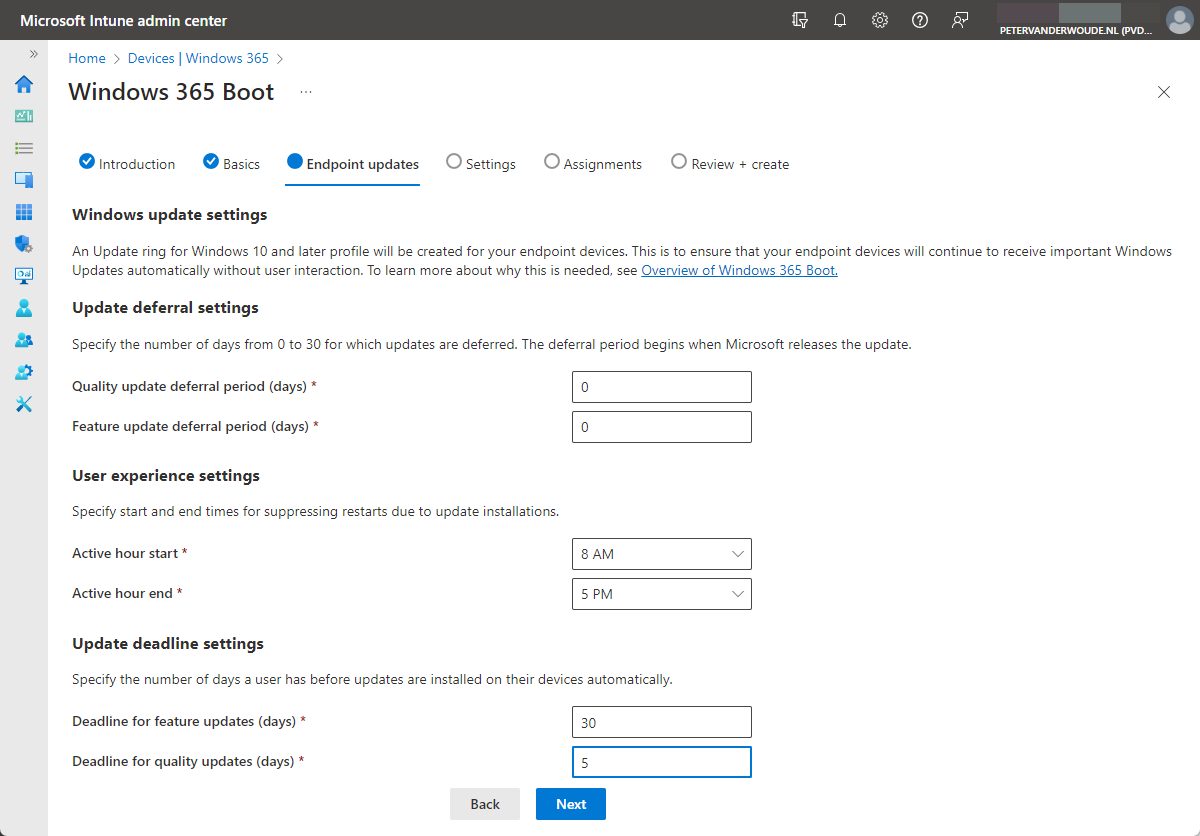
- On the Endpoint updates page, as shown in Figure 2, provide the following information and click Next : Settings
- In the Update deferral settings section, configure the required update deferral settings
- Specify with Quality update deferral period (days) the deferral period for quality updates in days
- Specify with Feature update deferral period (days) the deferral period for feature updates in days
- In the User experience settings section, configure the required active hours
- Specify with Active hour start the start time of the active hours
- Specify with Active hour end the end time of the active hours
- In the Update deadline settings section, configure the required update deadline settings
- Specify with Deadline for feature updates (days) the deadline for feature updates in days
- Specify with Deadline for quality updates (days) the deadline for quality updates in days
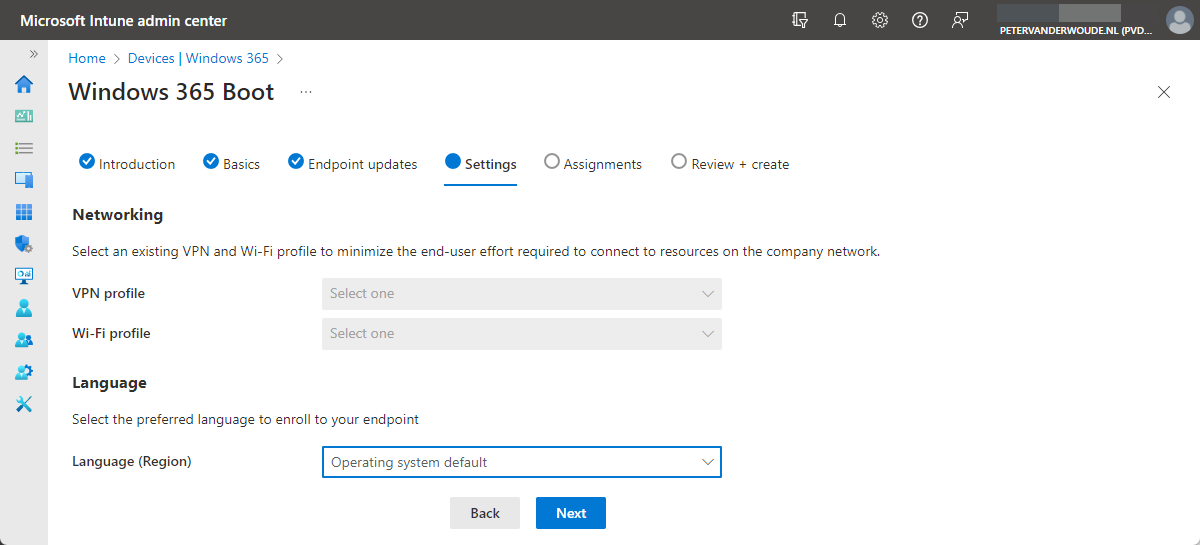
- On the Settings page, as shown in Figure 3, provide the following information and click Next : Assignments
- In the Networking section, configure the optional VPN and Wi-Fi profiles
- Select with VPN profile the VPN configuration that should be applied to the device
- Select with Wi-Fi profile the Wi-Fi configuration that should be applied to the device
- In the Language section, configure the preferred language
- Select with Language (Region) the preferred language for the device
- On the Assignments page, as shown in Figure 4, specify an existing Azure AD group or create a new Azure AD group that should be used for the assignment of all created resources, and click Next : Review + create
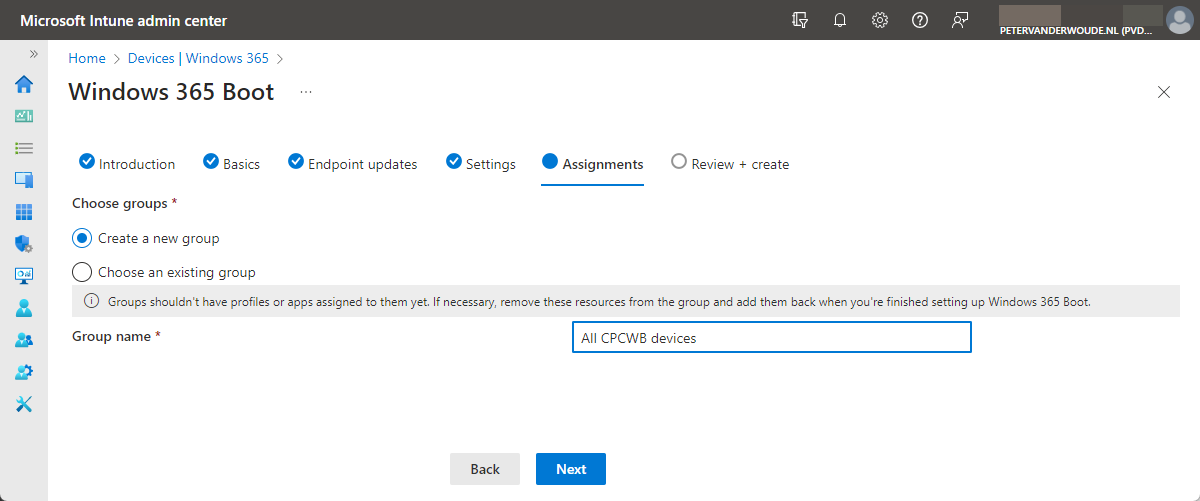
Note: When using an existing Azure AD group make sure that it’s not used, to prevent conflicting apps and settings.
- On the Review + create page, review the configuration and click on the checkmark to start the creation
Note: The guided scenario will create the Windows 365 app, the Azure Virtual Desktop (HostApp), an Enrollment Status Page, an Autopilot profile, a Settings Catalog profile with device configurations, a Custom policy for shared PC configurations, a Update ring policy for update configurations, and a Policy Set to group all created resources.
Additional configurations to prevent access to the physical device
After going through the guided scenario, any supported Windows 11 device can be configured with Windows 365 Boot. At this moment, however, this guided scenario still allows users to interact with the local device. To prevent users from accessing certain local resources of the physical device, Microsoft advises to use the following configurations when applicable:
- Prevent access to Task Manager by using DisableTaskMgr of ADMX_CtrlAltDel in Policy CSP
- Prevent users from changing the device’s password by using DisableChangePassword of ADMX_CtrlAltDel in Policy CSP
- Set default credential provider by using DefaultCredentialProvider of ADMX_CredentialProviders in Policy CSP
- Remove Notifications and Action Center from Taskbar by using DisableNotificationCenter of ADMX_Taskbar in Policy CSP
- Prevent device notifications by using NoToastNotification of ADMX_WPN in Policy CSP
- Prevent auto launch of apps during user sign-in by using DisableExplorerRunLegacy_1 of ADMX_Logon in Policy CSP
- Improve sign-in on touch devices by using EnableTouchKeyboardAutoInvokeInDesktopMode in TextInput of Policy CSP
Note: The expectation is that these settings will become part of the default configuration when Windows 365 Boot becomes General Available.
Experiencing Windows 365 Boot
After configuring Windows 365 Boot, it’s time to experience the change in behavior. The physical Windows 11 device will clearly reference Cloud PC on the login screen of the device. When users provide their credentials to sign-in, it will automatically start connecting to the Cloud PC of the user. Unless, of course, the user has no Cloud PC assigned. That will result in an error message. When the user has a Cloud PC assigned, the experience will be seamless and the physical device will automatically start connecting to the Cloud PC of the user (as shown below in Figure 5).

When sign-in out of the Cloud PC, the physical device will return to the login screen. When shutting down, or restarting, the Cloud PC, that does not impact the physical device. The physical device can be manually shutdown, or restarted, by using the power options on the login screen.
More information
For more information about Windows 365 Enterprise Cloud PC, refer to the following docs.
4 thoughts on “Getting started with Windows 365 Boot”