The last couple of weeks were mainly focused on getting started with Windows 365 Enterprise. Mainly focused on the networking configurations and join types of Cloud PCs. This week the focus will go to the more advanced imaging options. When looking specifically at Windows 11, the available Gallery image only contains the Microsoft 365 apps for enterprise. In some scenarios that might not be sufficient and some tuning and additional apps are required. In those cases, it’s always possible to rely on a custom image. An image that is based on the same starting point, but tuned to be a better fit for that specific scenario. This post will go through a simple process for creating an image based on an Azure Virtual Machine (VM), followed with the steps to add that image to Microsoft Endpoint Manager (MEM) and using it in a provisioning policy. This post will end by looking at the user experience.
- Creating the custom image based on an Azure Virtual Machine
- Adding the custom image to Microsoft Endpoint Manager
- Creating a provisioning policy with the custom image
- Assigning a license to users
- Creating and assigning user settings
- Experiencing the custom image
Important: When possible, keep it simple. Only use the more advanced networking and imaging options when really necessary. Otherwise, stick to the simplicity of standard Windows 365 Enterprise Cloud PCs.
Note: In some areas this post has some overlap with the previous posts. For the completeness of this post, those areas are reused in this post. That provides the reader with single post for all required configurations.
Creating the custom image based on an Azure Virtual Machine
When looking at using a custom image for the provisioning of a Cloud PC, it starts by creating an image. The easiest place to create that image, is in Azure. Main reason for that is the easy integration with the Images resources. That makes the creation of a new image, a simple and straight forward process of three steps: 1) the creation of the VM, 2) the customization of the VM and 3) the capture of the image.
Step1: Creating the Azure VM
Creating the Azure VM is a very straight forward process (and the details are out of scope for this post). The most important part of this step is the starting point. Within the Marketplace there are many images available that can be used as that starting point. The easiest would be to start with one of the default images that are available for Cloud PCs. Simply search for Windows 365 Enterprise – Cloud PC and select the image that should be that starting point of the custom image.
Step 2: Customizing the Azure VM
Customizing the Azure VM is very scenario specific (and the details are out of scope for this post). Connect to the created VM and make the customizations (app installations and tuning) that are applicable to the scenario. After performing the required customizations, navigate to C:\Windows\System32\Sysprep and start sysprep.exe to prepare the VM for hardware independence and cleanup. Within the System Preparation Tool use the following configuration:
- System Cleanup Action: Select Enter System Out-of-Box Experience (OOBE) to configure the behavior on startup
- Select Generalize to make sure that the created image is ready for reuse
- Shutdown Options: Select Shutdown to make sure that when the image is used it will start in OOBE
Note: Keep in mind that the custom images should not contain Azure Virtual Desktop client components and that it’s not possible to use and import Windows multi-session images into Windows 365.
Step 3: Capturing the Azure VM
Once the Azure VM is turned off, it can be easily captured by using default Azure functionality. Every VM contains the Capture option that can be used for creating the image of the VM. The following steps walk through the process of creating a managed image that can be used for provisioning new Cloud PCs:
- Open the Azure portal, navigate to Virtual Machines and select the customized stopped VM
- On the Overview page, as shown below in Figure 1, click Capture to start image capturing process

- On the Basics page, as shown below in Figure 2, provide the following information and click Review + Create
- Subscription: The subscription is already preselected, based on the configuration of the VM
- Resource group: Select the resource group that should be used to store the captured image
- Region: The region is already preselected, based on the configuration of the VM
- Share image to Azure compute gallery: Select No, capture only a managed image. to only capture the image
- Automatically delete this virtual machine after creating the image: Select this to delete the VM after creation
- Zone resiliency: Select this to have the ability to use the image in an availability zone
- Name: Provide a name for the custom image to distinguish it from other image

- On the Review + Create page, click Create to start the creation of the image
Note: When relying on a custom image, make sure to automate as much as possible. More automation makes sure that there are no differences in the creation and the result of the imaging process.
Adding the custom image to Microsoft Endpoint Manager
When the custom image is created, the next step is to add the custom image to the Windows 365 service. That can be achieved by using a very straight forward process in MEM. The following three steps walk through that proces.
Note: Keep in mind that the Windows 365 service may be granted a Reader role for the Azure subscription.
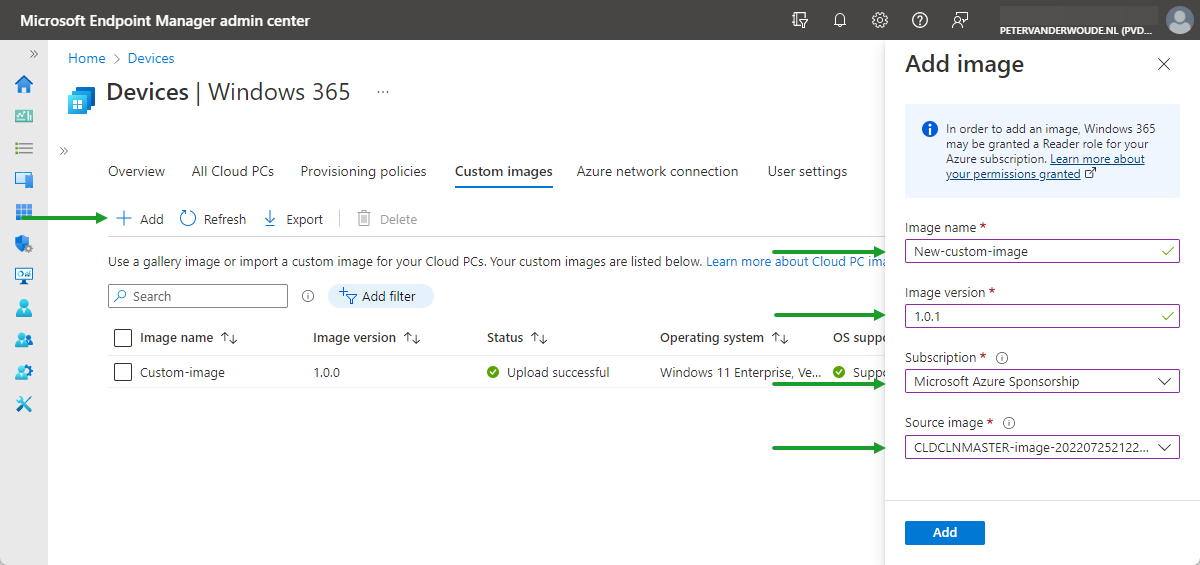
- Open the Microsoft Endpoint Manager admin center portal and navigate to Devices > Windows 365 > Custom images
- On the Custom images tab, click Add
- On the Add image pane, as shown below in Figure 3, provide the following information and click Add
- Image name: Provide a name for the custom image to distinguish it from other image
- Image version: Provide a version number for the custom image
Note: The version should follow the Major(in).Minor(int).Patch(int) format, were int is between 0 and 2,147,483,647.
- Subscription: Select the subscription that contains the just created custom image
Note: The flow will grant the Windows 365 service with permissions in the selected Azure subscription.
- Source image: Select the just created custom image from the list
Note: The list only shows images that generalize from generation 2 VMs with Windows 10 Enterprise or later.
Creating a provisioning policy with the custom image
When the custom image is created and added to MEM, the next step is to create the provisioning policy. That is similar to creating a provisioning policy for any form of providing a Cloud PC to a user. That policy will make sure that the Cloud PCs are provisioned with the correct configuration, for the licensed users. In this case, the policy will make sure that the Cloud PCs are provisioned based on the created custom image. That will make sure that the users get a Cloud PC that’s running the latest version of Windows 11, including the required tuning and specific apps. The following seven steps walk through the required steps for a Azure AD joined Cloud PC, based on a custom image.
- Open the Microsoft Endpoint Manager admin center portal and navigate to Devices > Windows 365 > Provisioning policies
- On the Provisioning policies tab, click Create policy
- On the General page, provide the following information and click Next
- Name: Provide a name for the provisioning policy to distinguish it from other similar policies
- Description: (Optional) Provide a description for the provisioning policy to add additional details
- Join type: Select Azure AD join to make sure that the Cloud PC will join Azure AD
- Network: Select Microsoft hosted network to rely on the default network configuration
- Region: Select the required region to make sure that the Cloud PC is in the right region
- On the Image page, as shown below in Figure 4, provide the following information and click Next
- Image type: Select Custom image to rely on a custom image for the Cloud PC
- Select the just added custom image as image to rely on customized configuration for the Cloud PC

- On the Configuration page, provide the following information and click Next
- Language & Region: Select the required language to relate the Cloud PC to the country
- Select a service: Select the service to provide additional services to common management tasks on the Cloud PC
- On the Assignments page, select the group of user that should receive a Cloud PC and click Next
- On the Review + create page, verify the configuration and click Create
Note: The steps for Azure network connections are similar. The only differences are in step 3, regarding the join type for the Cloud PC and network of the Cloud PC.
Assigning a license to users
When the provisioning policy is created, users can get a Cloud PC once a license is assigned. Once that license is assigned the provisioning of the Cloud PC will immediately start, The following two steps provide some guidance to easily assign the required license, based on a group in Azure AD.
- Open the Microsoft Entra admin center portal and navigate to Billing > Licenses
- Select the Windows 365 Enterprise license > Licensed groups and Assign the group with Cloud PC users
Note: From a management perspective, the easiest would be to use the same group for licensing and provisioning
Creating and assigning user settings
Optionally, it’s also possible to configure some user specific settings that define various settings for the user. At this moment, those user settings can only be used to configure local administrator privileges and to configure the restore service. The nice thing about these user settings is that, besides that it’s optional, it can be applied before or after the assignment of a Cloud PC. As the settings are user settings, it applies to all assigned Cloud PCs and take effect when the user logs on. The following five steps walk through the process of creating and assigning the user settings.
- Open the Microsoft Endpoint Manager admin center portal and navigate to Devices > Windows 365 > User settings
- On the User settings tab, click Add
- On the General page, provide the following information and click Next
- Name: Provide a name for the user settings to distinguish it from other similar policies
- Select Enable Local admin to provide the user with local administrator privileges on the Cloud PC
- Select Allow user to initiate restore service to provide the user with option to restore the Cloud PC
- Frequency of restore-point service: Select the interval of how often a restore point of the Cloud PC will be created
- On the Assignments page, select the group of user that should receive a Cloud PC and click Next
- On the Review + create page, verify the configuration and click Create
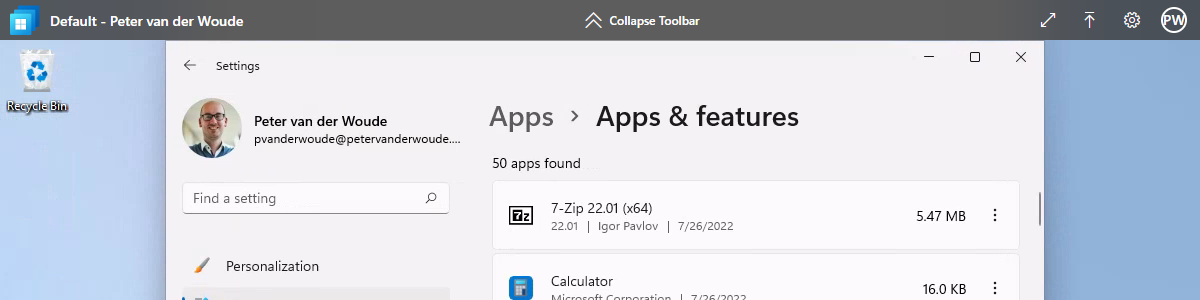
Experiencing the custom image
After getting the configurations in place to provision the Cloud PC, it’s time to experience this Cloud PC as a user. The management experience is similar to any other device that is managed via Microsoft Intune. The only difference is in the actions that the administrator can perform. The user can go to Windows 365 (microsoft.com) to access their Cloud PCs and to manage their Cloud PCs. After connecting to the Cloud PC, the user is prompted to configure the features that the Cloud PC can use of the device, followed with a sign-in prompt. Once signed in, the user can be productive and has a tuned configuration and additional apps (as shown below in Figure 6). That enables the user to use the software required to be productive.
More information
For more information about custom images and Windows 365 Enterprise Cloud PC, refer to the following docs.
1 thought on “Getting started with Windows 365 Enterprise using a custom image”