This week is a short follow-up on my posts of the last couple of weeks about getting started with Windows 365 Enterprise. One of the items that was not specifically addressed is device compliance. In general it would be great to address Cloud PCs like any other laptop or desktop within the organization. There are, however, some differences to keep in mind and that might require organizations to use a slightly adjusted configuration for Cloud PCs. One of the main reason for that could be disk encryption. This post will address how disk encryption is different for Cloud PCs and also how other hardening features are similar for Cloud PCs. Besides that, this post will provide an easy method to work with exceptions for Cloud PCs, by using filters.
Disk encryption for Windows 365 Enterprise Cloud PCs
While organizations might want to configure and require disk encryption (of BitLocker) on their devices, the usage of BitLocker is currently not supported on Cloud PCs. That, however, doesn’t mean that Cloud PCs are not encrypted. Instead, the disks of Cloud PCs are encrypted by using Azure Storage server-side encryption (SSE). Azure Storage SSE is similar to BitLocker encryption on Windows. Using Azure Storage SSE makes sure that the data on the disk of the Cloud PC is automatically encrypted at rest, by using a 256-bit Advanced Encryption Standard (AES) encryption. By using encryption at that level, it doesn’t affect the performance of the Cloud PC itself. That makes sure that the user experience is not affected by the implementation of the disk encryption for the Cloud PC. Besides that, not only the disks of Cloud PCs are automatically encrypted at rest, the snapshots and images are also automatically encrypted at rest. However, it’s no BitLocker. So, at this moment, make sure to configure the device compliance policies in correspondence with this encryption used for Cloud PCs.
Important: BitLocker is currently not supported as an encryption method for Windows 365 Enterprise Cloud PCs.
Note: Azure Storage SSE is relying on platform-managed keys for encryption of Windows 365 Enterprise Cloud PCs.
Trusted Launch for Windows 365 Enterprise Cloud PCs
Besides disk encryption, there are more important security features that help with a better security posture of Cloud PCs. At the end of last year, Microsoft introduced Azure Trusted Launch for Virtual Machines (VMs). That introduction was basically vital for organizations to be able to use Windows 11 on their Cloud PCs. And the reason for that is simple, as Trusted Launch can further harden the Generation 2 VMs. Trusted Launch brings security features that can be used to make sure that VMs are deployed with verified and signed bootloaders, OS kernels, and a boot policy. That is achieved by using Secure Boot, vTPM, Measured Boot and Boot integrity monitoring. Those features make sure that VMs can get the same level of protection against boot kits, rootkits, and kernel-level malware, as laptops and desktops. Best part of it is that Trusted Launch is now also the default for new Cloud PCs. That default makes sure that organizations can use the same checks in their device compliance policies for code integrity and Secure Boot for Cloud PCs and don’t need to create exclusions for those configurations.
Note: Trusted Launch is used by default to improve security on Windows 365 Enterprise Cloud PCs.
Creating a filter for Windows 365 Enterprise Cloud PCs
When looking at the device compliance options within Microsoft Intune, there is nowadays a very easy method to make sure that compliance policies only apply to specific devices. That can be achieved by using filters. Filters enable organizations to filter a group of devices based on the configured properties. As there is a need to create a separate device compliance policy for Cloud PCs, it’s also good to makes sure that there is a specific filter that contains all Cloud PCs. That can be achieved by looking at the device model. The following six steps walk through the creation of a filter for all Cloud PCs within the environment.
- Open the Microsoft Endpoint Manager admin center portal and navigate Devices > Filters (alternative roads to the same configuration are Apps > Filters or Tenant admin > Filters)
- On the Devices | Overview page, click Create
- On the Basics page, provide the following information and click Next
- Filter name: Specify a unique name to distinguish the filter from other filters
- Description: (Optional) Specify a description to further explain the usage of the filter
- Platform: Select Windows 10 as the platform
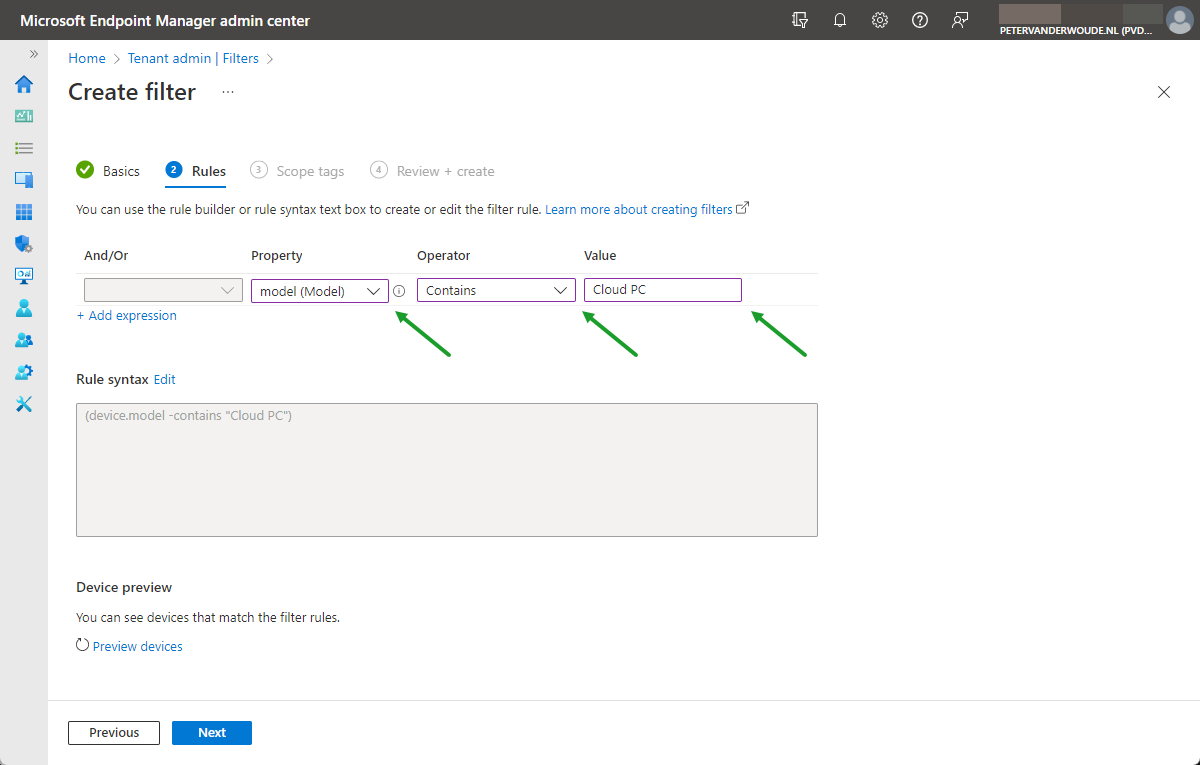
- On the Rules page, as shown below in Figure 1, create the following configuration and click Next
- Expression – This expressions is used to filter devices based on the model
- And/Or: Not applicable
- Property: Select model as value to filter on the model
- Operator: Select Contains as value to look for a model that contain a specific value
- Value: Specify Cloud PC as value to look for Windows 365 Enterprise Cloud PC as model
- On the Scope tags page, configure the required scope tags and click Next
- On the Review + create page, verify the configuration and click Create
Using the filter for assigning Window 365 Enterprise Cloud PCs
Once the filter is available, it can be used for including and excluding devices that match the properties of the filter. In this case the filter can be used to exclude the Cloud PCs from the other device compliance policies and to include the Cloud PCs for the device compliance policy that is specific to Cloud PCs. The following nine steps walk through the configuration of a device compliance policy that will only be used for Cloud PCs.
- Open the Microsoft Endpoint Manager admin center portal navigate to Endpoint security > Device compliance
- On the Compliance policies | Policies blade, click Create Policy
- On the Create a policy page, provide the following information and click Create
- Platform: Select Windows 10 and later as value to
- Profile type: Based on the selected platform configured to Windows 10/11 compliance policy
- On the Basics page, provide a valid name for the device compliance policy and click Next
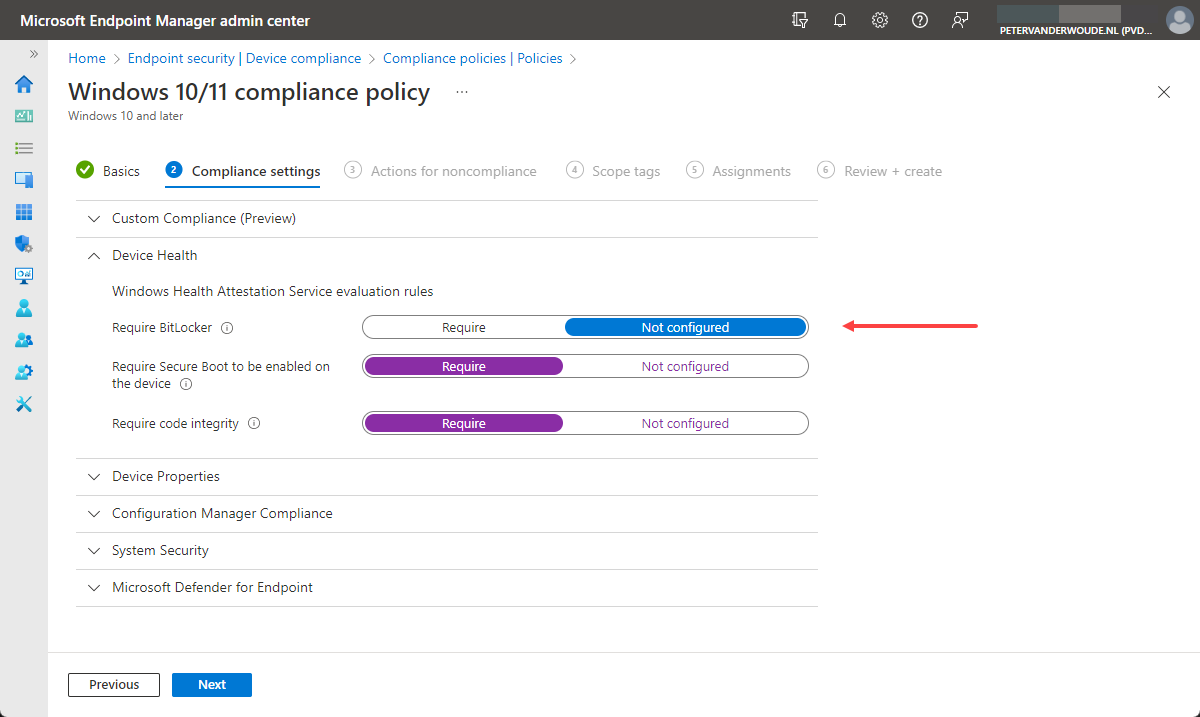
- On the Compliance settings page, as shown below in Figure 2, configure the require device compliance settings that at least don’t include the Require BitLocker setting and click Next
- On the Actions for noncompliance page, leave the default configuration of Action on Mark device noncompliant with Schedule (days after noncompliance) on Immediately and click Next
- On the Scope tags page, configure the applicable scope tags and click Next
- On the Assignments page, as shown below in Figure 3, configure the assignment by selecting the applicable user group and using the created filter to only include the Cloud PCs and click Next

Note: When creating a device compliance policy that should not be assigned to Cloud PCs, use a similar configuration and only use Exclude as the filter mode.
- On the Review + create page, review the configuration and click Create
Note: During the testing there was some wonky behavior with the Require code integrity setting and the Require Secure Boot to be enabled on the device settings. Initially those settings gave an error that would eventually go away.
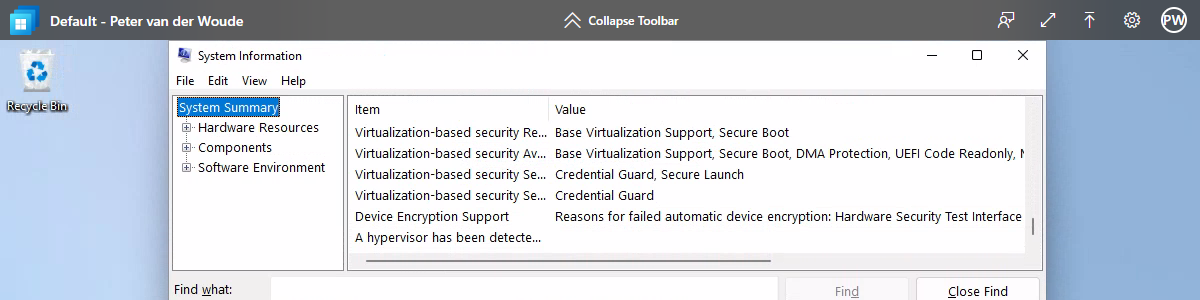
Experiencing the default of Windows 365 Enterprise Cloud PCs
There are many ways to end this blog post. Probably the best way would be to not show the compliance state with one of the compliance policies, but to show the default available security features. Some of the capabilities provided by Trusted Launch that enables most of the standard device compliance settings also for Cloud PCs. The easiest method to look at that information is by using the System Information app (msinfo). That provides a clear overview that includes direct information about for example Secure Boot (as shown below in Figure 4).
More information
For more information about device compliance and Windows 365 Enterprise Cloud PC, refer to the following docs.
- Data encryption in Windows 365 | Microsoft Docs
- General availability of Azure Trusted Launch for virtual machines (microsoft.com)
- Trusted launch for Azure VMs – Azure Virtual Machines | Microsoft Docs
- Device compliance policies in Microsoft Intune | Microsoft Docs
- Create filters in Microsoft Intune | Microsoft Docs
2 thoughts on “Device compliance for Windows 365 Enterprise Cloud PCs”