The last couple of blog post were all about getting starting with Windows 365 Enterprise Cloud PC. The first blog post, after a nice vacation, had to continue in that area. Just with a twist. This week all about Microsoft Dev Box. Microsoft Dev Box is now in preview and is a new managed service provided by Microsoft that builds on the strong foundation of Windows 365. That new managed service enables developers to create on-demand, high-performance, secure, ready-to-code, project-specific workstations in the cloud. The best part of it is that it enables developers to create their own dev boxes, within the provided technical and financial limits. The idea of this post is to show how IT administrators provide the technical framework, how development teams can handle their own technical details and financials and how to enable developers to deploy new dev boxes. During this post the following subjects will be addressed:
- Introducing Microsoft Dev Box
- Setting up the Microsoft Dev Box service
- Configuring the Microsoft Dev Box project
- Creating a Microsoft Dev Box
Important: At the moment of writing, Microsoft Dev Box is available in public preview.
Introducing Microsoft Dev Box
The idea of Microsoft Dev Box is actually quite simple: empower developers to self-service high-performance, secure and ready-to-code workstations in the cloud. The framework for the self-service capabilities are provided and managed by the IT administrator, while anything around costs and functionalities can be maintained by the developer teams. That makes sure that the developer has the required flexibility and productivity without giving in on security and compliance requirements from the organization. That productive feeling is further strengthened by the support of Microsoft Dev Box for any developer IDE, SDK, or tool that runs on Windows. By default, those tools are not available for the developers. So, that requires a good strategy to make sure that a new dev box is up-and-running as quick as possible. That can either be achieved by using custom images that include the required tools, or by using the powerful integration with Microsoft Intune for the distribution of the required tools. That integration is pretty similar to Windows 365, as it’s built on that as a foundation. There are, however, a few important differences with Windows 365. The main differences are that the pricing model is consumption-based for compute and storage and that there are self-service capabilities for the user (i.e. the developer).
Setting up the Microsoft Dev Box service
Setting up the Microsoft Dev Box service is in it’s simplest form a five step process. Those five steps will make sure that the basics are in place to enable development teams to self-serve dev boxes that are Azure AD joined and relying on a gallery image.
Step 1: Creating a dev center
The first step, when looking at the creation of Microsoft Dev Box, starts with dev center. Dev center is used centrally manage and apply settings to a group of projects related to dev boxes. The following five steps walk through the creation of a dev center.
- Open the Azure portal and navigate to Dev centers
- On the Dev centers page, click Create to create a Dev center
- On the Basics page, as shown in Figure 1, provide the following information and click Next : Tags
- Subscription: Select the subscription in which to create the dev center
- Resource group: Select the resource group in which to create the dev center
- Name: Specify a name for the dev center
- Location: Select the location in which to create the dev center

- On the Tags page, select the required tags and click Next : Review
- On the Review + Create page, click Create to create the dev center
Step 2: Creating a network connection
The second step is about the creation of an important component of a dev box, the network connection. That network connection determines the location of the dev boxes and allows them to be connected to the existing virtual networks. The following five steps walk through the creation of that network connection.
- Open the Azure portal and navigate to Network connections
- On the Network connections page, click Create to add a new network connection
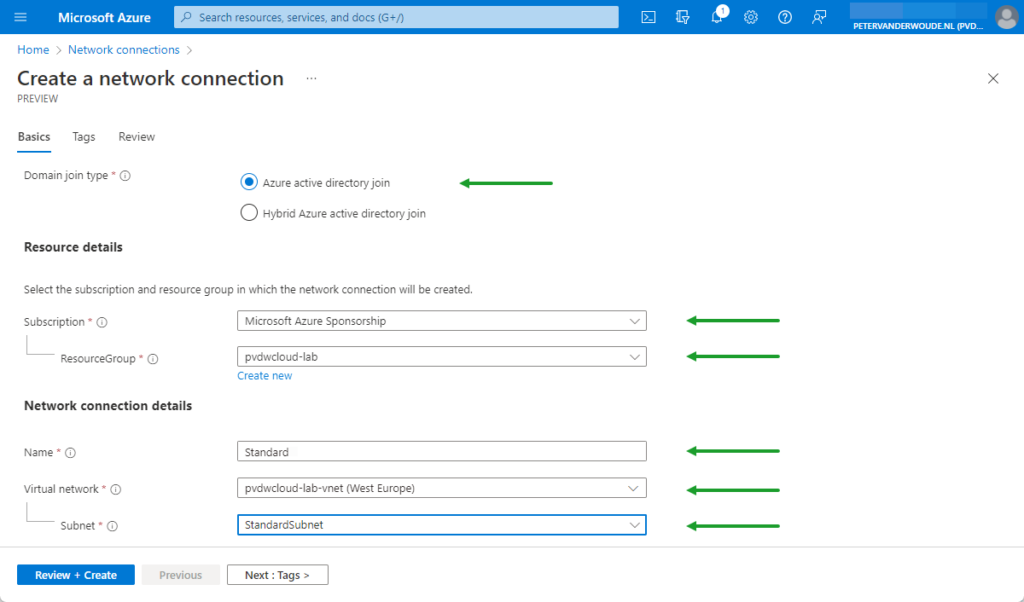
- On the Basics page, as shown in Figure 2, provide the following information and click Next : Tags
- Domain join type: Select Azure active directory joined to use the network connection for an Azure AD join
- Subscription: Select the subscription in which to create the network connection
- Resource group: Select the resource group in which to create the network connection
- Name: Specify a name for the network connection to easily identify it when configuring dev boxes
- Virtual network: Select the virtual network to which the dev boxes will be attached
- Subnet: Select the subnet containing the IP addresses to be used for the dev boxes in the pool
- On the Tags page, select the required tags and click Next : Review
- On the Review + Create page, click Create to create the network connection
Step 3: Attaching the network connection to the dev center
The third step is connecting that network connection to the dev center, to be able to use the network connection for dev boxes. That can be achieved by walking through the following three steps.
- Open the Azure portal and navigate to Dev centers > select the newly created dev center > Networking
- On the Networking page, click Add to create a network connection for the dev boxes
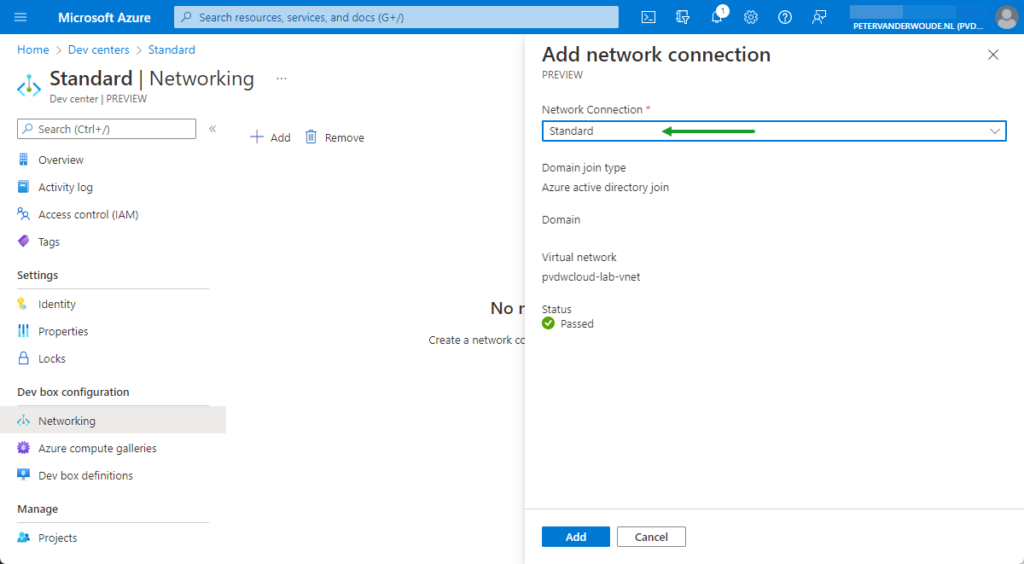
- On the Add network connection page, as shown in Figure 3, select the newly created network connection and click Add
Step 4: Creating a dev box definition
The fourth step, after creating the and attaching the network connection to the dev center, is to define the dev boxes. That means, creating a definition that describes the image and the SKU (i.e. storage and compute) that should be used by the dev boxes. That definition can be used by multiple projects within the dev center and can be created by goin through the following steps.
- Open the Azure portal and navigate to Dev centers > select the newly created dev center > Dev box definitions
- On the Dev box definitions page, click Create to create a definition for the dev boxes
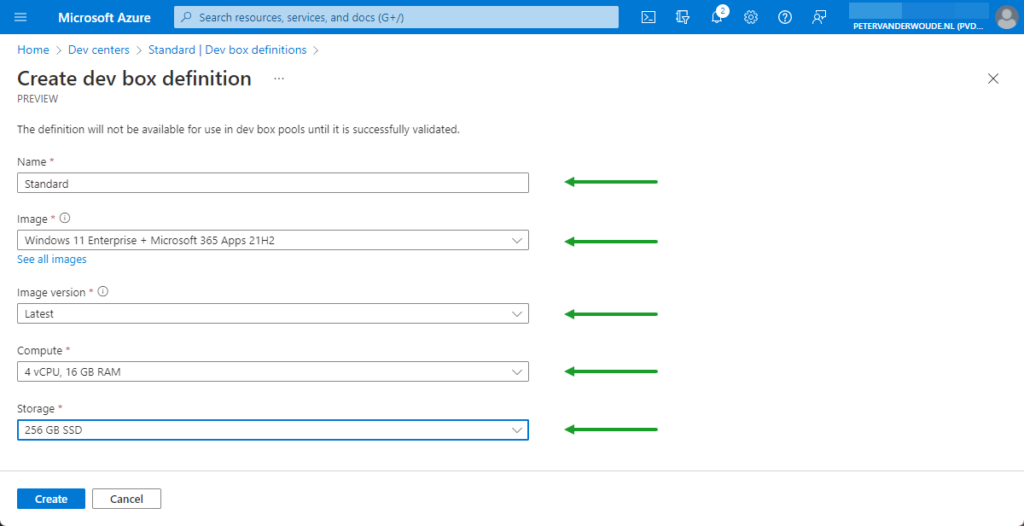
- On the Create Dev box definition page, as shown in Figure 4, provide the following information and click Create
- Name: Specify a name for the definition to easily identify it when configuring dev boxes
- Image: Select the image that is used as the base operating system for the dev boxes
Note: By default, only the standard gallery images are shown. To use a custom image, make sure to first attach the Azure Compute Gallery that contains the custom images.
- Image version: Select the version of the image that should be used for the dev boxes
Note: Select latest to make sure that a new dev box is always use the latest version available or select a specific version to make sure that all dev boxes always rely on the same version.
- Compute: Select the compute (i.e. CPU and RAM) that should be used for the dev boxes
- Storage: Select the storage that should be be used for the dev boxes
Step 5: Creating a project that relies on the dev center
The fifth and final step, when the technical foundation is created, is to create a project. Projects enable the organization to manage team level settings and to empower development teams to self-serve dev boxes. The following five steps walk through the creation of a project.
- Open the Azure portal and navigate to Dev centers > select the newly created dev center > Projects
- On the Projects page, click create to create a project that the team level settings
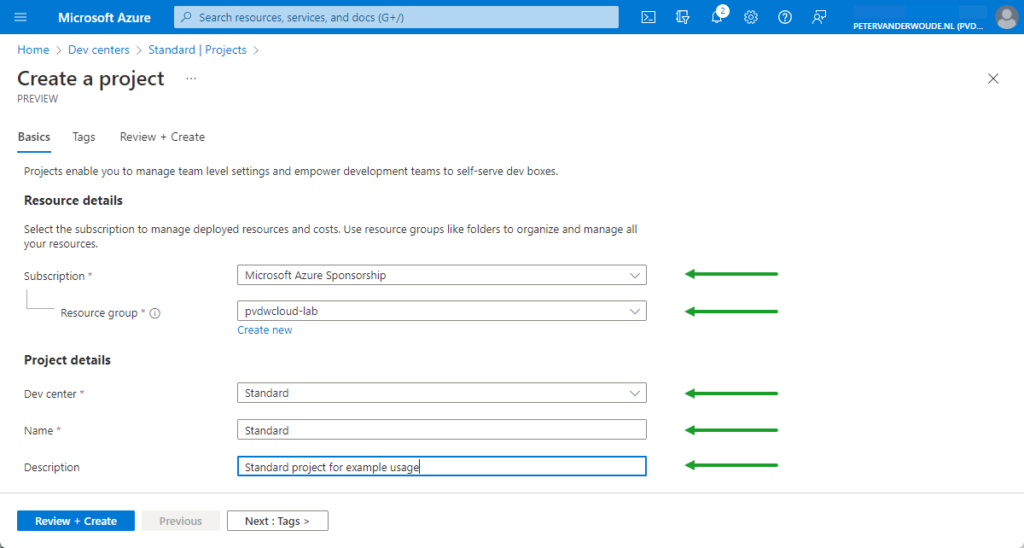
- On the Basics page, as shown in Figure 5, provide the following information and click Next : Tags
- Subscription: Select the subscription in which to create the project
- Resource group: Select the resource group in which to create the project
- Dev center: Select the dev center that should be associated to the project
- Name: Specify a name for the project to easily identify it when configuring dev boxes
- Description: Specify a description for the project
- On the Tags page, select the required tags and click Next : Review
- On the Review + Create page, click Create to create the network connection
Configuring the Microsoft Dev Box project
When the basics are in place for the Microsoft Dev Box services, it’s time to configure the project. The configuration of the project will make sure that developers can self-serve dev boxes within the project and is a simple two step proces.
Step 1: Creating a dev box pool
The first step in the configuration of the project is the configuration of a dev box pool. That configuration specifies the dev box definition and the network connection that should be used when the dev boxes are created. The dev box users create their dev boxes using the dev box pool. The following three steps walk through the process of creating a dev box pool.
- Open the Azure portal and navigate to Dev centers > select the newly created dev center > Projects > select the newly created project > Dev box pools
- On the Dev box pools page, click Create to create a dev box pool for the developers
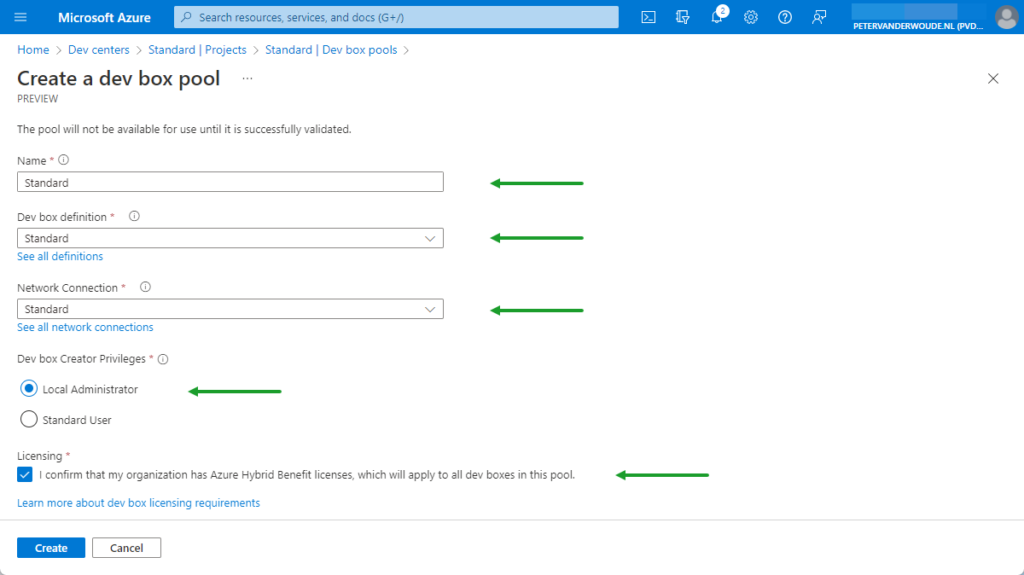
- On the Create a dev box pool page, as shown in Figure 6, provide the following information and click Create
- Name: Specify a name for the dev box pool to easily identify it when creating dev boxes
- Dev box definition: Select the earlier created dev box definition as the definition for dev boxes in this pool
- Network connection: Select the earlier created network connection as the connection for dev boxes in this pool
- Dev box creator privileges: Select the standard permissions (standard user or local administrator) for the creator of dev boxes in this pool
- Licensing: Select this check box when the organization has the required Azure Hybrid Benefit licenses
Step 2: Providing access to the Microsoft Dev Box project
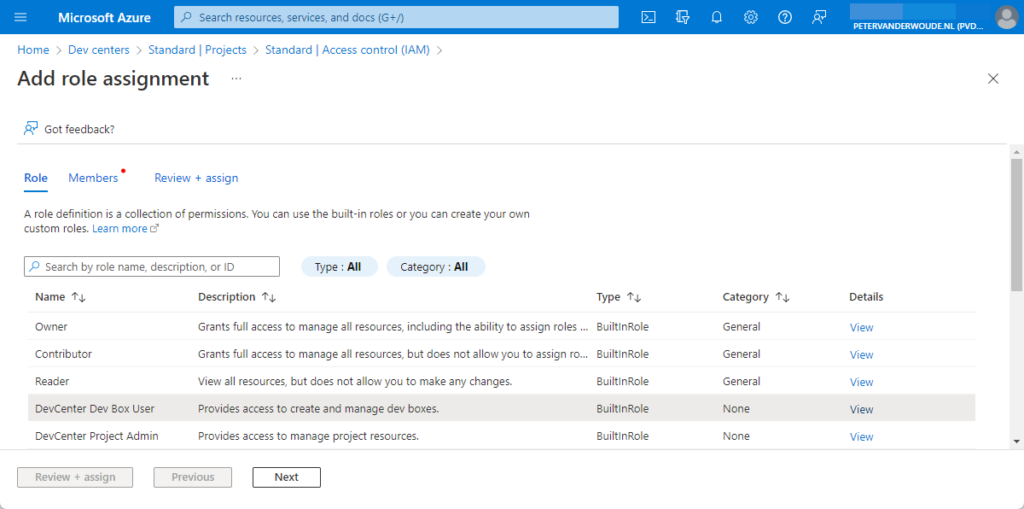
The second and last step is to provide developers access to the dev box pool in the project. That can be achieved by assigning the DevCenter Dev Box User role. That role provides the developers with the permissions to create, manage and delete their own dev boxes. The following five steps walk through the process of providing that access.
- Open the Azure portal and navigate to Dev centers > select the newly created dev center > Projects > select the newly created project > Access control (IAM)
- On the Access control (IAM) page, select Add > Add role assignment to create a role assignment for developers
- On the Add role assignment > Role page, as shown in Figure 7, select DevCenter Dev Box User and click Next
- On the Add role assignment > Members page, select the required Members and click Next
- On the Add role assignment > Review + assign page click Review + assign
Note: To provide users permissions to manage projects, add those users to the DevCenter Project Admin role.
Creating a Microsoft Dev Box
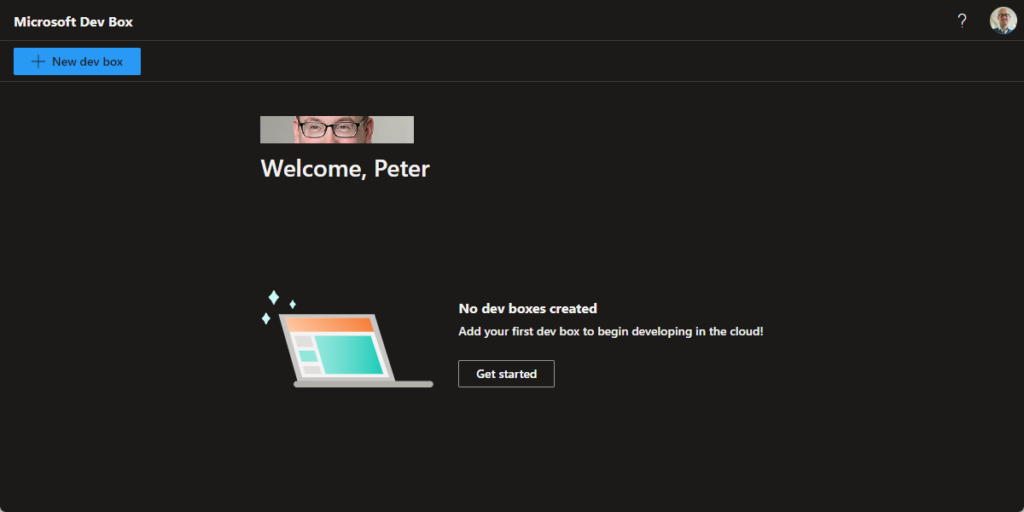
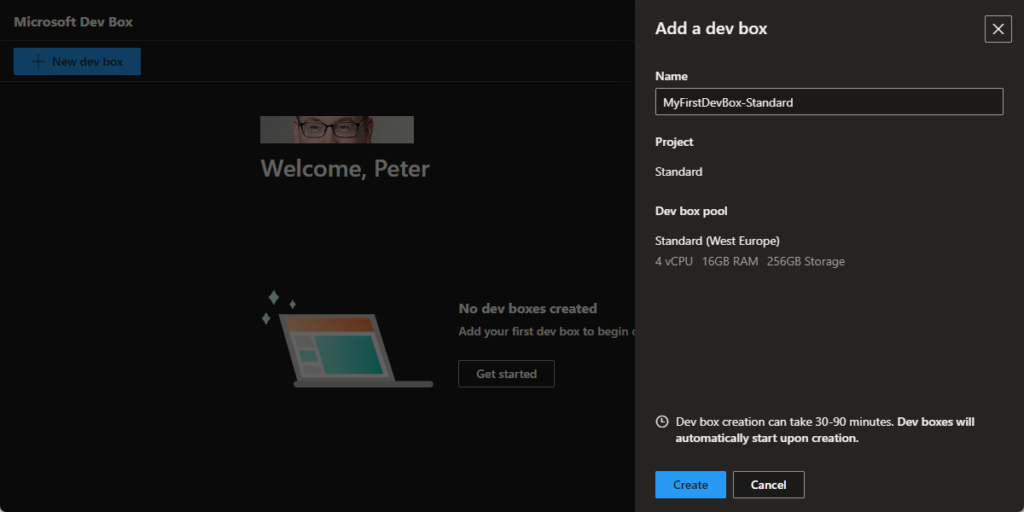
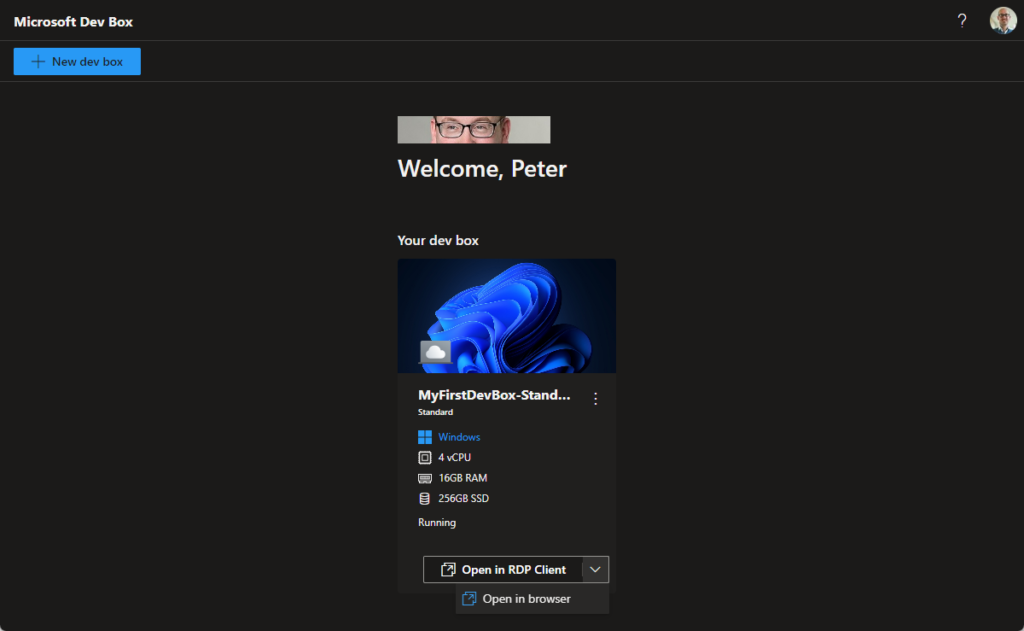
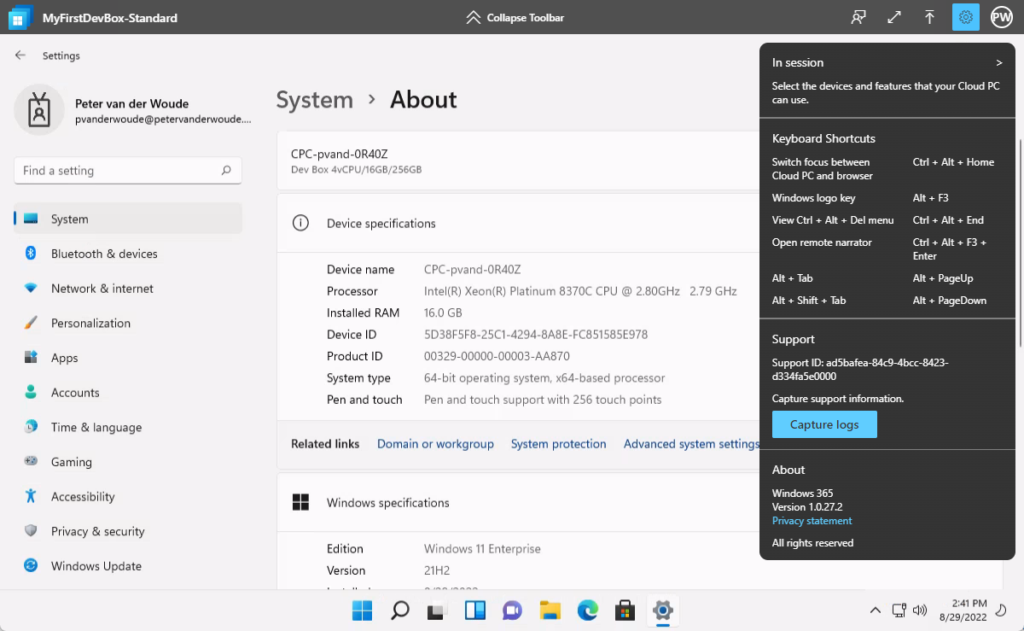
Once the configuration is in place, the developer can go to the Microsoft Dev Box portal. That portal provides the developers with the ability to create their own dev boxes and to manage those dev boxes. A new developer for the project gets the overview as shown in Figure 8. A blank portal with the ability to create a new dev box. That new dev box can be created by simply providing the information as shown in Figure 9. That information is only the name of the dev box. That name is only the name of the dev box that the developer will see in the portal, as the actual name will be something with CPC, the username and something random (similar to Windows 365 Cloud PCs). Once the dev box is created, the developer can connect to the dev box as shown in Figure 10. The information in the Settings app will show that it’s actually a dev box with the configured specifications (as shown in Figure 11).
More information
For more information about Microsoft Dev Box, refer to the following docs.
- Introducing Microsoft Dev Box
- Announcing Microsoft Dev Box Preview | Azure Blog and Updates | Microsoft Azure
- What is Microsoft Dev Box? | Microsoft Docs
- Configure the Microsoft Dev Box service | Microsoft Docs
- Configure a Microsoft Dev Box project | Microsoft Docs
- Create a Microsoft Dev Box | Microsoft Docs

1 thought on “Getting started with Microsoft Dev Box”