This week is a follow-up on the post of last week about getting started with Microsoft Cloud PKI (Cloud PKI). This time it’s all about using a bring your own certificate authority (BYOCA) with Cloud PKI. BYOCA is focused on providing organizations with the ability to rely on an existing private CA. That can for example be an existing on-premises PKI infrastructure based on Active Directory Certificate Services (ADCS). BYOCA enables the IT administrator to create an issuing CA in Cloud PKI that is anchored to that existing private CA. By doing that, the issuing CA becomes an extension of the already existing (on-premises) PKI infrastructure. That might take some of the previously mentioned benefits away, as this won’t takeaway all the need to maintain on-premises servers, or hardware. It does, however, make sure that organizations can still rely on the existing (on-premises) PKI infrastructure for distributing certificates to non-Intune managed devices and keep ownership of the (offline) root CA. Besides that, the rest of the concept is the same. Cloud PKI handles the certificate issuance, renewal, and revocation for Intune managed devices. This post will focus on the steps for configuring an issuing CA based on a BYOCA. The certificate profiles will be briefly mentioned.
Important: Keep in mind that during trial licenses, the CAs are created using software-backed keys, instead of HSM-backed keys. Those CAs can still be used when purchasing an actual license, but the keys remain software-backed.
Note: For more information around the PKI hierarchy that should be used, please refer to the Microsoft docs.
Creating the issuing CA based on a BYOCA
When creating an issuing CA based on a BYOCA, then the process immediately starts with creating an issuing CA. The issuing CA will be responsible for issuing the certificates for Intune managed devices. During the creation of that issuing CA, Cloud PKI automatically provides the Simple Certificate Enrollment Protocol (SCEP) service that is used to request certificates from the issuing CA on behalf of the Intune managed devices. The following six steps walk through the process of creating that issuing CA within Cloud PKI, based on a BYOCA. A really straight forward process that further shows the simplicity of Cloud PKI.
- Open the Microsoft Intune admin center portal and navigate to Tenant admin > Cloud PKI
- On the Tenant admin | Cloud PKI page, click Create
- On the Basics page, provide a valid name certification authority and click Next
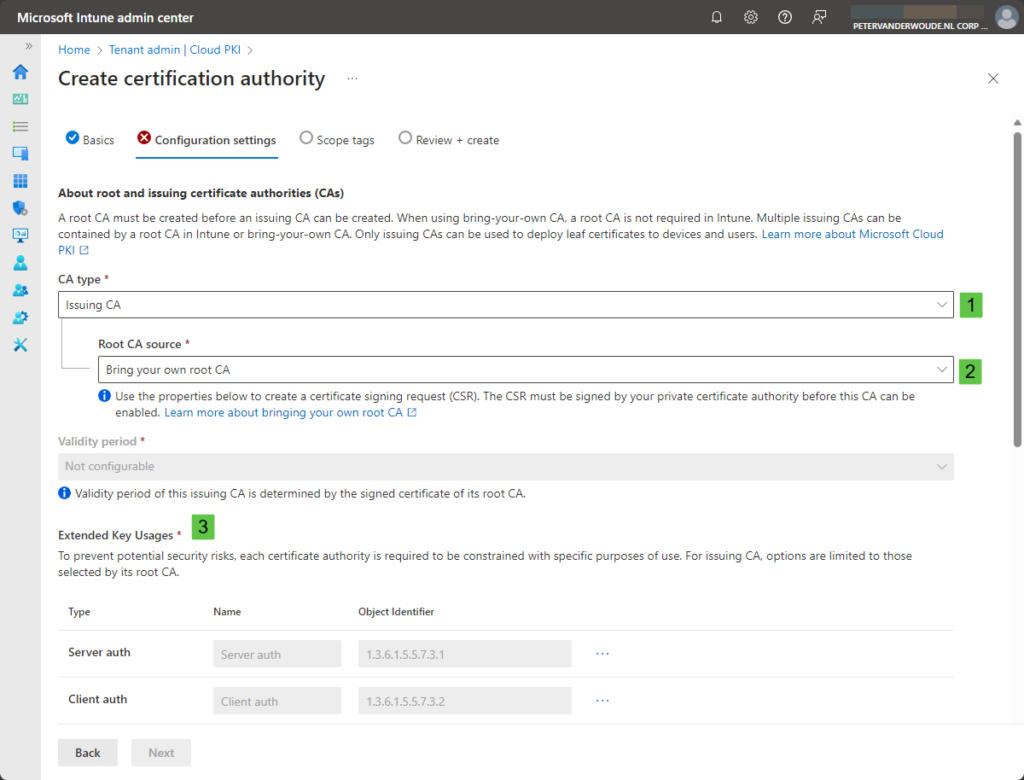
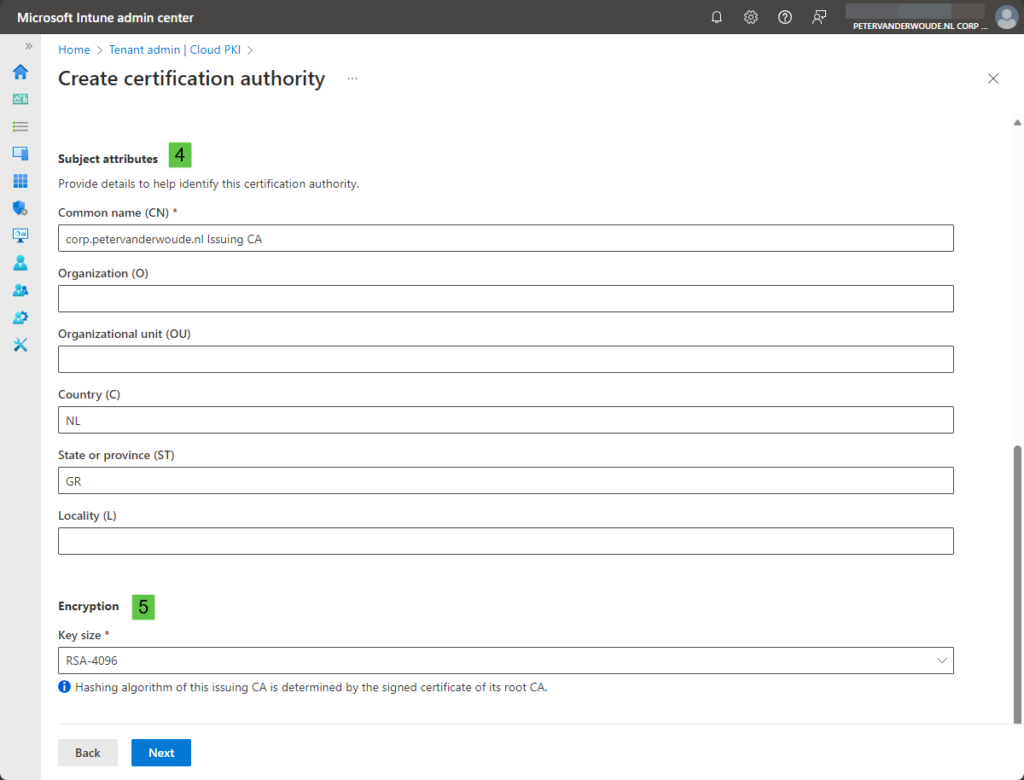
- On the Configuration settings page, as shown in Figure 1 and Figure 2, provide the following information and click Next
- CA type (1): Select Issuing CA to create a new issuing CA
- Root CA source (2): Select Bring your own root CA to be able to use BYOCA
- Validity period (-): Not configurable as it is determined based on the signed certificate of the root CA
- Extended Key Usages (3): Select the purpose of the issuing CA by selecting the required key usage types
- Subject attributes (4): Specify at least the Common name (CN) that helps to identify the CA
- Encryption (5): Select the required key size, the hash algorithm is determined by the signed certificate of the root CA
- On the Scope tags page, add any required scope tags and click Next
- On the Review + create page, verify the configuration and click Next
Signing the certificate signing request
After creating the issuing CA, it’s time to activate the issuing CA by downloading the signing request (CSR) file and signing it by the (on-premises) private root CA. Basically, the signing CA can be a root or issuing CA from any tier of the (on-premises) PKI infrastructure. That process starts by downloading the CSR-file. The CSR-file can be downloaded at the following location:
- Open the Microsoft Intune admin center portal and navigate to Tenant admin > Cloud PKI
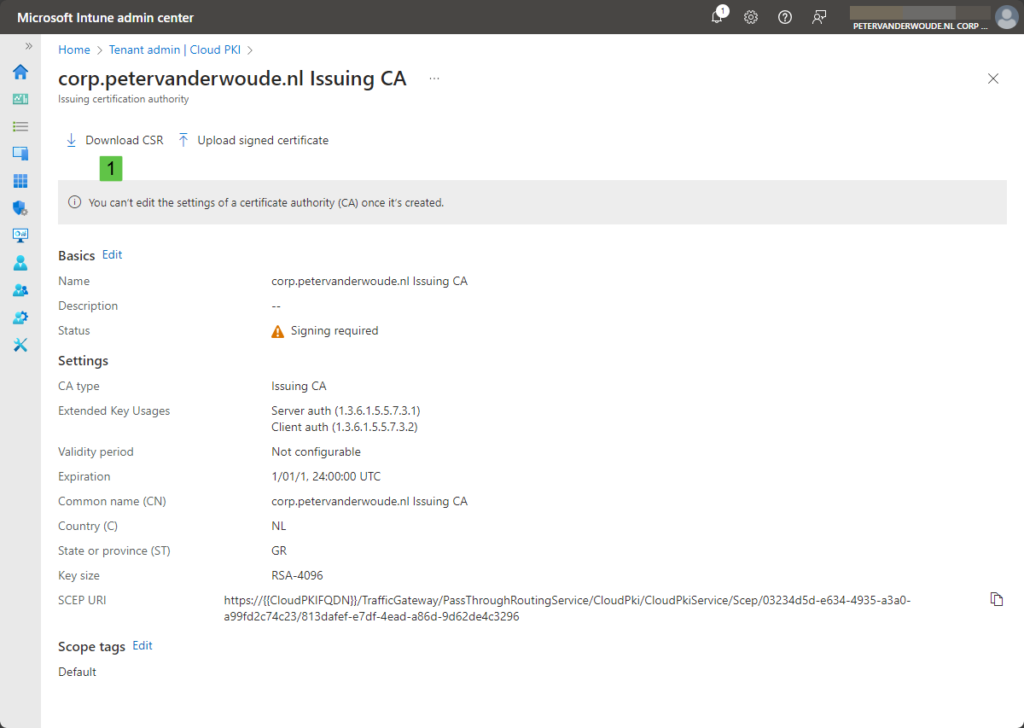
- Select the issuing CA, as shown in Figure 3
- Click on Download CSR (1) and store the CSR-file
Note: Notice that as long as there is no signed certificate, the status of the issuing CA will be Signing required. And as long as the issuing CA is in that particular state, it won’t be able to actually issue certificates to clients.
After downloading the CSR-file, it’s time to actually sign that signing request. That can be achieved by using the Certification Authority Web Enrollment, when available, or by using the certreq.exe command-line tool. The latter method is probably the most universal option. Below is an example that specifies the certificate template for subordinate CA (-attrib), a specific CA (-config), the downloaded CSR-file (.req), and the response file (.cer).
certreq -submit -attrib "CertificateTemplate:SubCA" -config "CLDSRV01\corp-CLDSRV01-CA" "C:\Temp\corp.petervanderwoude.nl Issuing CA.req" "C:\Temp\IssuingCASigned.cer"Besides that, it’s eventually also required for the issuing CA and the clients to trust the complete key chain of the (on-premises) private CA. To prepare for that, make sure to retrieve the full key chain that includes the root CA and all intermediate, issuing, or subordinate CAs. Below is an example to retrieve that whole key chain by using a specific CA (-config), specifying the required parameter for retrieving the full key chain (-ca.chain) and specifying the output file (.p7b).
certutil -config "CLDSRV01\corp-CLDSRV01-CA" -ca.chain "C:\Temp\FullCertChain.p7b"Note: Simply double-click the output file to retrieve the CAs in the chain that should be trusted by client devices.
Uploading the signed certificate
After retrieving the signed certificate, and the chain of trust certificates, it’s time to upload the signed certificate. That upload will eventually finalize the creation of the issuing CA and to enable it start issuing client certificates. Those certificate files can be uploaded at the following location:
- Open the Microsoft Intune admin center portal and navigate to Tenant admin > Cloud PKI
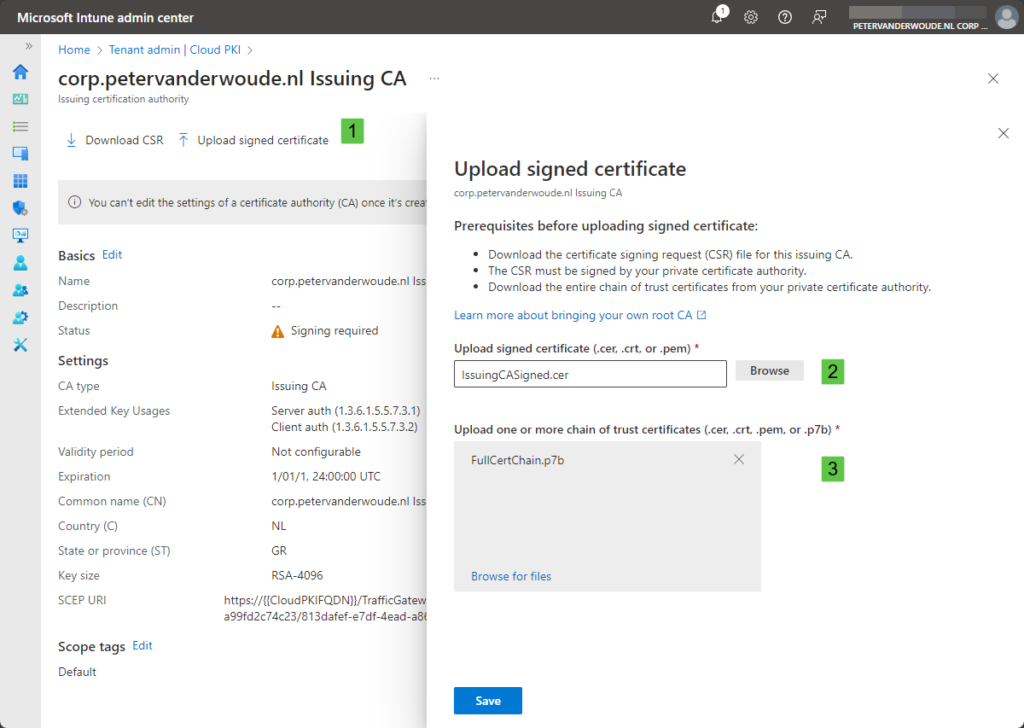
- Select the issuing CA, as shown in Figure 4, and click on Upload signed certificate (1)
- On the Upload signed certificate blade, select the signed certificate (.cer) with the Upload signed certificate field (2), select the key chain (.p7b) with the Upload one or more chain of trust certificate field (3) and click Save
Note: Make sure to upload the full chain of trust certificates of the (on-premises) private CA that is used to sign the certificate request.
Verifying the delivered certificates
When the configuration of the Cloud PKI is in place, it’s important that the certificate profiles are created to distribute the public keys of the (on-premises) private CA and the issuing CA to make them trusted by the client devices. After that, it’s time to actually distribute the client authentication certificate. The distribution of all these certificates is similar to any other Cloud PKI implementation. The steps to distribute all of these certificates are described in the section Distributing the trusted certificates and the section Delivering the client authentication certificate of this post about getting started with Microsoft Cloud PKI.
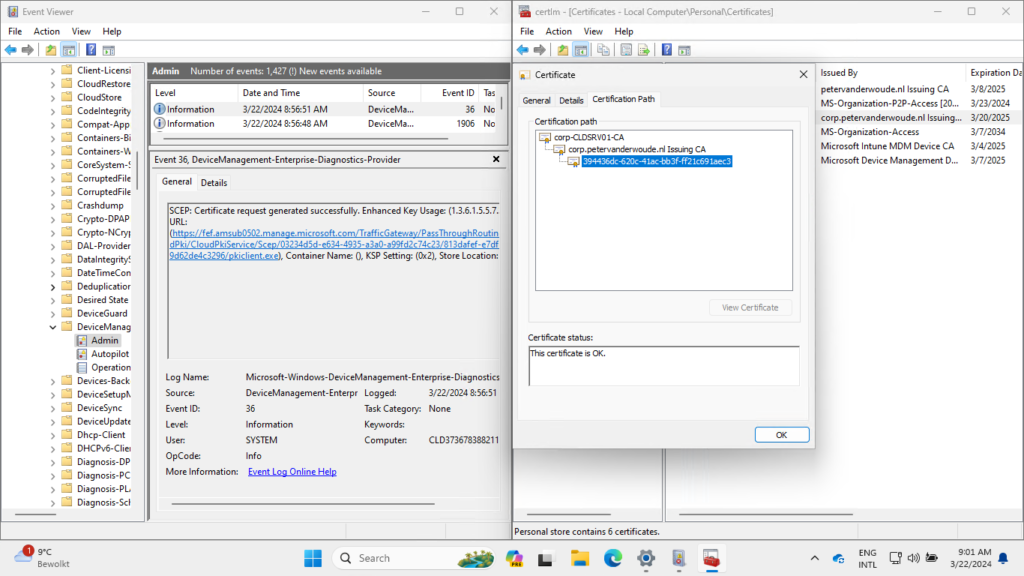
After the required certificate profiles are created, it’s time to verify the delivered certificates. And that is similar to the deployment of a Cloud PKI only implementation. So, there are multiple locations that provide a quick overview of the successful delivery of the client authentication certificate and the certification path. The first location is locally on the device. The Event Viewer provides an overview of the certificate request in the Microsoft-Windows-DeviceManagement-Enterprise-Diagnostics-Provider/Admin log. Especially Event ID 36, as shown below in Figure 5, provides interesting details about the success. Besides that, of course the client authentication certificate itself provides a lot of information. That certificate immediately indicates the success. Below in Figure 5 is also an brief overview of that distributed certificate, including its certificate path. That path includes the (on-premises) private CA at the beginning of the chain.
The second location also provides a pretty clear overview. Within the Microsoft Intune admin center portal there is an overview of the delivered client authentication certificates. That overview, as shown below in Figure 6, can be found by navigating to Tenant admin > Cloud PKI > [issuing CA] > View all certificates. Besides that, that location can also be used to Revoke certificates.
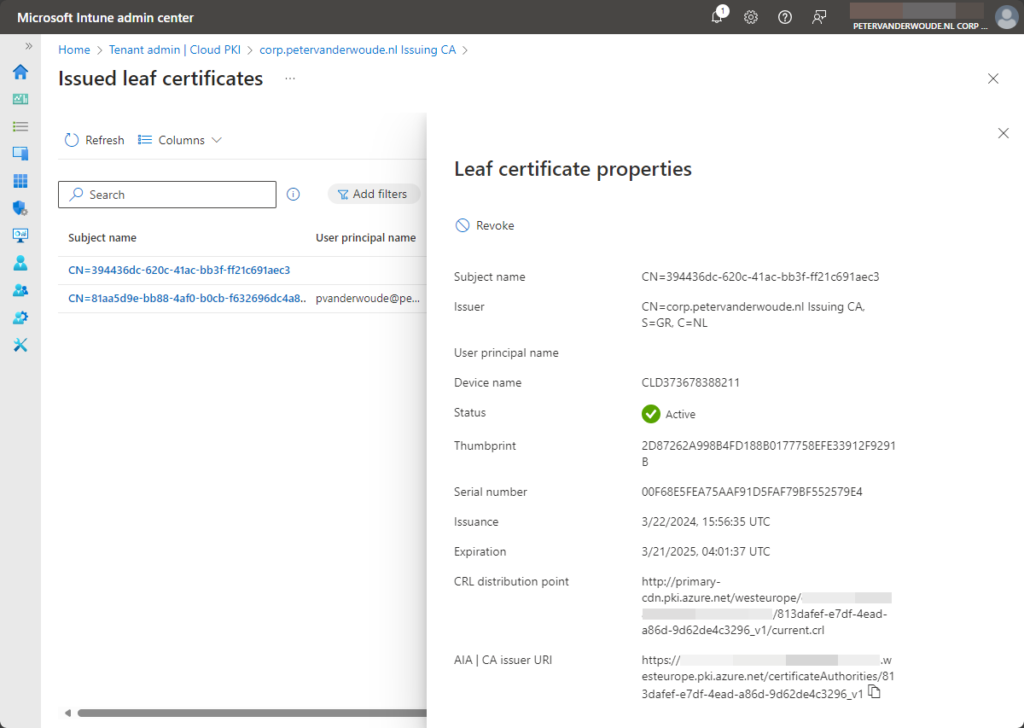
Note: Also keep in mind that the overview of the certification authorities immediately shows that the Root common name displays External root CA to indicate that it chains to an (on-premises) private CA.
More information
For more information about the Intune Suite add-on capabilities and Microsoft Cloud PKI, refer to the following docs.
- Use Intune Suite add-on capabilities – Microsoft Intune | Microsoft Learn
- Microsoft Cloud PKI for Microsoft Intune – Microsoft Intune | Microsoft Learn
- Deployment models for Microsoft Intune cloud PKI – Microsoft Intune | Microsoft Learn
- Bring your own certificate authority with Cloud PKI – Microsoft Intune | Microsoft Learn
- Monitor issued PKI certificates with Microsoft Intune – Microsoft Intune | Microsoft Learn
- Audit logs for Microsoft Intune cloud PKI – Microsoft Intune | Microsoft Learn

I am running a common on prem CA + Issuing CA from Microsoft on a Server 2022 since many years. There is no offline-CA installed because I am running only a small company. The on prem issuing CA creates certificates for all MS server systems and all client PC’s which are registered in Intune.
I guess that any creation of an additional issuing CA in Intune based on a BYOCA as decribed in your above article will cause a conflict because there will be then two competing issuing CA’s creating certificates for the Intune registered WIN10/WIN11 devices. Is there a migration procedure to deactivate the on prem issuing CA resposibility only for all the Intune registered PC devices or what do you recommed to do ?
I would like to continue with the on prem CA + issuing CA only for the server devices but using the new Cloud PKI for certificate service of the Intune registered devices.
Hi Rudi,
In general certificates don’t conflict and can life side-by-side. A new issuing CA will distribute new certificate.
Regards, Peter