This week is all about Mobile Application Management (MAM) for Windows. A long awaited feature that will be a big help with addressing unmanaged Windows devices. MAM for Windows enables organizations to manage the app in a similar way as already possible on mobile platforms. So, making sure that there is a separation between personal and work data, and making sure that the chances of accidental data leakages getting slimmer. In some areas, especially when looking at browser access, it might feel similar to what could already be achieved by using app enforced restrictions in Conditional Access, or by using Microsoft Defender for Cloud Apps in combination with Conditional Access. Big difference, however, is that MAM for Windows also includes the ability to use app conditions and device conditions. In which app conditions can be used to verify specific properties of the app configuration and in which device conditions can be used to verify specific properties of the device configuration. This post will start with a quick introduction, followed with the required configurations to get started with MAM for Windows. This post will end with a first look at the current experience with Microsoft Edge, as that’s currently the only supported app.
Important: Keep in mind that, at the moment of writing, MAM for Windows is in public preview and requires an opt-in.
Note: There are multiple prerequisites for MAM for Windows. Mainly for the minimum versions of Microsoft Edge and Windows. That information will be shared after the opt-in and will change when general available.
Introducing MAM for Windows
Windows Information Protection (WIP) was one of the features that should enable users to work on their personal devices. One of the big problems with WIP, was that it was a device feature that could not be decently required for the user. Something had to change. Many features came, in different licenses, to sort of replace that functionality. Think about Endpoint DLP to protect data, app enforced restrictions to limit access to Exchange Online and SharePoint Online, and even session controls with Defender for Cloud Apps. Many options, with different license requirements, but still missing some native Windows functionality. That challenge could be addressed with MAM for Windows. MAM for Windows provides users with the required separation between personal and work data, based on the identity of the user. Similar to the mobile platforms (iOS/Android). When the users signs into the app with their personal account, nothing changes, and when the user signs into the app with their work account, the app will be protected. A huge difference compared to the functionality provided by WIP, back in the days.
The configuration of MAM for Windows, contains three actions: 1) the Windows Security Center connector must be configured to use the threat level of the device for access to the app, 2) the app protection policy must be configured to protect the app, and 3) Conditional Access must be configured to require the use of the app protection policy with the app.
Note: Keep in mind that, at the moment of writing, only Microsoft Edge is supported with MAM for Windows.
Configuring Windows Security Center connector
When interested in using the threat level of devices in the app protection policy, the first configuration is the connector for Windows Security Center. That connector will make the threat level of devices available. The following three steps walk through the straight forward process of adding that connector in Microsoft Intune.
- Open the Microsoft Intune admin center and navigate to Tenant admin > Connectors and tokens > Mobile Threat Defense
- On the Connectors and tokens | Mobile Threat Defense page, click Add
- On the Add Connector blade, as shown below in Figure 1, select Windows Security Center and click Create
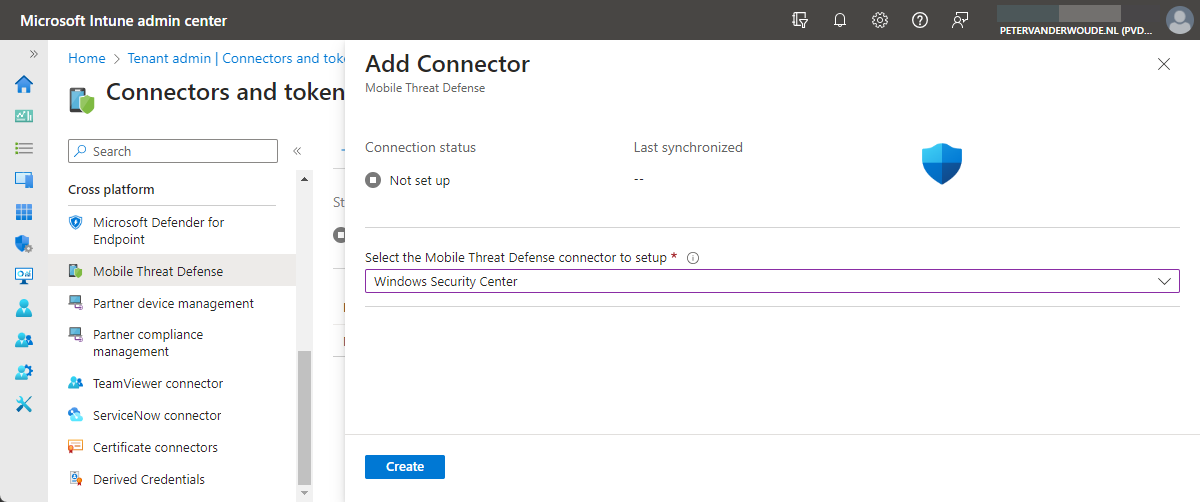
Note: At this moment, the connector will show Unavailable until the first user actually uses MAM for Windows.
Configuring the app protection policy
The second configuration is the app protection policy itself. That policy will be used to protect the configured apps. In other words, MAM for Windows. Within that policy, the configuration can be done to protect the data within the apps. The following nine steps walk through the process of creating that app protection policy for Microsoft Edge on Windows.
- Open the Microsoft Intune admin center portal navigate to Apps > App protection profiles
Note: After opting-in to the public preview, a link will be shared to the admin center with the required features enabled.
- On the Apps | App protection policies blade, click Create policy > Windows
- On the Basics page, provide the basic policy information and click Next
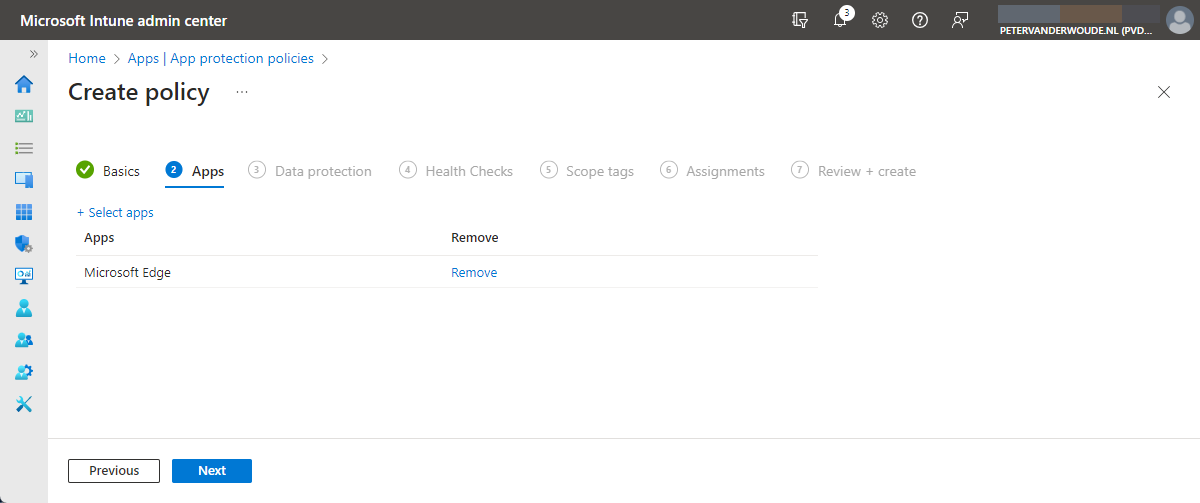
- On the Apps page, as shown below in Figure 2, select Microsoft Edge and click Next
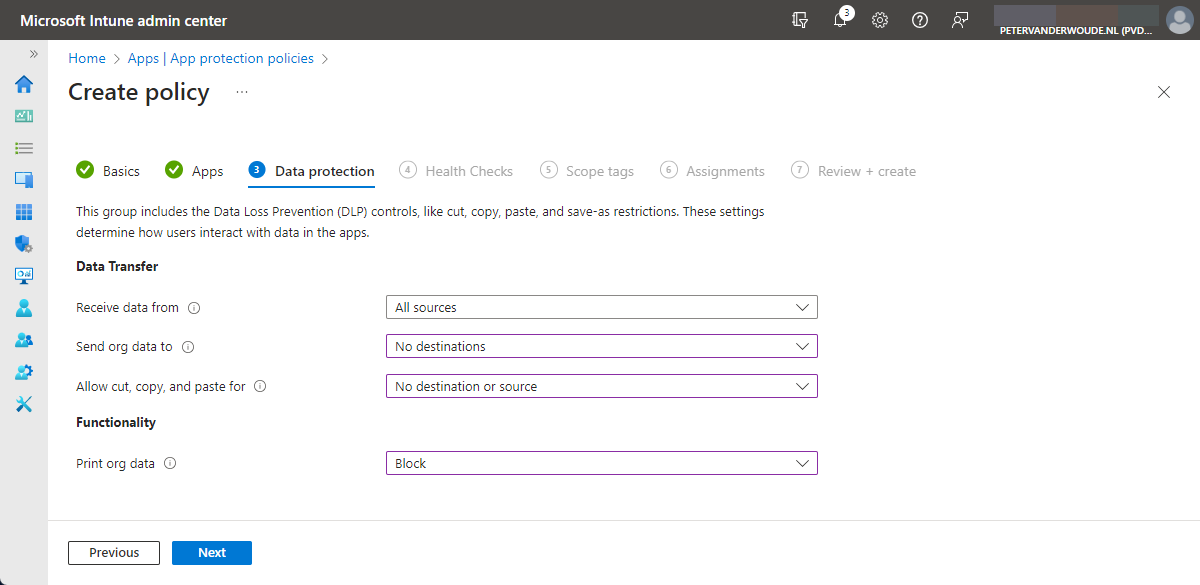
- On the Data protection page, as shown below in Figure 3, specify the following information and click Next
- Receive data from: Choose between All sources and No sources, to specify the source that users can receive data from in the managed app
- Send org data to: Choose between All destinations and No destinations, to specify the destinations that users can send data to in the managed app
- Allow cut, copy, and paste for: Choose between Any destination and any source and No destination or source, to specify the option for allowing cutting, copying, and pasting data from the managed app
- Print org data: Choose between Block and Allow, to specify the option for printing from the managed app
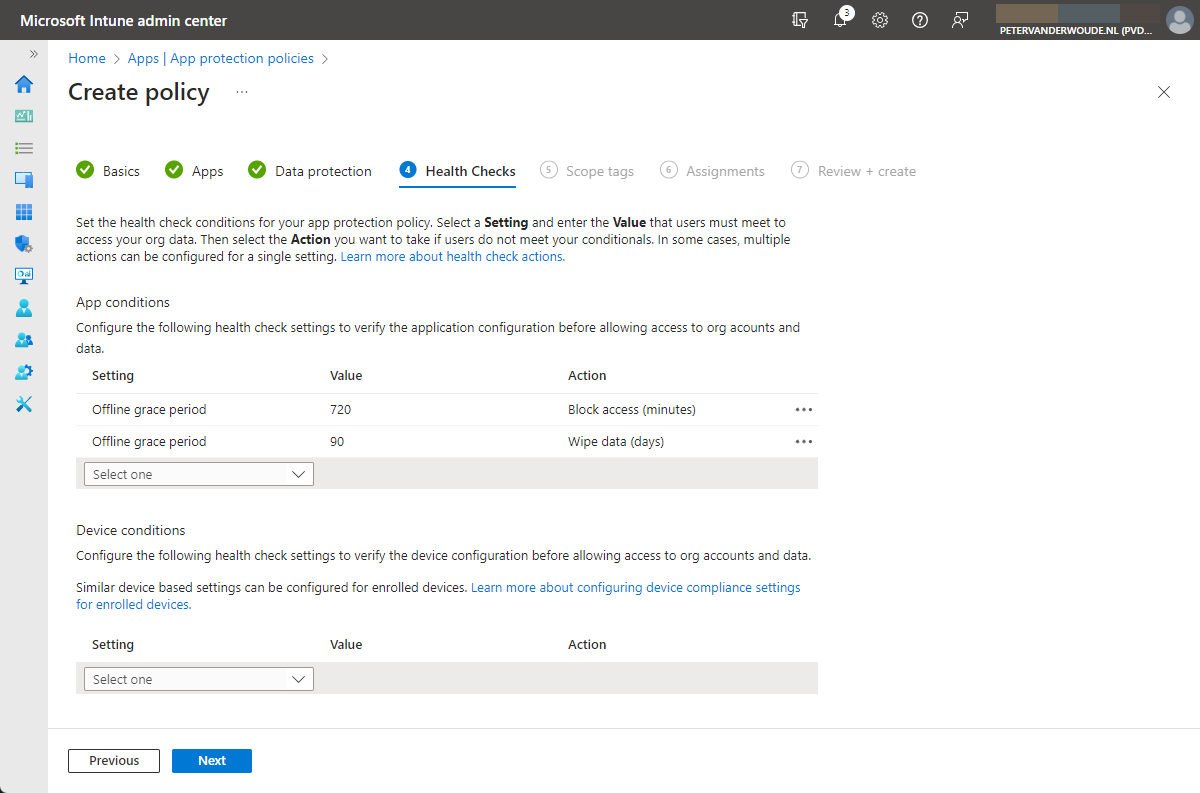
- On the Health Checks page, as shown below in Figure 4, specify the required access requirements – that includes the option in the device conditions to configure the threat level of the device – and click Next
- On the Scope tags page, specify the required scope tags and click Next
- On the Assignments page, specify the required assignment and click Next
- On the Review + create page, click Create
Configure the Conditional Access policy
When also interested in requiring the use of the app protection policy, the third configuration is the creation of a Conditional Access policy. That policy can be used to require an app protection policy. The following six steps walk through the process of creating that conditional access policy for Microsoft Edge on Windows.
- Open the Microsoft Intune admin center portal navigate to Endpoint security > Conditional Access, or open the Azure portal and navigate to Azure Active Directory > Security > Conditional Access
- On the Conditional Access | Policies blade, click New policy
- On the Assignments section, configure the following for the minimal required assignments sections
- Users and groups: Select the users that should be assigned with this policy
- Target resources: Select Cloud apps > Select apps > Office 365 as the app that should be assigned with this policy
- Conditions: Select at least the following conditions that should be used as additional filters for assignment of this policy
- Device platforms: Select Yes > Select device platforms > Windows for the applicable the platform
- Client apps: Select Yes > Browser for the applicable client app
- On the Access controls section, configure the following for the minimal required access control section
- Grant: Select Grant access > Require app protection policy for requiring app protection with this policy
- Select Enable policy > On to enable this policy
- Select Create to create this policy
Important: Keep in mind that, at the moment of writing, the policy must be specifically targeted to the specified combination of the cloud app with the platform and the client app.
Experiencing MAM for Microsoft Edge on a personal Windows device
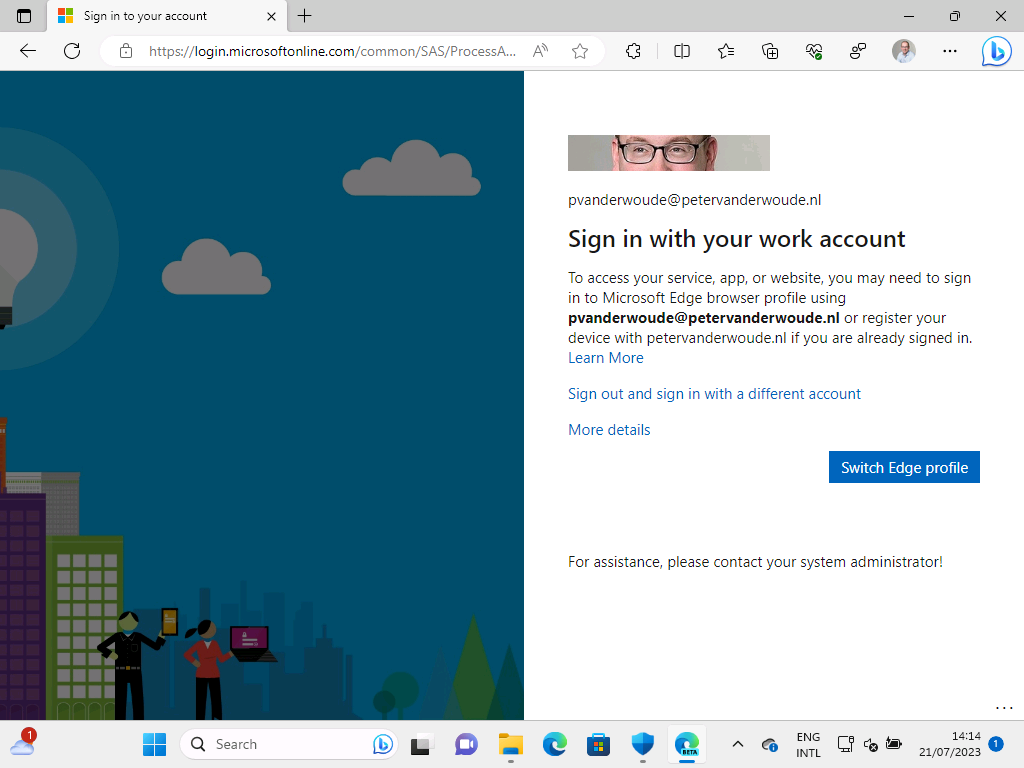
When the configurations of the different components are in place, it’s time to have a look at the user experience. For this, the ideal test case is a user running Windows 11 Home edition. On that device, the user is running the Microsoft Edge browser with a personal profile configured. When that user navigates to Office 365, the user can sign-in with their work account and will be prompted to switch profile and/or register the device (as shown below in Figure 5). When that user now wants to switch profile, the device must be registered and NOT managed. That means that the user should uncheck the box with Allow my organization to manage my device and click OK (as shown below in Figure 6).
Note: Keep in mind that, at the moment of writing, MAM must be enabled as a preview feature in Microsoft Edge.

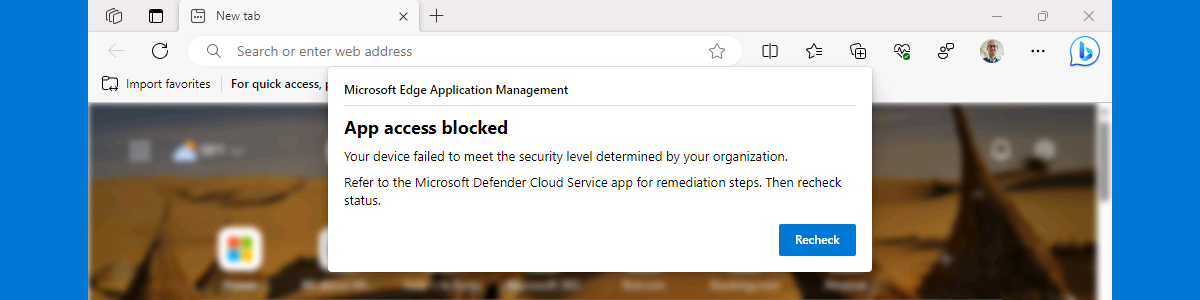
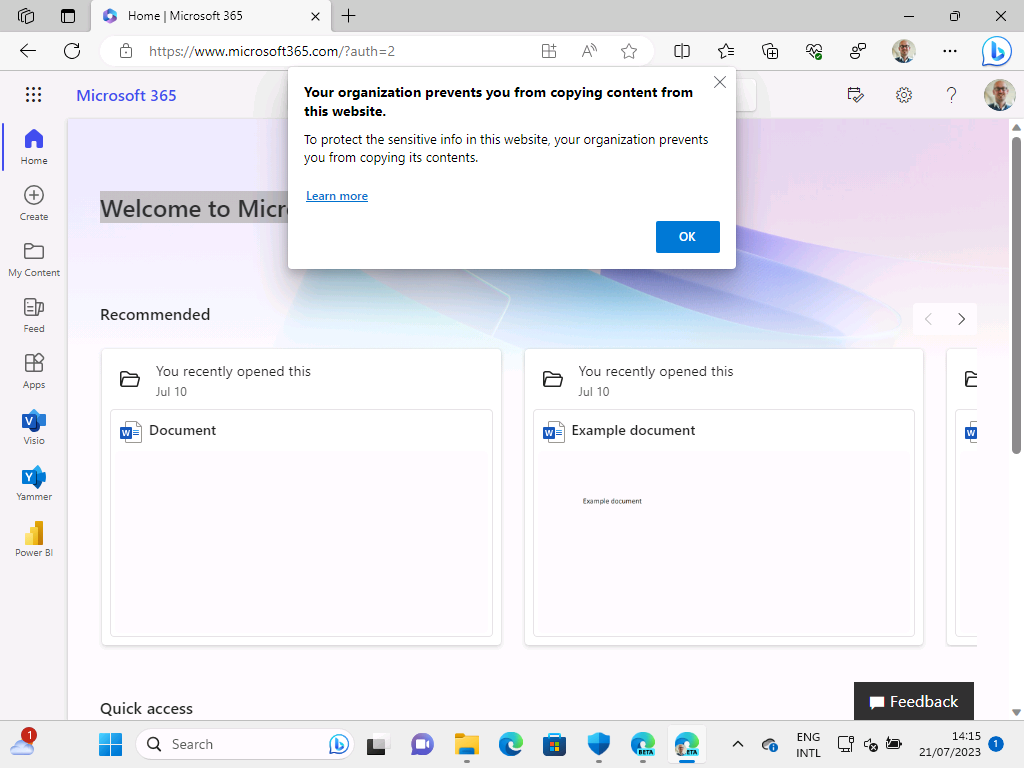
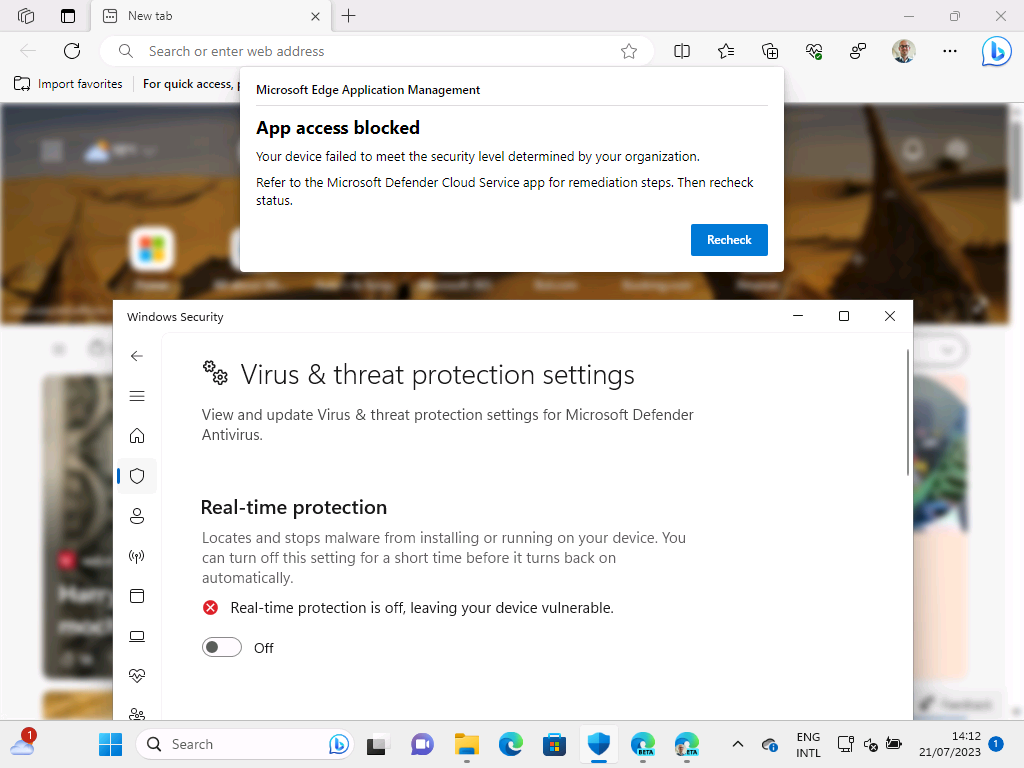
Once the registration is completed, the app protection policy will eventual be applied to the profile of the work account. And only to that account. That enables some easy to test experiences. When the user, for example, wants to copy something from the browser, when signed into the work account, the user will be prompted when that’s not allowed (as shown below in Figure 7). More interesting is the real added value of MAM. So, actually having a conditional launch type of functionality. That can be tested with with changing the threat level of the device. When that level changes, the user will be prompted that the access to the app is not allowed (as shown below in Figure 8).
Besides looking at the user experience, there is also interesting information in the Sign-in logs in Azure AD about the applied Conditional Access policy, and in App Protection status report in Microsoft Intune about the applied app protection policy. On the Windows device itself, there will be the MamLog.txt log file in the user date of Microsoft Edge about the check-in for MAM.
More information
For more information about MAM for Microsoft Edge and Conditional Access, refer to the following docs.
- Microsoft Edge app protection policy settings for Windows MAM – Microsoft Intune | Microsoft Learn
- Conditional Access – Require app protection policy for Windows – Microsoft Entra | Microsoft Learn
- Enable the Mobile Threat Defense connector for unenrolled devices – Microsoft Intune | Microsoft Learn
Hi Peter
Did you come across any issues when testing the cut and paste of data from and to the browser. Also despite everything being set up the connector still shows as ‘unavailable’. Any tips from your testing would be appreciated.
Hi andy,
Apologies for the late reply, as I was enjoying my vacation. Some behavior was still a bit wonky. The connector status changed pretty instant after using my first test client. I did use that client for nearly all tests, including turning off Defender.
Regards, Peter
Hi Peter, do you think that this could be used to provide “posturing” or “health checks” for personal computers connecting to our Citrix gateway? For example, we could force them to use Edge to launch Citrix and if they weren’t running a supported OS, then they would have their access revoked.
Thanks, Brian.
Hi Brian,
When you’re only using web access, and you’ve integrated Citrix with Azure AD, I would say yes.
Regards, Peter
Thanks very much. Yes we’ve integrated Citrix with Azure AD. I don’t suppose you know when this feature is going to be released to the public do you?
Sadly I don’t. And it’s always hard to guess when features are ready for GA.
Regards, Peter
Thank you again. Sorry, for some reason, I didn’t get an email saying you had replied. Do you know if they are considering introducing an app protection policy for Mac OS?
Thanks!
Brian
No problem. I wouldn’t be surprised if they did, but I haven’t seen and/or heard anything about that yet.
Regards, Peter
Thanks Peter.
Hi there,
Maybe I missed it but this article is about pushing the policy to unmanaged devices but I don’t see how you accomplish this? If the policy is assigned to a specific user group the users will get this policy on managed and unmanaged devices?
How do I make sure this policy is only applied to unmanaged devices? The filter option isn’t available for Windows it seems.
Hi Martin,
MAM for Windows requires a separate enrollment that won’t be applicable when the device is managed. To quote the docs: “Intune MAM on Windows supports unmanaged devices. If a device is already managed, then Intune MAM enrollment will be blocked and APP settings will not be applied. If a device becomes managed after MAM enrollment, APP settings will no longer be applied.“.
Regards, Peter
Hello,
This is an interesting solution. I’m testing it on a restricted test user group, but it seems this is enforced also on domain joined devices (full azure and hybrid joined devices).
Hi Max,
You’ve got to filter the assignments of CA and APP to only target the specific situation that you want to hit.
Regards, Peter
If you accidentally click ‘No, sign in to this app only’, which Microsoft say you ‘mustn’t do’, the profile doesn’t login on the Edge browser. …. assuming a user does click this option, how do you remove the profile from Edge so that MAM can be setup correctly?
Hi Mike,
You can remove the account again by selecting it and removing it via the account settings in Microsoft Edge.
Regards, Peter