About a year ago I did a blog post about managing Windows Defender on Windows 10 via OMA-DM, by using the available policies in the Policy CSP. This week I’m going to have another look at Windows Defender, on Windows 10, but this time from a reporting perspective. This time I want to report about the health of Windows Defender on the Windows 10 devices that are managed via OMA-DM. To get that type of information I can use the Defender configuration service provider (CSP). The Defender CSP contains the information about the health of Windows Defender.
During this blog post I’ll go through the Defender CSP, the required configuration to get the Windows Defender health information and the administrator experience.
Defender CSP
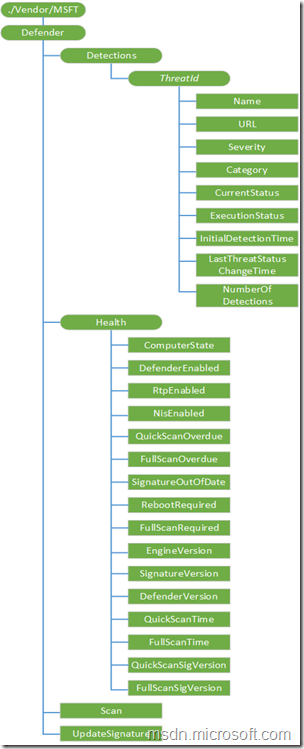
 Before starting with the required configuration to get the information about the health of Windows Defender, it’s good to have a quick look at the Defender CSP. That CSP is used to configure various Windows Defender actions across the enterprise. More specifically, I will go through the Health node. That node contains the information about the Windows Defender health status that I’m looking for.
- ComputerState: This node provides the current state of the device;
- DefenderEnabled: This node shows if the Windows Defender service is running;
- RtpEnabled: This node shows if the real-time protection is running;
- NisEnabled: This node shows if the network protection is running;
- QuickScanOverdue: This node shows if a Windows Defender quick scan is overdue;
- FullScanOverdue: This node shows if a Windows Defender full scan is overdue;
- SignatureOutOfDate: This node shows if the Windows Defender signature is outdated;
- RebootRequired: This node shows if a reboot is required;
- FullScanRequired: This node shows if a Windows Defender full scan is required;
- EngineVersion: This node shows the version number of the Windows Defender engine;
- SignatureVersion: This node shows the version of the Windows Defender signatures;
- DefenderVersion: This node shows the version of Windows Defender;
- QuickScanTime: This node shows the time of the last Windows Defender quick scan;
- FullScanTime: This node shows the time of the last Windows Defender full scan;
- QuickScanSigVersion: This node shows the signature version used during the last quick scan;
- FullScanSigVersion: This node shows the signature version used during the last full scan.
Configuration
Now it’s time to start with the required configuration to enable the ability to report about the Windows Defender health of Windows 10 devices managed via OMA-DM. However, it’s good to note that this is currently only possible in Microsoft Intune hybrid, as we need to extend the inventory on Windows 10 devices.
The Health node of the Defender CSP contains exactly the information that I’m looking for and that I would like to add to the inventory of my Windows 10 devices. Luckily, in a Microsoft Intune hybrid environment I can extend the hardware inventory to include specific OMA-URI settings. OMA-URI settings that can be added to the hardware inventory are shown, in the picture above, in a rectangular shape (and are documented with a supported Get operation).
All of the available settings, in the Health node of the Defender CSP, support the Get operation. If I want to add a custom class to the hardware inventory, with all the the available settings of the Health node, I can use the following in a MOF file.
[ SMS_Report (TRUE),
SMS_Group_Name (“PTCLOUD Windows10 DefenderHealth”),
SMS_Class_ID (“MICROSOFT|Windows10_DefenderHealth|1.0”),
Namespace (“Reserved”),
SMS_DEVICE_URI (“”) ]
class Windows10_DefenderHealth : SMS_Class_Template
{
[SMS_Report (TRUE), SMS_DEVICE_URI(“WM:./Vendor/MSFT/Defender/Health/ComputerState”)]
String ComputerState;
[SMS_Report (TRUE), SMS_DEVICE_URI(“WM:./Vendor/MSFT/Defender/Health/DefenderEnabled”)]
Boolean DefenderEnabled;
[SMS_Report (TRUE), SMS_DEVICE_URI(“WM:./Vendor/MSFT/Defender/Health/RtpEnabled”)]
Boolean RtpEnabled;
[SMS_Report (TRUE), SMS_DEVICE_URI(“WM:./Vendor/MSFT/Defender/Health/NisEnabled”)]
Boolean NisEnabled;
[SMS_Report (TRUE), SMS_DEVICE_URI(“WM:./Vendor/MSFT/Defender/Health/QuickScanOverdue”)]
Boolean QuickScanOverdue;
[SMS_Report (TRUE), SMS_DEVICE_URI(“WM:./Vendor/MSFT/Defender/Health/FullScanOverdue”)]
Boolean FullScanOverdue;
[SMS_Report (TRUE), SMS_DEVICE_URI(“WM:./Vendor/MSFT/Defender/Health/SignatureOutOfDate”)]
Boolean SignatureOutOfDate;
[SMS_Report (TRUE), SMS_DEVICE_URI(“WM:./Vendor/MSFT/Defender/Health/RebootRequired”)]
Boolean RebootRequired;
[SMS_Report (TRUE), SMS_DEVICE_URI(“WM:./Vendor/MSFT/Defender/Health/FullScanRequired”)]
Boolean FullScanRequired;
[SMS_Report (TRUE), SMS_DEVICE_URI(“WM:./Vendor/MSFT/Defender/Health/EngineVersion”)]
String EngineVersion;
[SMS_Report (TRUE), SMS_DEVICE_URI(“WM:./Vendor/MSFT/Defender/Health/SignatureVersion”)]
String SignatureVersion;
[SMS_Report (TRUE), SMS_DEVICE_URI(“WM:./Vendor/MSFT/Defender/Health/DefenderVersion”)]
String DefenderVersion;
[SMS_Report (TRUE), SMS_DEVICE_URI(“WM:./Vendor/MSFT/Defender/Health/QuickScanTime”)]
String QuickScanTime;
[SMS_Report (TRUE), SMS_DEVICE_URI(“WM:./Vendor/MSFT/Defender/Health/FullScanTime”)]
String FullScanTime;
[SMS_Report (TRUE), SMS_DEVICE_URI(“WM:./Vendor/MSFT/Defender/Health/QuickScanSigVersion”)]
String QuickScanSigVersion;
[SMS_Report (TRUE), SMS_DEVICE_URI(“WM:./Vendor/MSFT/Defender/Health/FullScanSigVersion”)]
String FullScanSigVersion;
};
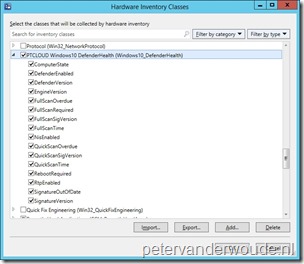
This MOF file can be used to extend the hardware inventory by simply performing the following steps in the Configuration Manager console.
Result
Now let’s end this post with the most important thing, the visualization. The extension to the hardware inventory will make sure that the information about the Windows Defender health is reported by Windows 10 devices that are managed via OMA-DM. It will add the information, like every extension to the hardware inventory, to a custom table, with it’s own custom view, in the database. That will make it relatively easy to create a custom report, as shown below, to display the information in a readable form to the administrative users.
| Administrator experience |
Also, keep in mind that the information will also be available in the Resource Explorer, of the Configuration Manager console, for the Windows 10 devices that are managed via OMA-DM.
More information
Fore more information about the Defender CSP and the Policy CSP, please refer to:

However, it’s good to note that this is currently only possible in Microsoft Intune hybrid, as we need to extend the inventory on Windows 10 devices.
Has this changed since the writing of this article?
No, that information is still applicable.