
This week is a follow-up on an earlier post about controlling devices connected to Windows devices. That post was focussed on device control as a feature of Microsoft Defender for Endpoint, in general. This post will specifically focus on Device Control Printer Protection. Device Control Printer Protection is the printer protection feature that can be used to prevent users from printing via non-corporate network printers or non-approved USB-printers. That adds an additional layer of data protection and security. This post will look in more detail at the printer protection configuration options, at applying printer protection and at the experience with printer protection enabled (the user experience and the administrator experience).
Note: The configuration options (protect) are available within a Microsoft 365 E3 license and the reporting options and more (detect and respond) are available within in a Microsoft 365 E5 license.
Introducing Device Control Printer Protection settings
When looking at Device Control Printer Protection, it starts by looking at the settings. These settings are ADMX-backed settings that are available via the Printing.admx and can be used to enable printer protection and to configure a list of exclusions. When looking from an MDM-perspective, those settings are available in the Printers area of the Policy CSP. The table below provides an overview of the printer protection related settings in that area, and the complete node of the setting starts with ./Vendor/MSFT/Policy/Config/Printers/.
| Setting | Friendly name | Type | Value | Description |
|---|---|---|---|---|
| EnableDeviceControl | Enable Device Control Printing Restrictions | String | <enabled/> | This setting can be used to enable Device Control Printer Protection and to apply the setting on the device. |
| EnableDeviceControlUser | Enable Device Control Printing Restrictions | String | <enabled/> | This setting can be used to enable Device Control Printer Protection and to apply the setting on the user. |
| ApprovedUsbPrintDevices | List of Approved USB-connected print devices | String | <enabled><data id=”ApprovedUsbPrintDevices_List” value=”[list]”> | This setting can be used to configure a list of allowed USB-connected printers, by specifying a list of approved VID/PID combinations, and to apply the setting on the device. |
| ApprovedUsbPrintDevicesUser | List of Approved USB-connected print devices | String | <enabled><data id=”ApprovedUsbPrintDevices_List” value=”[list]”> | This setting can be used to configure a list of allowed USB-connected printers, by specifying a list of approved VID/PID combinations, and to apply the setting on the user. |
Important: When configuring a list (mentioned as [list] in the table above) of approved VID/PID combinations, the format is <vid>/<pid>[,<vid>/<pid>].
Note: This area also contains settings to publish shared printers in Active Directory (PublishPrinters) and settings to control the point and printer behavior (PointAndPrintRestrictions and PointAndPrintRestrictions_User).
Configuring Device Control Printer Protection settings
When looking at the configuration of Device Control Printer Protection, it starts with determining the VID/PID combinations of allowed USB-connected printers. After determining the allowed USB-connected printers, it’s time to gather the information to construct the list of VID/PID combinations. Once that list is constructed, it can be applied by using Microsoft Intune. When no USB-connected printers should be allowed, simply only enable printer protection.
Constructing a list of VID/PID combinations
Constructing a list of VID/PID combinations can be a relatively easy task when the devices are already onboarded in Microsoft Defender for Endpoint. For that scenario, Microsoft provides a kusto query that can be used to find the USB-printers that are used within the organization, including a construction of the VID/PID combination of the printers. That query is shown below and can be easily adjusted by adding some additional filters to find specific VID/PID combinations. Use the results of that query to costruct the list of VID/PID combinations.
DeviceEvents
| where ActionType == "PnpDeviceConnected"
| extend parsed=parse_json(AdditionalFields)
| extend DeviceDescription = tostring(parsed.DeviceDescription)
| extend PrinterDeviceId = tostring(parsed.DeviceId)
| extend VID_PID_Array = split(split(PrinterDeviceId, "\\")[1], "&")
| extend VID_PID = replace_string(strcat(VID_PID_Array[0], '/', VID_PID_Array[1]), 'VID_', '')
| extend VID_PID = replace_string(VID_PID, 'PID_', '')
| extend ClassId = tostring(parsed.ClassId)
| extend VendorIds = tostring(parsed.VendorIds)
| where DeviceDescription == 'USB Printing Support'
| project Timestamp , DeviceId, DeviceName, ActionType, DeviceDescription, VID_PID, ClassId, PrinterDeviceId, VendorIds, parsed
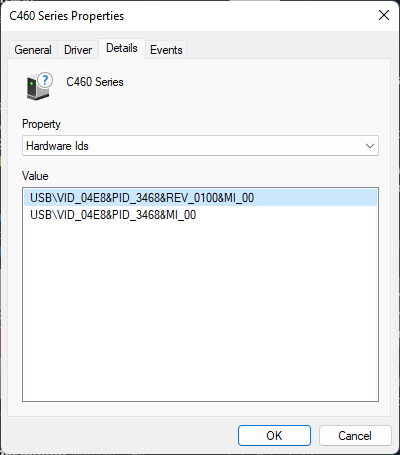
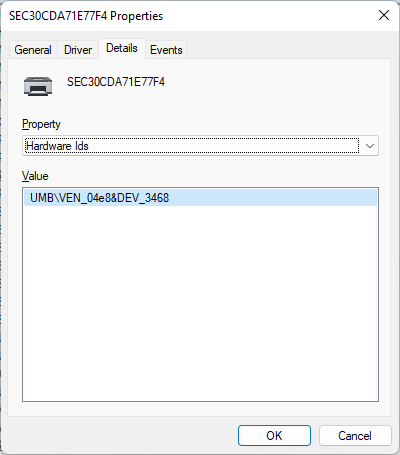
| order by Timestamp descWhen Microsoft Defender for Endpoint is not an option, or a device is available with the required USB-printer, the information can be retrieved locally. The easiest method to retrieve that information, is by going to Device Manager, opening the Properties of the USB-printer and navigating to the Details tab. Select Hardware Ids and the VID/PID information will be shown (as shown in Figure 1). When that same printer is network connected, the information can be found at the same place as VEN/DEV information (as shown in Figure 2).
Note: Keep in mind that at this moment the actual exclusion will only work for USB-connected printers.
Configuring a custom device configuration profile
Applying the Device Control Printer Protection configuration can be achieved by using Microsoft Intune. Some of the required ADMX-backed settings can be applied by multiple different configuration profiles and templates. At this moment the best method would still be to use a custom device configuration profile, as not all settings are available in the Settings Catalog. The following nine steps walk through the creation of that custom device configuration profile that will enable printer protection, creates an exclusion for a specific USB-printer, and is applied to the whole device (not just a specific user).
Important: The settings to enable printer protection are available in the Settings Catalog, as Enable Device Control Printing Restrictions. The user setting is available at Administrative Templates > Control Panel > Printers and the device setting is available at Administrative Templates > Printers.
Note: This configuration uses the shown information of a USB-connected Samsung printer as an example.
- Open the Microsoft Endpoint Manager admin center portal navigate to Devices > Windows > Configuration profiles
- On the Windows | Configuration profiles blade, click Create profile
- On the Create a profile blade, provide the following information and click Create
- Platform: Windows 10 and later
- Profile type: Templates
- Template name: Custom
- On the Basics page, specify a valid Name and optionaly a Description and click Next
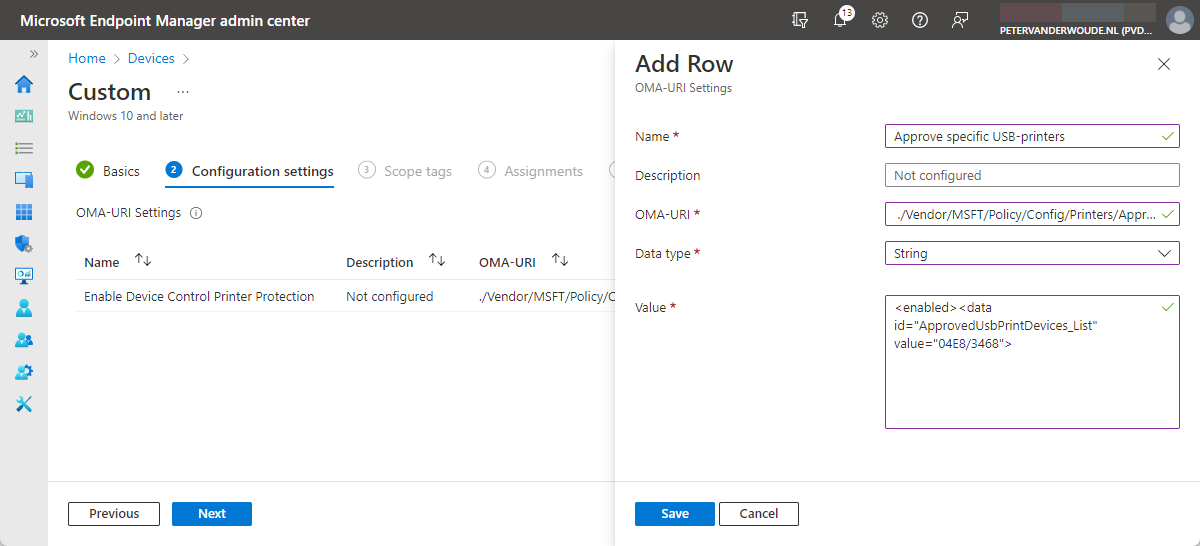
- On the Configuration settings page (see Figure 1), click Add to add rows for the following custom settings and click Next
- OMA-URI setting 1 – This setting is used to prevent users from using non-corporate printers
- Name: Provide a name for the OMA-URI setting to distinguish it from other similar settings
- Description: (Optional) Provide a description for the OMA-URI setting to further differentiate settings
- OMA-URI: Specify ./Vendor/MSFT/Policy/Config/Printers/EnableDeviceControl as value
- Data type: Select String as value
- Value: Specify <enabled/> as value
- OMA-URI setting 2 – This setting is used to specify specific approved USB printers
- Name: Provide a name for the OMA-URI setting to distinguish it from other similar settings
- Description: (Optional) Provide a description for the OMA-URI setting to further differentiate settings
- OMA-URI: Specify ./Vendor/MSFT/Policy/Config/Printers/ApprovedUsbPrintDevices as value
- Data type: Select String as value
- Value: Specify <enabled><data id=”ApprovedUsbPrintDevices_List” value=”04E8/3468”> as value
- On the Scope tags page, configure the required scope tags click Next
- On the Assignments page, configure the required assignment and click Next
- On the Applicability rules page, configure the required applicability rules and click Next
- On the Review + create page, verify the configuration and click Create
Experiencing Device Control Printer Protection
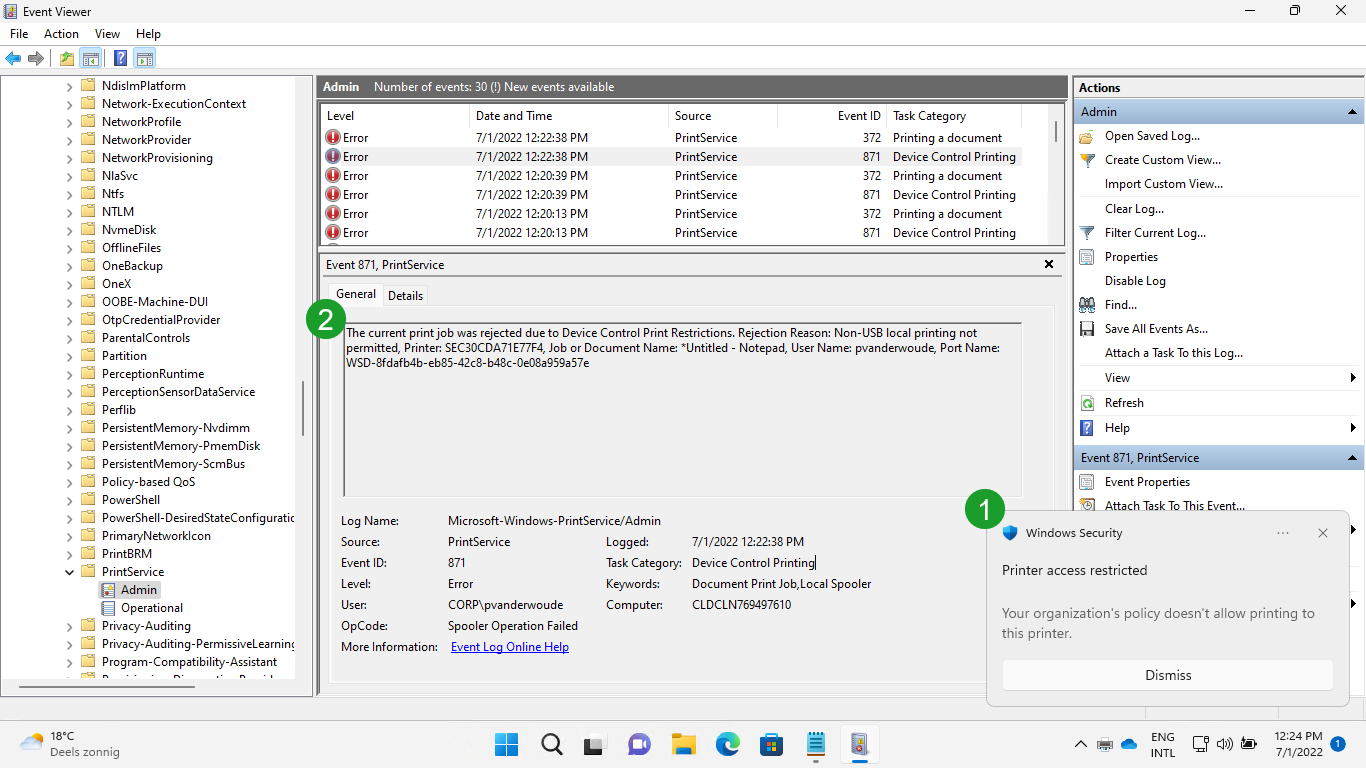
Once the configuration is applied, the behavior of Device Control Printer Protection can be easily experienced. The block experience of the user is the easiest to show, When the user wants to print, to any printer that is not allowed, the user will get the message as shown below in Figure 4 (with number 1). For more information, simply check the events in the Event Viewer (Microsoft > Windows > PrintService > Admin) and look for Event ID 871. That shows information about printjobs that are blocked.
When also relying on Microsoft Defender for Endpoint, it gets even better. In that case, the information is also available in the Microsoft 365 Defender protal. For that scenario, Microsoft also provides a kusto query that can be used to find blocked printjobs in the organization. That query is shown below and can be easily adjusted by adding some additional filters to find more specific details.
DeviceEvents
| where ActionType == 'PrintJobBlocked'
| extend parsed=parse_json(AdditionalFields)
| extend PrintedFile=tostring(parsed.JobOrDocumentName)
| extend PrintPortName=tostring(parsed.PortName)
| extend PrinterName=tostring(parsed.PrinterName)
| extend Policy=tostring(parsed.RestrictionReason)
| project Timestamp, DeviceId, DeviceName, ActionType, InitiatingProcessAccountName, Policy, PrintedFile, PrinterName, PrintPortName, AdditionalFields
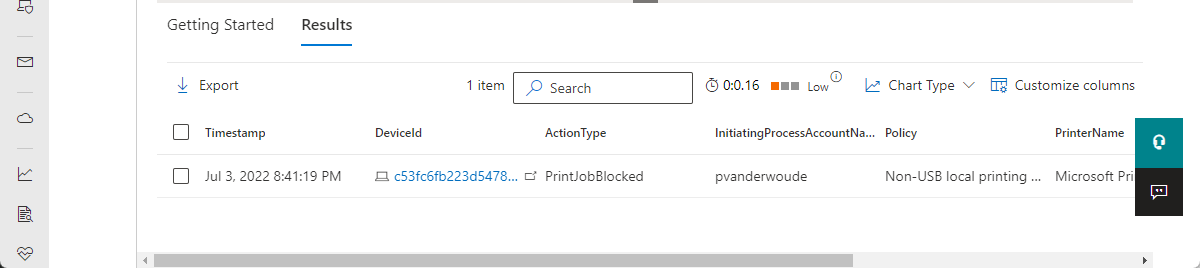
| order by Timestamp descThe results of that provided kusto query are shown below in Figure 5. In this case the blocked print job, that was trying to use a non-USB local printer, was a Microsoft Print to PDF printer. That’s also blocked by using printer protection.
More information
For more information about Device Control Printer Protection, refer to the following docs.
Hi,
What about a tutorial on setting up Microsoft print to pdf, i.e. the settings on the groups and policy XML files. Basically default deny with Group Policy (or Intune) and then using the xml files to allow corporate network printing and allowing of some USB printers and then also allow Microsoft Print To PDF. The Microsoft documentation does not provide good examples, the github XML files seem to have some errors such as Mask 64 when Max is 63. I have seen a lot of people struggling with Microsoft print to PDF and not much info online. Basically the behavior is that it blocks print to pdf (Microsoft Defender) and then the pdf files have 0 bytes.
Thank you for that suggestion! I’ll put it on my list.
Regards, Peter
Any hope on this Pete?
Hi Luca,
Have a look at this: https://learn.microsoft.com/en-us/microsoft-365/security/defender-endpoint/printer-protection-overview?view=o365-worldwide
Regards, Peter
I have read this document 10 times and my eyes are still crossed. Any hope for a deeper dive and better understanding of this function. I am running into the same issue where I need to block printers, but allow print to pdf or print to onenote. Thanks for all that you do.
Still on my todo list…
Regards, Peter
@Hel
Genau eine solche Anleitung und/oder Lösung suche ich.
Problem ist, das die aktivierte GPO mit “List of Approved USB-connected print devices” den Print to PDF (eDoc) sperrt.
Hinzu kommt, dass kein Intune sowie MS Defender im Einsatz steht (nur Fortinet).
Wer eine Lösung kennt, bitte gerne zustellen.
Besten Dank und Gruss
Reto