
This week is all about enhancing inventory reporting with information about the local administrators on the managed Windows 10 devices. This time is not about managing the different local administrators on those Windows 10 devices, but this time is about creating a report that provides insights to the different local administrators that are configured on those Windows 10 devices. The solution to enhance the inventory reporting, relies on PowerShell, Log analytics, Workbooks and the Azure Monitor HTTP Data Collector API. PowerShell is used to gather the information on the local device and uses the Azure Monitor HTTP Data Collector API to write the gathered information to Log analytics. Workbooks are used to visualize the gathered data from Log analytics. This solution is inspired and based on this great solution provided by Jan Ketil Skanke and Sandy Zeng. This post will go through some prerequisites, a portion of the script and the workbook to actual visualize the gathered data.
Prerequisites to gather local administrator inventory information
The prerequisites to gather local administrator inventory information, are the starting point for this post. Those prerequisites are summarized below and are focused on using the earlier mentioned solution as a starting point.
- Create a Log analytics workspace
- Copy the Workspace ID and the Primary key (Settings > Agents management)
- Download the Invoke-CustomInventory.ps1 script
- Adjust the script with the information in the next section
Script to gather local administrator inventory information
The PowerShell script that is used as a starting point can be adjusted with the PowerShell script snippet below to gather local administrator inventory information. That snippet does an inventory of the local administrators and adds them to an array (line 4-9). That array is processed and the information is added in a structured manner – including a few properties from the main script – to a new array (line 11-19). That new structured array will be converted to JSON (line 21) and send to Log analytics (line 23). After adding the snippet, make sure to add the $collectAdminInventory variable and to set the variable in the main script to true to actually use the added snippet. The $responseAdminInventory variable can be used to report about a success in the main script.
if ($collectAdminInventory) {
    $adminLog = "AdminInventory"

    $localAdministrators = @()
    $administratorsGroup = ([ADSI]"WinNT://$env:COMPUTERNAME").psbase.children.find("Administrators")
    $administratorsGroupMembers= $administratorsGroup.psbase.invoke("Members")
    foreach ($administrator in $administratorsGroupMembers) {
        $localAdministrators += $administrator.GetType().InvokeMember('Name','GetProperty',$null,$administrator,$null)
    }

    $adminArray = @()
    foreach ($localAdministrator in $localAdministrators) {
        $tempAdminArray = New-Object System.Object
        $tempAdminArray | Add-Member -MemberType NoteProperty -Name "ManagedDeviceName" -Value "$ManagedDeviceName" -Force
        $tempAdminArray | Add-Member -MemberType NoteProperty -Name "ManagedDeviceID" -Value "$ManagedDeviceID" -Force
        $tempAdminArray | Add-Member -MemberType NoteProperty -Name "ComputerName" -Value "$ComputerName" -Force
        $tempAdminArray | Add-Member -MemberType NoteProperty -Name "LocalAdministrator" -Value "$localAdministrator" -Force
        $adminArray += $tempAdminArray
    }

    $adminjson = $adminArray | ConvertTo-Json

    $responseAdminInventory = Send-LogAnalyticsData -customerId $customerId -sharedKey $sharedKey -body ([System.Text.Encoding]::UTF8.GetBytes($adminjson)) -logType $adminLog
}Note: As an alternative use this PowerShell script snippet in combination with the PowerShell script example documented here. In that case, simply remove the additional properties in the new structured array and only focus on the local administrators and the device. An example of that example PowerShell script with the shown PowerShell script snippet can be downloaded here.
After creating the PowerShell script, use Proactive remediations, of Endpoint analytics, to distribute the script as a script package. Configure the script as the detection script and configure it to run in 64-bit. Using a detection script, has the advantage over the standard script functionality as it enables the configuration of a schedule. That schedule can be used to configure the frequency of how often the script has to run.
Workbook to display local administrator inventory information
The Workbook that contains the local administrator inventory reporting information – that is available for download here – is created with three different sections. A section with the information in time, a section with summarized information displayed in top 3 and a section with device specific information.
Section 1 – Overview of local administrators per device over time
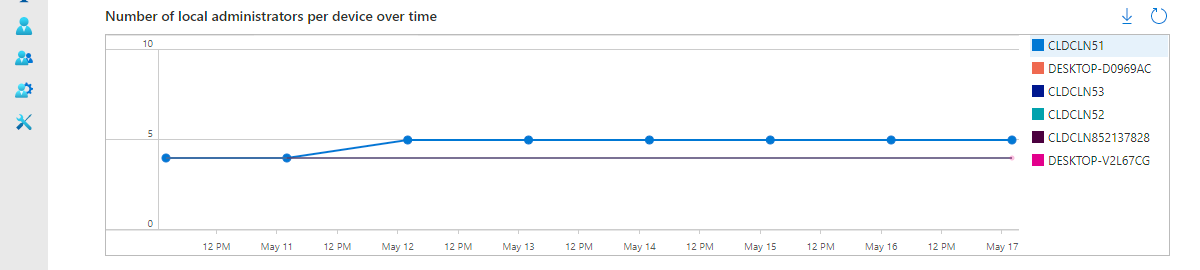
The first section provides an overview of the number of local administrators per device over time. That provides an overview, as shown below in Figure 1, with a timeline chart for the number of local administrators. That chart can help with detecting anomalies, as changes are quickly shown in the chart. To achieve that chart, a distinct count is used for the local administrators and the data points are set once a day per computer. That results in the kusto query as shown below.
AdminInventory_CL
| summarize dcount (LocalAdministrator_s) by bin(TimeGenerated,1d), ComputerName_s
| render timechart 
Figure 1: Local administrator information in time
Section 2 – Overview of summarizations of device and local administrator statistics
The second section provides an overview of the number of local administrators per device and an overview of the number of devices with the same local administrator. That provides an overview, as shown below in Figure 2, with two bar charts for displaying that information. Those charts can help with detecting anomalies, as the extremes are quickly shown in the charts. The first chart, that is shown below in Figure 2 on the left, is created by aggregating the local administrator information and simply counting the local administrators per device. That results in the kusto query as shown below.
AdminInventory_CL
| summarize arg_max(TimeGenerated, *) by ManagedDeviceID_g, LocalAdministrator_s
| summarize NumberOfAdministrators = count (LocalAdministrator_s) by ComputerName_s
| top 3 by NumberOfAdministrators
| render barchart
The second chart, that is shown below in Figure 2 on the right, is also created by aggregating the local administrator information and than simply counting the devices with the same local administrator. That results in the kusto query as shown below.
AdminInventory_CL
| summarize arg_max(TimeGenerated, *) by ManagedDeviceID_g, LocalAdministrator_s
| summarize NumberOfDevices = count (ComputerName_s) by LocalAdministrator_s
| top 3 by NumberOfDevices asc
| render barchart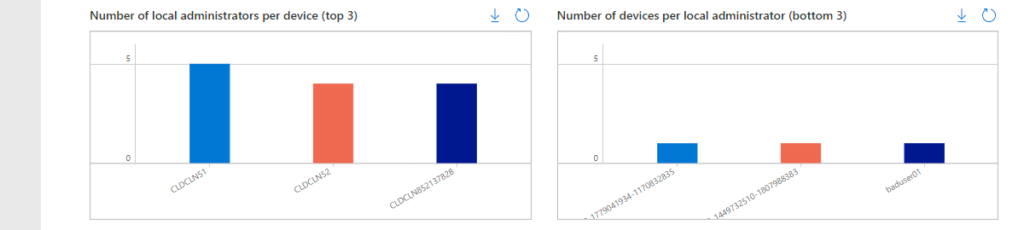
Figure 2: Specific stats for local administrators and devices

Section 3 – Overview of device specific local administrator information
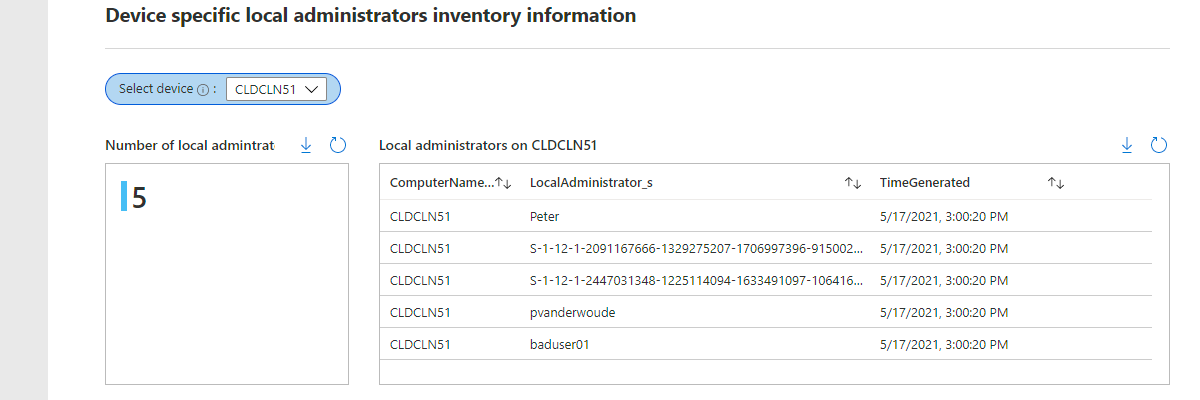
The third section provides an overview of the local administrator information of a specific device, by selecting that specific device. That provides an overview, as shown below in Figure 3, with a total count of local administrators and a table with the different local administrators. That table provides an overview of the selected device. The selection is created by adding a parameter with the different computer names that have send local administrator information. That results in the kusto query as shown below.
AdminInventory_CL
| summarize arg_max(TimeGenerated, *) by ManagedDeviceID_g
| project ComputerName_s
The total count, that is shown below in Figure 3 on the left, is created by aggregating the local administrator information for the selected device and simply counting the local administrators. That results in the kusto query as shown below.
AdminInventory_CL
| where ComputerName_s == "{Device}"
| summarize arg_max(TimeGenerated, *) by ManagedDeviceID_g, LocalAdministrator_s
| summarize AdminCount = count (LocalAdministrator_s)
The table, that is shown below in Figure 3 on the right, is also created by aggregating the local administrator information for the selected device and than simply projecting that information. That results in the kusto query as shown below.
AdminInventory_CL
| where ComputerName_s == "{Device}"
| summarize arg_max(TimeGenerated, *) by ManagedDeviceID_g, LocalAdministrator_s
| project ComputerName_s, LocalAdministrator_s, TimeGenerated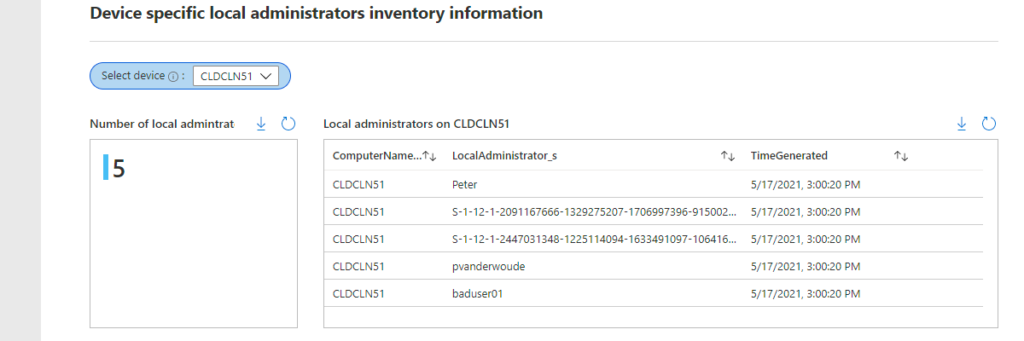
Figure 3: Device specific local administrator information
Complete overview of the workbook to display local administrator inventory information
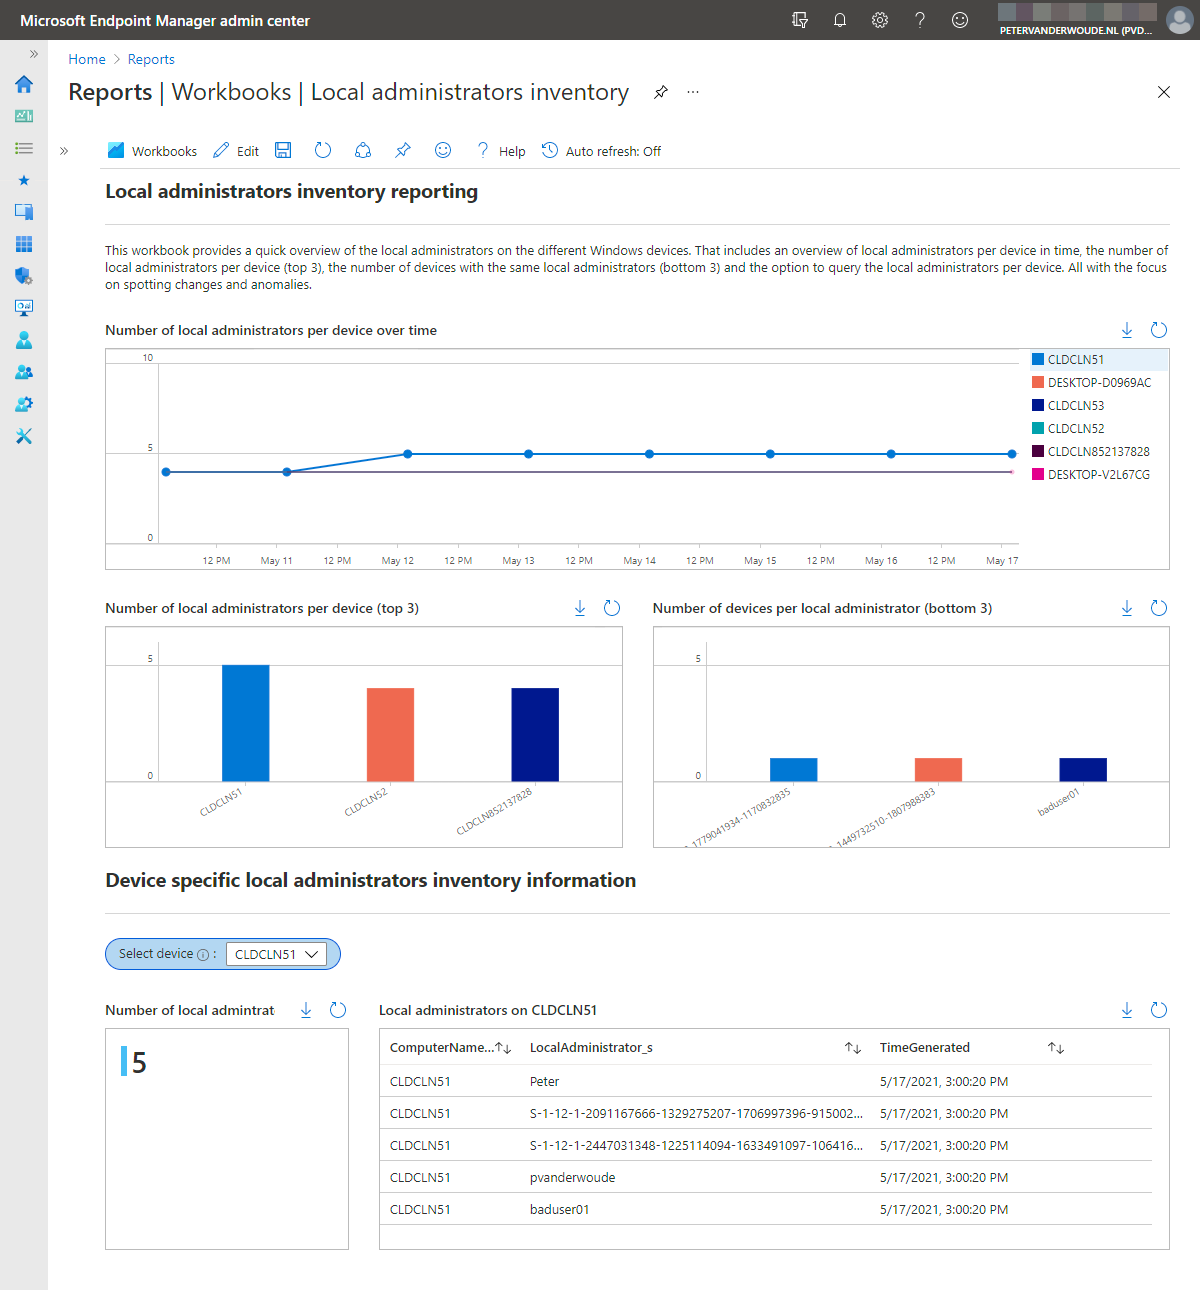
The complete overview of the Workbook is shown below in Figure 4. That figure provides a complete view of the different sections of the Workbook, including a short text and a heading as an introduction.
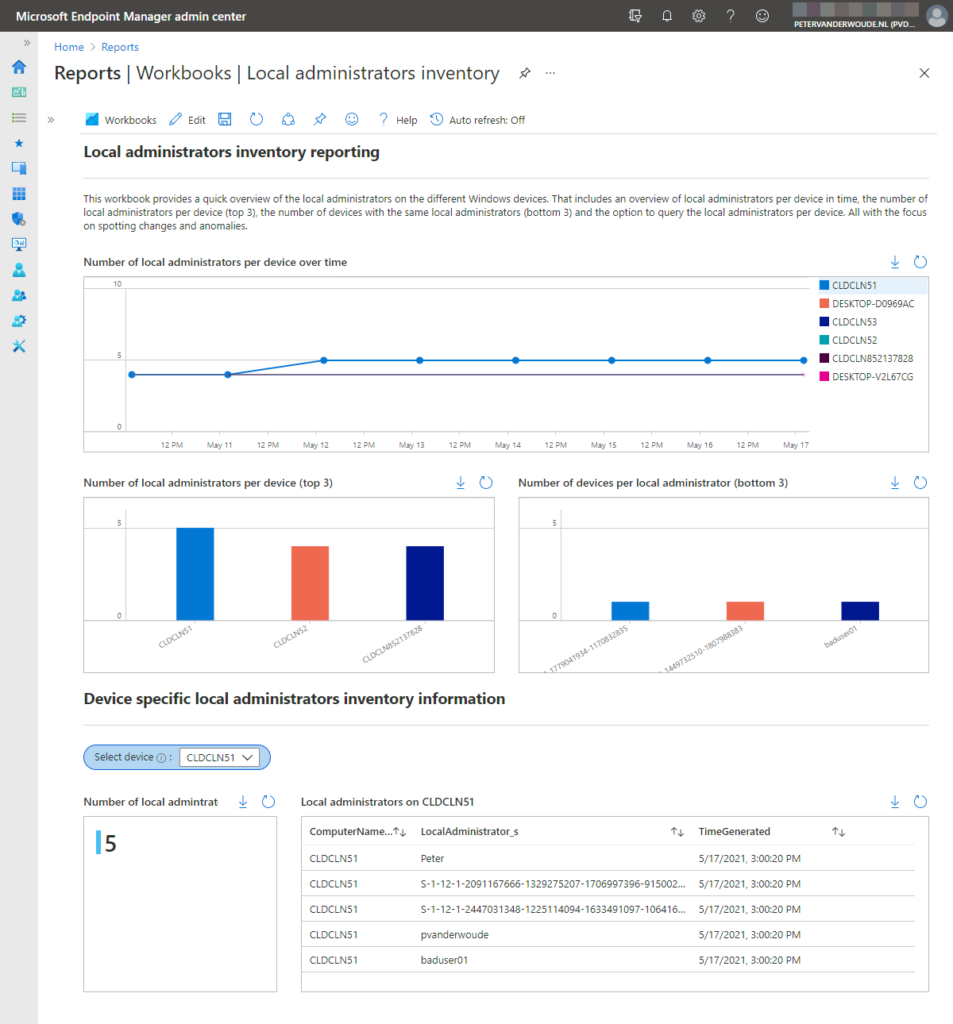
Figure 4: Complete workbook with local administrator inventory information
More information
For more information about the different subjects that are described in this post, refer to the following docs.
Hi peter,
I have the proactive script running and pulling data into my log analytics workspace, but when I try and create the workbook using yours i get this error when clicking Done Editing under the Advanced Editor
Cannot load from JSON: This item type is 3 (query), but the JSON provided was undefined (Unknown)
Any help would be much appreciated
Thanks
Finn
Hi Nuttykind,
Did you add the JSON on the right location?
Regards, Peter
Hello Peter, I’m getting the same Type 3 error as Nuttykind when adding the linked workbook JSON code under the advanced editor in my log analytic workspace\workbook space . I confirmed I have data flowing from clients properly. Thanks
That sounds like you went to the Advanced Editor of the initial query of a new Workbook. You need to go a bit higher on the screen to the Workbook controls and go to the Advanced Editor. That’s simply displayed as “” and is located between the pin icon and the smiley icon.
Regards, Peter
Hi Peter,
Looks very interesting. I am evaluating this at the moment for our company.
What I am not sure about is if an existing Log Analystics Workspace can be used (we have one for Update Compliance) or that it’s better to create a separate Log Analystics Workspace for this ?
Hi Johan,
You could reuse an existing workspace, but I’m not sure that the Update Compliance workspace would be the best option. Also, not sure if the solution would still be free for use, when using the workspace for other data.
Regards, Peter
Hello Peter,
I am trying to implement this script and workbook.
However, when adding the code for the workbook, I get an error: You do not have authorization to make this request.
I see a couple of references to subscriptions in the workbook code, could that be the issue?
I have implemented workbooks from the mentioned AppInventory/DeviceInventory from JanKetilSkanke, and that works. I cannot see references to subscriptions in that workbook sample code.
Could you please assist?
Switched all the references to subscriptions, and that seems to fixed it.
Might mention it for workbook newbies like me 🙂
Thank you for the update and great to hear that you already figured it out.
Regards, Peter
Hello,
The link to the script (Invoke-CustomInventory.ps1) hosted in github is broken, can you fix?
Hi Robson,
That’s a script of the boys and girls of msendpointmgr.com. I’m affraid they moved it..
Regards, Peter
“You do not have authorization to make this request. Please check your permissions on the selected resources.”
Well, I do have Owner rights = full access
So no idea what else to do
Hi sebus,
When are you receiving that message?
Regards, Peter
Hi Peter,
I have got the same error message when viewing the workbook from the Intune Portal. I have created a custom role to view the workbook but so far I cannot see anyting as its throwing the message ““You do not have authorization to make this request. Please check your permissions on the selected resources.”
I selected the following permissions for the custom role:
Microsoft.OperationalInsights/workspaces/query/IntuneAuditLogs/read
Microsoft.OperationalInsights/workspaces/query/IntuneDeviceComplianceOrg/read
Microsoft.OperationalInsights/workspaces/query/IntuneDevices/read
Microsoft.OperationalInsights/workspaces/query/IntuneOperationalLogs/read
Microsoft.Insights/Logs/IntuneAuditLogs/Read
Microsoft.Insights/Logs/IntuneDeviceComplianceOrg/Read
Microsoft.Insights/Logs/IntuneOperationalLogs/Read
Microsoft.OperationalInsights/workspaces/query/Tables.Custom/read
Microsoft.OperationalInsights/workspaces/query/read
Microsoft.OperationalInsights/workspaces/read
Microsoft.Insights/Workbooks/Read
What other permissions do I need?
Regards,
Jenne
Hi Jenne,
Do you also have permissions on the subscription and the Log Analytics workspace?
Regards, Peter
Hi Peter, yes I have permissions for that. I managed to resolve, the subscription ID was wrong so I changed the complete url. (a few times on the workbook) That fixed the problem. Thanks for the reply.
Jenne
Ah, thanks for letting us know!
Regards, Peter