
This week continues the journey through Windows Hello for Business. The last weeks were all about requiring the use of Windows Hello for Business, while this week is all about requiring the use of something extra with Windows Hello for Business. That something extra is a second unlock factor. By default, Windows requires the use of a single authentication factor to verify the identity of a user and to unlock the device. And even though the construction of Windows Hello for Business can be considered multi-factor authentication, as it combines something that you have (e.g. a device with a hardware TPM) with something that you know (e.g. a PIN) or with something that you are (e.g. a fingerprint), the unlock factor of the device with hardware TPM can be just a PIN. That PIN is device specific, but it can be a potential threat (e.g. via shoulder surfing) that can be relatively easily mitigated. Even with standard Windows functionality. That standard functionality is extending Windows Hello for Business with multi-factor unlock. Multi-factor unlock enables organizations to require a combination of credential providers and trusted signals. This post will provide an introduction to Windows Hello for Business multi-factor unlock, the configuration options and the steps for using Microsoft Intune to apply the configuration.
Introducing Windows Hello for Business multi-factor unlock
Windows Hello for Business multi-factor unlock provides organizations with the ability to require a combination of credential providers to verify the identity of the user and to unlock the device. That combination of credential providers, however, is limited to a specific list of supported credential providers. That list of supported credential providers is summarized in the table below, including the default usage and the configuration options within the first and second unlock factors. Third-party credential providers are not supported as unlock factor. Almost all of the different credential providers can be configured as the first and the second unlock factor. It is, however, important to keep in mind that any credential provider can only be used to satisfy one unlock factor. Using, for example, PIN to satisfy the first and second unlock factor is not possible.
| Credential Provider | CLSID | Default | Configuration option |
|---|---|---|---|
| PIN | {D6886603-9D2F-4EB2-B667-1971041FA96B} | First and second unlock factor | First and second unlock factor |
| Fingerprint | {BEC09223-B018-416D-A0AC-523971B639F5} | First unlock factor | First and second unlock factor |
| Facial recognition | {8AF662BF-65A0-4D0A-A540-A338A999D36F} | First unlock factor | First and second unlock factor |
| Trusted signal | {27FBDB57-B613-4AF2-9D7E-4FA7A66C21AD} | Second unlock factor | Second unlock factor |
Another interesting part of Windows Hello for Business multi-factor unlock, is the trusted signal credential provider. The trusted signal credential provider can only be used to satisfy the second unlock factor and can use any of the following signals.
- Bluetooth – Use a connected bluetooth device to satisfy the trusted signal (available with Windows 10 version 1709 and later). That signal enables the IT administrator to configure a bluetooth class of devices that can be used as the second unlock factor. That configuration requires users to have that specified bluetooth device configured and connected to their device, to satisfy the second unlock factor. Common used example is phone (512).
- IP configuration – Use the IP configuration to satisfy the trusted signal (available with Windows 10 version 1709 and later). That signal enables the IT administrator to specify IP configurations that can be used as the second unlock factor. That configuration requires users to have a specific IP configuration on their device, that can often be related to a specific location, to satisfy the second unlock factor. Common used examples are the network prefix, the gateway, the DHCP server, the DNS server and the DNS suffix.
- Wi-Fi – Use the wireless connection to satisfy the trusted signal (available with Windows 10 version 1803 and later). That signal enables the IT administrator to specify wireless network configurations that can be used as the second unlock factor. That configuration requires users to be connected to a specific wireless network, that can often be related to a specific location, to satisfy the second unlock factor. Common used examples are the ssid, the bssid, the network security and the trusted root CA.
The trusted signals can be configured by configuring signal rules in XML. That XML should be properly formatted in a single line. Each signal rule contains at least a rule element like this <rule schemaVersion="1.0"> </rule> and each rule element contains one or more signal elements. Those signal elements describe the actual signal configuration. When the IT administrator wants to allow multiple signal elements, a rule element can contain multiple signal elements. The actual configuration depends on if multiple signals should be required or if only one of the signals should be required. When multiple signals should be required, the signal elements are within an and element like this <rule schemaVersion="1.0"> <and> </and> </rule>, and when only one signal should be required, the rule elements are separated with a comma like this <rule schemaVersion="1.0"> </rule>,<rule schemaVersion="1.0"> </rule>. The different configuration options of the signal elements are described in the table below.
| Signal | Element | Description | Example |
|---|---|---|---|
| bluetooth | – | The bluetooth signal element describes the bluetooth signal and attributes, in which the classOfDevice attribute describes the device in the bluetooth protocol (possible values: 0, 256, 512, 768, 1024, 1280, 1536, 1792, 2048, 2304, 7936). | <signal type="bluetooth" scenario="Authentication" classOfDevice="512" rssiMin="-10" rssiMaxDelta="-10"/> |
| ipConfig | – | The ipConfig signal element describes the IP configuration and contains one ore more IP configuration elements. | <signal type="ipConfig"> </signal> |
| ipConfig | ipv4Prefix | The optional ipv4Prefix element describes the network prefix and can only exist once in the signal element (also available as ipv6Prefix). | <ipv4Prefix>192.168.20.0/24</ipv4Prefix> |
| ipConfig | ipv4Gateway | The optional ipv4Gateway element describes the gateway and can only exist once in the signal element (also available as ipv6Gateway). | <ipv4Gateway>192.168.20.1</ipv4Gateway> |
| ipConfig | ipv4DhcpServer | The optional ipv4DhcpServer element describes the DHCP server and can only exist once in the signal element (also available as ipv6DhcpServer). | <ipv4DhcpServer>192.168.20.1</ipv4DhcpServer> |
| ipConfig | ipv4DnsServer | The optional ipv4DnsServer element describes the DNS server and can exist multiple times in the signal element (also available as ipv6DnsServer). | <ipv4DnsServer>192.168.20.1</ipv4DnsServer> |
| ipConfig | dnsSuffix | The optional dnsSuffix element describes the DNS suffix and can exist multiple times in the signal element. | <dnsSuffix>corp.petervanderwoude.nl</dnsSuffix> |
| wifi | – | The wifi signal element describes the Wi-Fi configuration and contains one ore more Wi-Fi elements. | <signal type="wifi"> </signal> |
| wifi | ssid | The required ssid element describes the name of the wireless network and can only exist once in the signal element. | <ssid>corpwifi</ssid> |
| wifi | bssid | The optional bssid element describes the mac address of the wireless access point and can only exist once in the signal element. | <bssid>34-cd-56-ff-f6-57</bssid> |
| wifi | security | The required security element describes the security of the wireless network (supported values: Open, WEP, WPA-Personal, WPA-Enterprise, WPA2-Personal, WPA2-Enterprise) and can only exist once in the signal element. | <security>WPA2-Enterprise</security> |
| wifi | trustedRootCA | The optional trustedRootCA element describes the thumbprint of the trusted root certificate of the wireless network and can only exist once in the signal element. | <trustedRootCA>b3 02 45 bb 33 4b b3 4b 5b 89 b3 bb 86 b3 45 3b 4c 33 5b cc</trustedRootCA> |
| wifi | sig_quality | The optional sig_quality element describes the signal strength of the wireless network and can only exist once in the signal element. | <sig_quality>75</sig_quality> |
Configuring Windows Hello for Business multi-factor unlock
When looking at the configuration of Windows Hello for Business multi-factor unlock, the PassportForWork CSP can help. That CSP contains the DeviceUnlock node in the device configuration and is available with Windows 10 version 1803 and later. That node contains the following settings nodes that should be configured for Windows Hello for Business multi-factor unlock.
- GroupA – This node contains a list with CLSIDs, comma separated, that are allowed as the first unlock factor
- GroupB – This node contains a list with CLSIDs, comma separated, that are allowed as the second unlock factor
- Plugins – This node contains the signal rules, in XML, that configure the trusted signals
Important: The XML should not be nicely formatted with new lines and tabs, but formatted in a single line.
Those settings of the PassportForWork CSP are currently not available via the Settings Catalog and still require the use of a custom profile with OMA-URI settings. The following 10 steps walk through the configuration of a custom profile with the required OMA-URI settings. Those steps configure PIN, fingerprint and facial recognition as the first unlock factor options, PIN and trusted signal as the second unlock factor options, and bluetooth connected phone or network prefix as trusted signal rules.
- Open the Microsoft Endpoint Manager admin center portal navigate to Devices > Windows > Configuration profiles
- On the Windows | Configuration profiles blade, click Create profile
- On the Create a profile blade, provide the following information and click Create
- Platform: Windows 10 and later
- Profile type: Templates
- Template name: Custom
- On the Basics page, provide the following information and click Next
- Name: Provide a name for the custom profile to distinguish it from other similar profiles
- Description: (Optional) Provide a description for the custom profile to further differentiate profiles
- Platform: (Greyed out) Windows 10 and later
- Profile type: (Greyed out) Custom
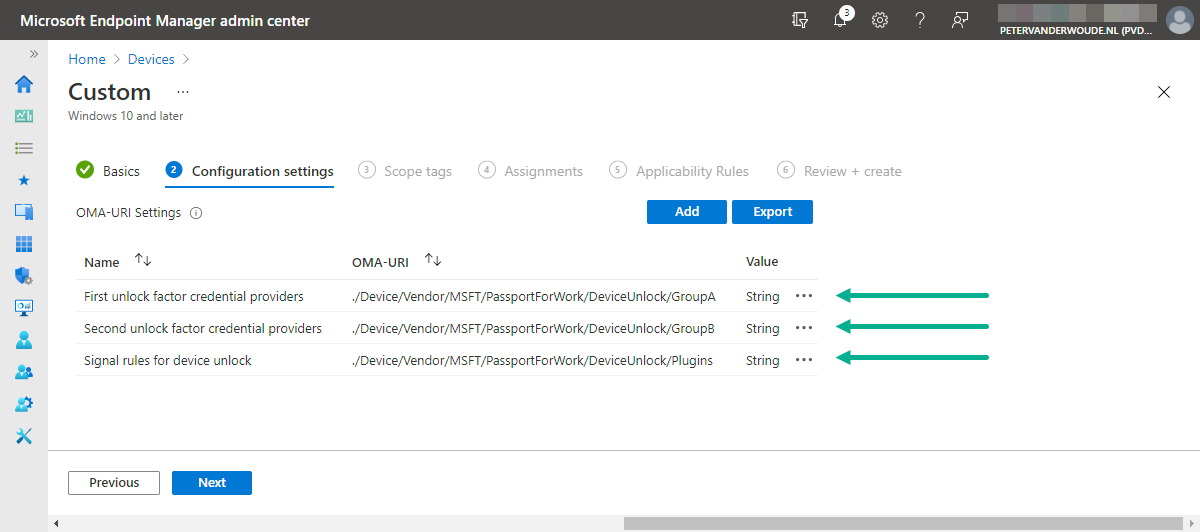
- On the Configuration settings page, see also Figure 1, click Add to add a row for the following custom settings and click Next
- OMA-URI setting 1 – This setting is used to define the first unlock factor credential providers
- Name: Provide a name for the OMA-URI setting to distinguish it from other similar settings
- Description: (Optional) Provide a description for the OMA-URI setting to further distinguish it from other similar settings
- OMA-URI: Specify ./Device/Vendor/MSFT/PassportForWork/DeviceUnlock/GroupA as value to define the first unlock factor credential providers
- Data type: Select String
- Value: Specify {D6886603-9D2F-4EB2-B667-1971041FA96B},{BEC09223-B018-416D-A0AC-523971B639F5},{8AF662BF-65A0-4D0A-A540-A338A999D36F} as value to configure PIN, fingerprint and facial recognition as the allowed first unlock factor credential providers
- OMA-URI setting 2 – This setting is used to define the second unlock factor credential providers
- Name: Provide a name for the OMA-URI setting to distinguish it from other similar settings
- Description: (Optional) Provide a description for the OMA-URI setting to further distinguish it from other similar settings
- OMA-URI: Specify ./Device/Vendor/MSFT/PassportForWork/DeviceUnlock/GroupB as value to define the second unlock factor credential providers
- Data type: Select String
- Value: Specify {D6886603-9D2F-4EB2-B667-1971041FA96B},{27FBDB57-B613-4AF2-9D7E-4FA7A66C21AD} as value to configure PIN and trusted signal as the allowed second unlock factor credential providers
- OMA-URI setting 3 – This setting is used to define the signal rules for device unlock
- Name: Provide a name for the OMA-URI setting to distinguish it from other similar settings
- Description: (Optional) Provide a description for the OMA-URI setting to further distinguish it from other similar settings
- OMA-URI: Specify ./Device/Vendor/MSFT/PassportForWork/DeviceUnlock/Plugins as value to define the signal rules
- Data type: Select String
- Value: Specify <rule schemaVersion=”1.0″> <signal type=”bluetooth” scenario=”Authentication” classOfDevice=”512″ rssiMin=”-10″ rssiMaxDelta=”-10″/> </rule>,<rule schemaVersion=”1.0″> <signal type=”ipConfig”> <ipv4Prefix>192.168.20.0/24</ipv4Prefix> </signal> </rule> as value to require a connected bluetooth phone or a specific network prefix as trusted signal

Figure 1: Configuring the first and second unlock factor credential providers
- On the Scope tags page, configure the required scope tags click Next
- On the Assignments page, configure the required assignment and click Next
- On the Applicability rules page, configure the required applicability rules and click Next
- On the Review + create page, verify the configuration and click Create
Experiencing Windows Hello for Business multi-factor unlock
Experiencing the behavior with Windows Hello for Business multi-factor unlock is pretty straight forward. Simply start a configured Windows 10 device, or Windows 11 device, and sign-in with one of the available allowed first unlock factor credential providers. When a bluetooth phone is connected to the device, or the device is connected to the expected network, the second unlock factor will automatically be verified. Figure 3 shows an example of a Windows 10 device and Figure 4 shows an example of a Windows 11 device.
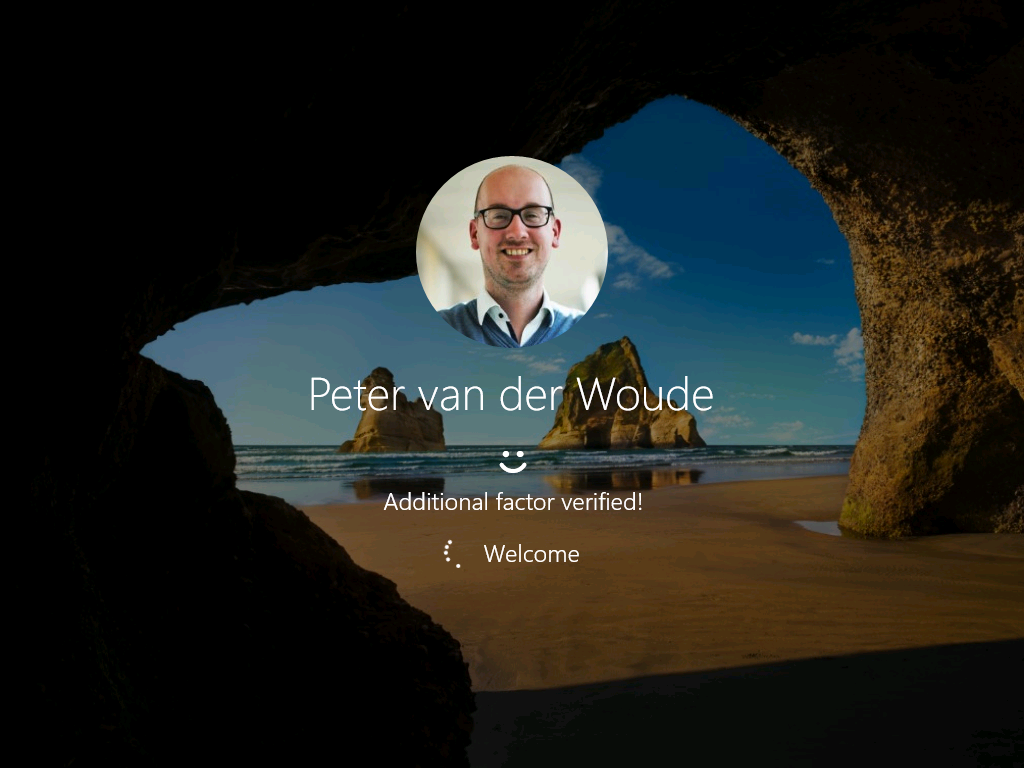
Figure 2: User experience when requiring multi-factor unlock on Windows 10

Figure 3: User experience when requiring multi-factor unlock on Windows 11
Important: Keep in mind that multi-factor unlock is an extension on Windows Hello for Business. That means that the request for the second unlock factor will only come when using one of the specified first unlock factors. When for example using username-password, or FIDO2 security keys, there will be no request for a second unlock factor. Make sure to align the available credential provider with the required behavior.
More information
For more information about Windows Hello for Business multi-factor unlock and and the different configuration options, refer to the following docs.
We are experiencing users forgetting more and more their passwords because of the use of Windows Hello for Business. Is there an easy way of introducing their account passwords as an additional needed factor once a week or similar so that they keep using them?
Hi David,
There not something like that in combination with Windows Hello. Also, isn’t that what you want to achieve? The user not knowing their password, means that they don’t use it anymore.
Regards, Peter
Aren’t there still instances though where Windows Hello for Business won’t pass through the token and an application will still require a password? Sorry, I’m not sure about the terminology.
Hi Pete,
That completely depends on the authentication methods that are used by the application.
Regards, Peter
Rdp for instance.
I really hope the will be alle to fix this for key trust deployment.
Hello Peter,
The second factor in combination with pin does not work.
the login screen with pin saying second factor required for this but it is not accepted while my mobile phone is connected and dynamic lock also is working when i disable bluetooth on my phone.
Also you say this:
“Specify {D6886603-9D2F-4EB2-B667-1971041FA96B},{27FBDB57-B613-4AF2-9D7E-4FA7A66C21AD} as value to configure PIN and trusted signal as the allowed second unlock factor credential providers”
Why do we need to specify the pin again as second factor? cause you say that any credential provider can only be used to satisfy one unlock factor and whe are using it already as the first unlock factor am i right?
Hi H. Huibers,
Yes, in this example I’ve configured PIN as both factors. Main reason is to provide combination options to the user. And yes, the user can only use the PIN as a single factor.
Regards, Peter
Hello Peter,
I configured a policy in Intune with trusted signal as 2nd factor but it is nog working with bluetooth phone and also not with wifi ssid. Kan aanvullende factor niet verifieren. Do you know what can be wrong? I use my phone also for dynamic lock and that is working fine.
Thanks in advance!
Hi Bauke,
That sounds like a misconfigured signal rules XML. Did you verify your configuration?
Regards, Peter
Hello Peter,
Thanks for your reply! This is the xml we have in our config:
We just copied and paste it in intune endpoint manager.
I think it was a problem with the “” characters and copy and paste. It is working now!
Thank you Peter!
Thank for the update Bauke. That’s a common challenge with the quotes and copy-paste.
Regards, Peter
Hello there,
I have a stupid question, but I can’t find an answer:
When creating the profile to enable Multifactor Unlock, on which type of group do we have to assign the profile: users group or devices group? I would think devices but…
Thanks. 🙂
Hi Dominique,
The most logical would be to assign on device group, as the policy otherwise might not be applied in time for the first usage.
Regards, Peter
Hi i’m trying to use windows hello MFA
we use pin for 1e unlock and finger for 2e unlock.
but after 1 logon it does nog work annymore and we can not login, keep asking for pin
Hi Kees,
What does your configuration look like?
Regards, Peter
Hey Peter!
Thanks for this guide, it gave me exactly what I needed.
A quick question, once a user boots up his computer he is presented with the 2FA.
However, after using the computer and locking the screen/putting the computer to sleep. He is no longer required to present this 2FA but a password is enough.
Is this something we can prevent and force the user to always need these two methods?
I’ve used the two settings you provided (Without Signal)
Hi Amit,
You can combine that with the configuration to require Windows Hello for Business.
Regards, Peter
Hey Peter,
So I’ve done this previously with my testing environment and everything seemed to be working properly.
However, I’ve deployed this to an existing environment by setting up the policy with the 2FA and a policy to requires the user to go through the windows hello PIN configuration.
PIN configuration went well and is still configured. however, when locking the screen/rebooting etc. the user is receiving a message saying “Your organization requires additional sign-in security. To set it up, go to Sign-in options in settings.
If you go to sign in options user is presented with either password/pin. but is not required to use them both.
Nothing interesting is showing in Settings.
Not sure why this is happening and what can be done to change that. but if you have any experience of dealing with this, it would be awesome!
Hi Amit,
What configuration are you using for the multi-factor requirement?
Regards, Peter
I’m Using these:
OMA-URI setting 1
OMA-URI: ./Device/Vendor/MSFT/PassportForWork/DeviceUnlock/GroupA
Data type: Select String
Value: {D6886603-9D2F-4EB2-B667-1971041FA96B},{BEC09223-B018-416D-A0AC-523971B639F5},{8AF662BF-65A0-4D0A-A540-A338A999D36F}
OMA-URI setting 2
OMA-URI: ./Device/Vendor/MSFT/PassportForWork/DeviceUnlock/GroupB
Data type: String
Value: Specify {D6886603-9D2F-4EB2-B667-1971041FA96B},{27FBDB57-B613-4AF2-9D7E-4FA7A66C21AD}
Just now i realize this notice you had at the bottom which is exactly what I am encountering:
Important: Keep in mind that multi-factor unlock is an extension on Windows Hello for Business. That means that the request for the second unlock factor will only come when using one of the specified first unlock factors. When for example using username-password, or FIDO2 security keys, there will be no request for a second unlock factor. Make sure to align the available credential provider with the required behavior.
Is there anyway to circumvent that and cause the password to not work as a single authentication?
Hi Amit,
In that case you might want to look at requiring the use of WHfB for sign in.
Regards, Peter
Thanks for the guide! This was great. Quick question.
After setting the Multi-factor unlock with Intune. And then i remove the device from the groups that applies the multi-factor unlock. The device is still asking for Multi factor unlock even if the policy is not applied anymore.
Is there a workaround to get rid of the config applied ?
Hi Alex,
That sounds like the registry keys are still in place. You might want to start there.
Regards, Peter
Hello Pter,
Multi factor unlock is perfect, but i have a question :
When the user is receiving a message saying “Your organization requires additional sign-in security, and click on “add factor” they are no pop to configure this second factor. They need to sign in with their password, then configure facial reconaissance or fingerprint, then logoff and logon again to use the Windows Hello multi factor.
Do you know if it’s possible to enable the user to configure 2 Windows hello factor before ? Or configure the second factor on the login script ? because that’s mean that every user need to configure second factor themselves before deploying the multi factor.
Many thanks, regards, Nicolas
Hi Nicolas,
The user must configure the different factors during the initial setup. Anything after that would require custom scripting creativity to make sure that you can still apply the configuration.
Regards, Peter
Hello Peter, thanks, but during the initial setup, we can only choose a pin. A biometric Factor is not asked. Did i miss something ?
Hi Nicolas,
Make sure that you allow biometric authentication in your Windows Hello configuration.
Regards, Peter
Hello peter. Its the case.
Hi Nicolas,
When your hardware is supported it should ask to (also) configure facial recognition and/or fingerprint.
Regards, Peter
Hi Peter,
Is it possible to implement the multifactor unlock and at the same time activate the “Require Windows Hello sign-in Microsoft accounts” option, which you have in Windows Hello, so that it is never possible to bypass the multi-factor unlock by using the Microsoft 365 password?
Kr,
Søren
Hi Søren,
That’s possible, but keep in mind that it also prevents other users from signing in to the device. It requires a good timing of the configurations.
Regards, Peter
Hi Peter,
Is there an easy way of introducing their account passwords to be forced on their first login? If not, can we use it as an additional needed factor with a particular frequency or time interval?
Many Thanks,
Osborne
Hi Osborne,
Not really, as the user by default has the option to choose between Windows Hello and username-password. At this moment, you can’t combine those.
Regards, Peter
Hi Peter,
I want to configure password as a first factor and PIN/facial recognition/Finger print as second factor, is it possible to achieve this. I have followed your article and first factor i was added password value, still its not working as expected. When I enter password, system will directly login but when I select PIN as first factor and facial/finger as second factor, its working multi factor authentication as explained in your article. could you please help and suggest on password as first factor
Hi P,
That’s not possible. You can’t combine this with the password option. If you want that type of MFA, you really have to look at third-party solutions.
Regards, Peter
Hi Peter, is it possible to enable multifactor authentication (sms, calling, authenticator app) after logging in with the pincode?
Hi Rick,
For this configuration you can only use Windows Hello signals. So, only the described options.
Regards, Peter
Hi Peter,
I have a question about this. I have configured my first unlock factor as a fingerprint/face and second factor as pin only. The issue I am coming across is that if the first factor of unlock cannot be satisfied (for example, face/fingerprint not found after a period of time) it goes to second factor. Then when the second factor is satisfied with the correct pin it asks for a pin again and logs you in. I am wondering is there a way to ensure the first factor is set to an indefinite time frame till it is satisfied before going into the second unlock factor stage?
Below are the settings I have at the moment.
OMA-URI setting 1
OMA-URI: ./Device/Vendor/MSFT/PassportForWork/DeviceUnlock/GroupA
Data type: Select String
Value: {BEC09223-B018-416D-A0AC-523971B639F5},{8AF662BF-65A0-4D0A-A540-A338A999D36F}
OMA-URI setting 2
OMA-URI: ./Device/Vendor/MSFT/PassportForWork/DeviceUnlock/GroupB
Data type: String
Value: Specify {D6886603-9D2F-4EB2-B667-1971041FA96B}
Thank you.
Hi Eldho,
I’ve heard that behavior before, but theoretically (according to the docs) it shouldn’t be possible. The docs mention “Whichever factor you use to satisfy the first unlock factor can’t be used to satisfy the second unlock factor. Each factor can therefore be used exactly once.”. So, from that perspective I would advice to contact Microsoft about this behavior.
Regards, Peter