The last few weeks – before my vacation – were all around Windows Hello for Business. And especially around unlocking devices by using Windows Hello for Business functionalities. This week, however, is a little different. This week is around the automatic lock functionality of Windows Hello for Business. That functionality is Windows Hello for Business dynamic lock. Dynamic lock enables organizations to automatically lock devices when users step away from their device. That automatic lock can be achieved by using the bluetooth signal of a paired phone. The device will automatically lock when the signal of that paired phone falls below the configured minimum value. Of course, automatically locking the device doesn’t prevent users from forgetting to lock their device, but it does prevent the device from being left unlocked for a long time. That makes the configuration of dynamic lock a nice addition to the widely known policy configurations for automatically locking devices after inactivity of the user. The main reason for that is that the policy only relies on the activity of the user and isn’t aware of the distance between the user and the device. This post will go through the configuration options and the configuration steps for Windows Hello for Business dynamic lock, followed with verifying the configuration on the device.
Configuring Windows Hello for Business dynamic lock
Windows Hello for Business dynamic lock determines the location of the user based on the strength of the bluetooth signal of the the paired phone of the user. A too weak signal will trigger the device to automatically lock. That does, however, requires users to pair their phone to their device, similar to when using their phone as second unlock factor for Windows Hello for Business multi-factor unlock. The configuration of the dynamic lock signal rule is also similar to the trusted signal rule of multi-factor unlock. That dynamic lock signal rule is configured by configuring a signal rule in XML. And that XML should be properly formatted in a single line. Unlike the trusted signal rule, the dynamic unlock signal rule can only contain the bluetooth signal type. Besides that, the signal scenario is also a static configuration and the signal classOfDevice currently only supports phone (512). Together that makes a configuration as shown below.
<rule schemaVersion="1.0"> <signal type="bluetooth" scenario="Dynamic Lock" classOfDevice="512" rssiMin="-10" rssiMaxDelta="-10"/> </rule>When specifically looking at applying that configuration of Windows Hello for Business dynamic lock, the PassportForWork CSP can help. That CSP contains the DynamicLock node in the device configuration and is available with Windows 10 version 1803 and later. That node contains the following settings nodes that should be configured for Windows Hello for Business dynamic lock.
- DynamicLock – This node contains a boolean to enable (true) or to disable (false) dynamic lock
- Plugins – This node contains the dynamic lock signal rule, in XML, that configures the dynamic lock signal
Those settings of the PassportForWork CSP are currently not available via the Settings Catalog and still require the use of a custom profile with OMA-URI settings. The following 10 steps walk through the configuration of a custom profile with the required OMA-URI settings. Those steps enable dynamic lock and configure a paired bluetooth phone dynamic lock signal rule.
Important: It’s recommended to use the default values for the configuration of the dynamic lock signal rule.
- Open the Microsoft Endpoint Manager admin center portal navigate to Devices > Windows > Configuration profiles
- On the Windows | Configuration profiles blade, click Create profile
- On the Create a profile blade, provide the following information and click Create
- Platform: Windows 10 and later
- Profile type: Templates
- Template name: Custom
- On the Basics page, provide the following information and click Next
- Name: Provide a name for the custom profile to distinguish it from other similar profiles
- Description: (Optional) Provide a description for the custom profile to further differentiate profiles
- Platform: (Greyed out) Windows 10 and later
- Profile type: (Greyed out) Custom
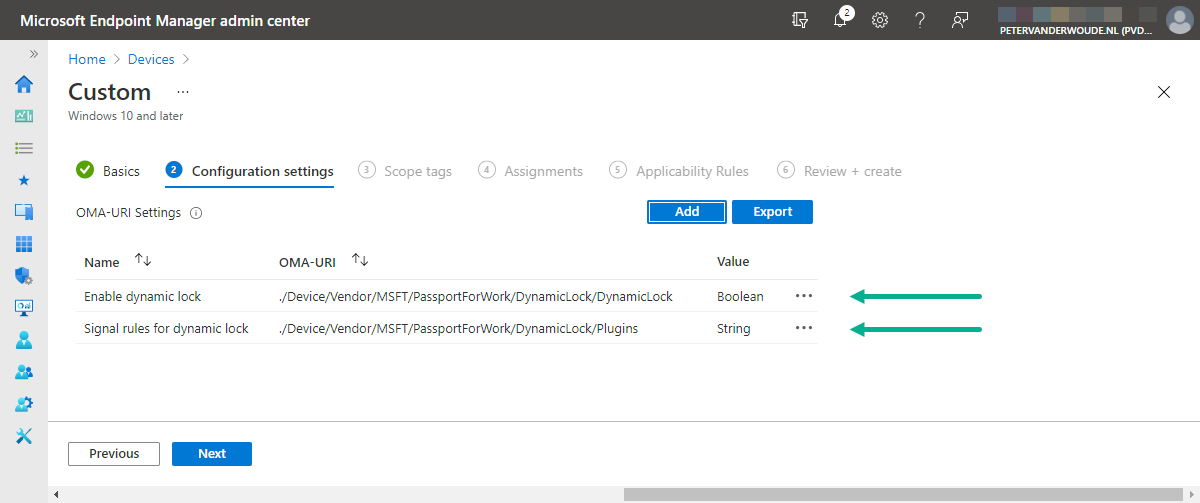
- On the Configuration settings page, see also Figure 1, click Add to add a row for the following custom settings and click Next
- OMA-URI setting 1 – This setting is used to enable dynamic lock
- Name: Provide a name for the OMA-URI setting to distinguish it from other similar settings
- Description: (Optional) Provide a description for the OMA-URI setting to further distinguish it from other similar settings
- OMA-URI: Specify ./Device/Vendor/MSFT/PassportForWork/DynamicLock/DynamicLock as value to enable dynamic lock
- Data type: Select Boolean
- Value: Select True as value to enable dynamic lock
- OMA-URI setting 2 – This setting is used to define the dynamic lock signal rule
- Name: Provide a name for the OMA-URI setting to distinguish it from other similar settings
- Description: (Optional) Provide a description for the OMA-URI setting to further distinguish it from other similar settings
- OMA-URI: Specify ./Device/Vendor/MSFT/PassportForWork/DynamicLock/Plugins as value to define the dynamic lock signal rule
- Data type: Select String
- Value: Specify <rule schemaVersion=”1.0″> <signal type=”bluetooth” scenario=”Dynamic lock” classOfDevice=”512″ rssiMin=”-10″ rssiMaxDelta=”-10″/> </rule> as value to require a paired bluetooth phone as dynamic lock signal

Figure 1: Configuring Windows Hello for Business dynamic lock
- On the Scope tags page, configure the required scope tags click Next
- On the Assignments page, configure the required assignment and click Next
- On the Applicability rules page, configure the required applicability rules and click Next
- On the Review + create page, verify the configuration and click Create
Verifying Windows Hello for Business dynamic lock configuration
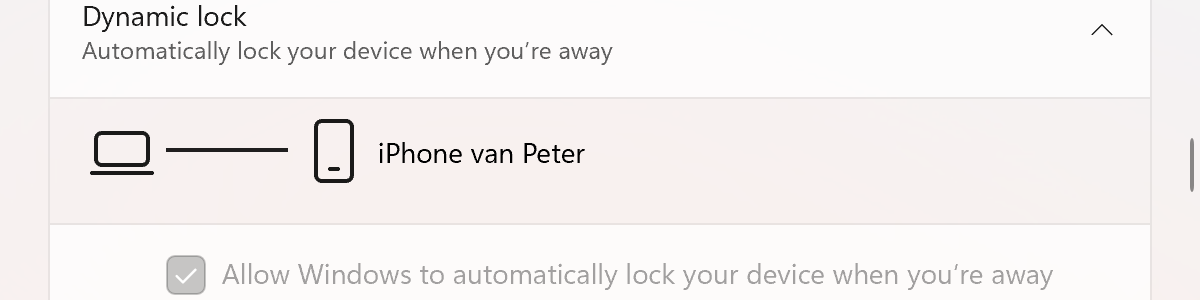
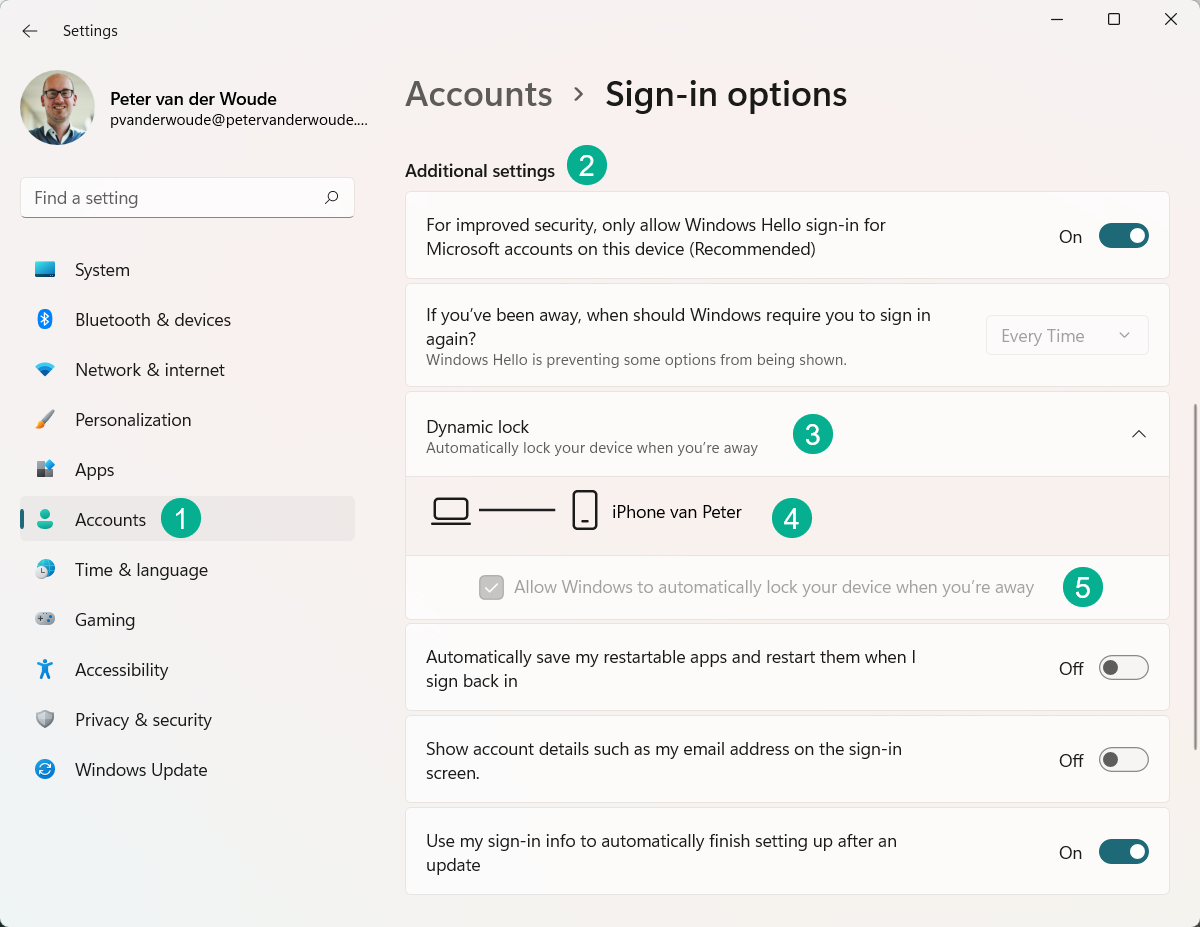
Verifying the Windows Hello for Business dynamic lock configuration is challenging to show in a screenshot. It is, however, relatively simple to show that the configuration is successfully applied. Not by looking at the status in the Microsoft Endpoint Manager admin center portal and not by looking at the Event Viewer, but by simply looking in the Settings app. When looking in the Settings app with the Additional settings in the Accounts section, the Dynamic lock configuration is enable and greyed out (as shown below in Figure 2).
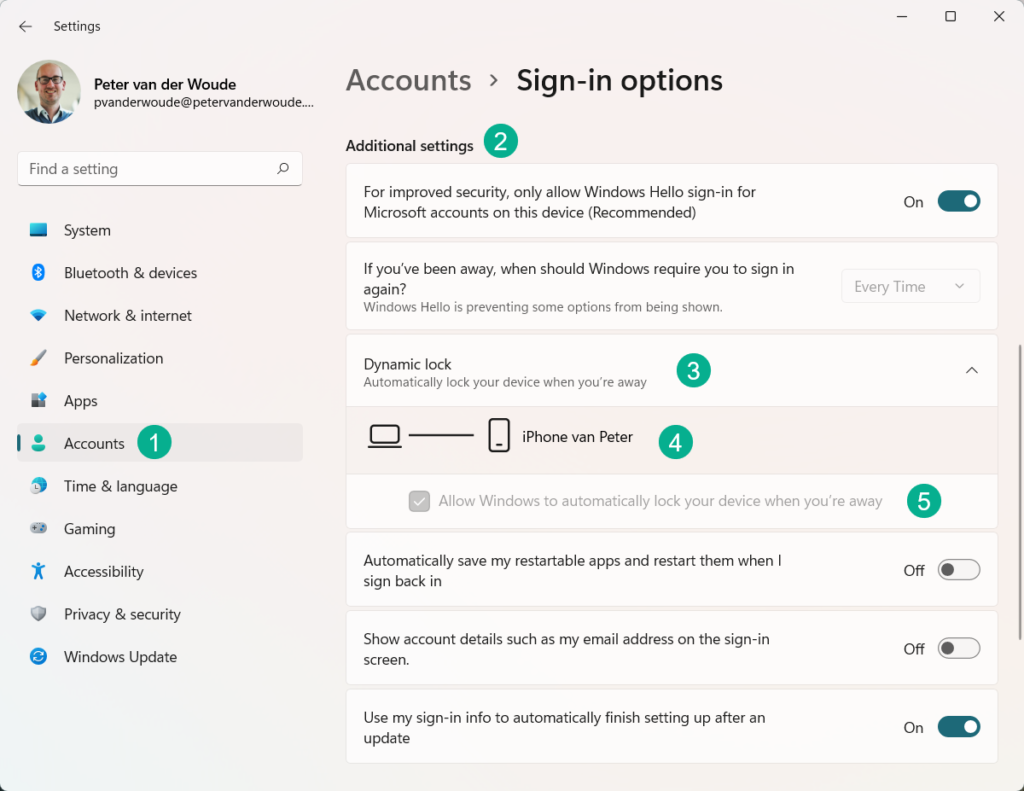
Figure 2: Verifying the Windows Hello for Business dynamic lock configuration in the Settings app on Windows 11
More information
For more information about Windows Hello for Business multi-factor unlock and and the different configuration options, refer to the following docs.
Hi Peter, do you know if it possible to lock Windows after removing your yubi key (on an AAD joined/Intune managed device) ?
Hi RKast,
Not with default functionality. I’ve seen people try with custom scripting on HID-devices, but nothing that works really snappy and out-of-the-box.
Regards, Peter
And how will these settings behave if user does not have paired their phone? Will it require them to pair? Or throw error?
Hi Kazzan,
It will ask the user to pair a device, but it’s not required.
Regards, Peter
Hi Peter,
I just configured this on some devices to test it, but for those that haven’t synced their phoned with Windows aren’t getting any question to pair the phone. Tested on both Windows 10/11. Do you know anything about this?
Hi Sebastian,
That’s also my experience. You can configure it as an admin, but it still requires the user to configure it.
Regards, Peter