
This week is all about providing users with an easy method to opt-in for using Windows 11. That easy method can be created by using standard functionality that is provided by Azure AD entitlement management – an identity governance feature – and that can be used to automate access request workflows, access assignments, reviews, and expiration. More specifically, entitlement management introduces the concept of an access package and those packages provide an easy method to govern access. In a way, an access package can be used to create a simple automated flow to allow users to opt-in for Windows 11. That can be achieved adding the user to an Azure AD group and using that group for the assignment of a feature update deployment. This post walks through the steps for creating the required access package, followed with the steps for creating the required feature update deployment. This post will end by showing the user experience with the access package.
Important: Azure AD entitlement management – that includes the concept of an access package – is an Azure AD Premium 2 functionality.
Note: This post assumes that an Azure AD security group with assigned membership is available. That security group will be used by the access package and the feature update deployment.
Creating an access package to add users to the specific group
The first action is to create an access package that will be used to provide the user with an automated flow to opt-in for Windows 11. In reality that flow will just add the user to the Azure AD security group that is used for the Windows 11 feature update deployment. The following nine steps walk through the creation of that access package.
Note: Keep in mind that these steps just provide a basic example that can be easily enhanced by adding an aproval flow or by adding more resources to the access package. Those resources could be a Teams site with information.
- Open the Azure portal and navigate to Azure Active Directory > Identity Governance > Access packages
- On the Identity Governance | Access packages page, click New access package
- On the Basics page, provide the following information and click Next
- Name: Provide a valid name for the access package to distinguish it from other similar access packages
- Description: Provide a description for the access package to provide more information about the access package
- Catalog: Select the catalog that should contain the access package
Note: When no catalog is available, make sure to create a catalog. That catalog is a container of resources and access packages and is used to group related resources and access packages.
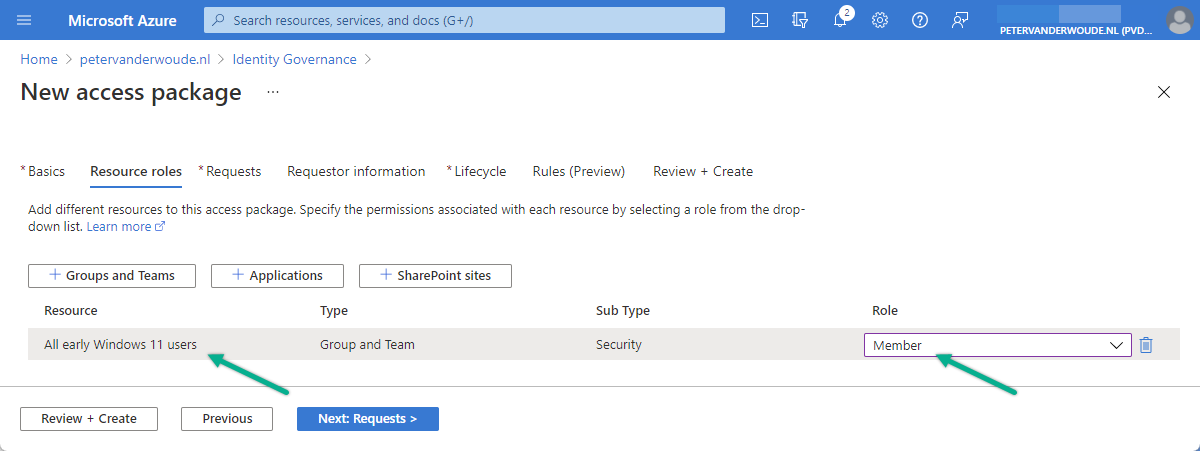
- On the Resource roles page, click Groups and Teams to add the Azure AD security group, set the Role to Member to make sure that the user opting-in for Windows 11 will be added as a member to the group, and click Next
- On the Requests page, provide the following information and click Next
- Users who can request access: Select For users in your directory > All members (excluding guests) to allow all users to request access to the opt-in for Windows 11
- Require approval: Select No to make it the responsibility of the user to opt-in for Windows 11
- Enable new requests: Select No to prevent new requests
Note: This section can be used to add an approval flow that will be triggered after requesting access.
- On the Requestor page, (optional) specify information and attributes from requestor to collect and click Next
- On the Lifecycle page, provide the following information and click Next
- Access package assignments expire: Select Never to not expire the access package assignments
- Require access reviews: Select No to not review the access to the access package assignments
Note: This section can be used to add access reviews to the access package that will be automatically scheduled.
- On the Rules page, (optional) specify rules that trigger custom flows and click Next
- On the Review + Create page, verify the configuration and click Next
Creating a feature update deployment to enable Windows 11 for the specific group
The second action is to create a feature update deployment that will be used to make Windows 11 available for the user, after opting-in. That means that a feature update deployment must be created that is assigned to the same Azure AD security group that used by the access package. The following six steps walk through the creation of that feature update deployment.
- Open the Microsoft Endpoint Manager admin center portal and navigate to Devices > Windows > Feature updates for Windows 10 and later
- On the Windows | Feature updates for Windows 10 and later blade, click Create profile
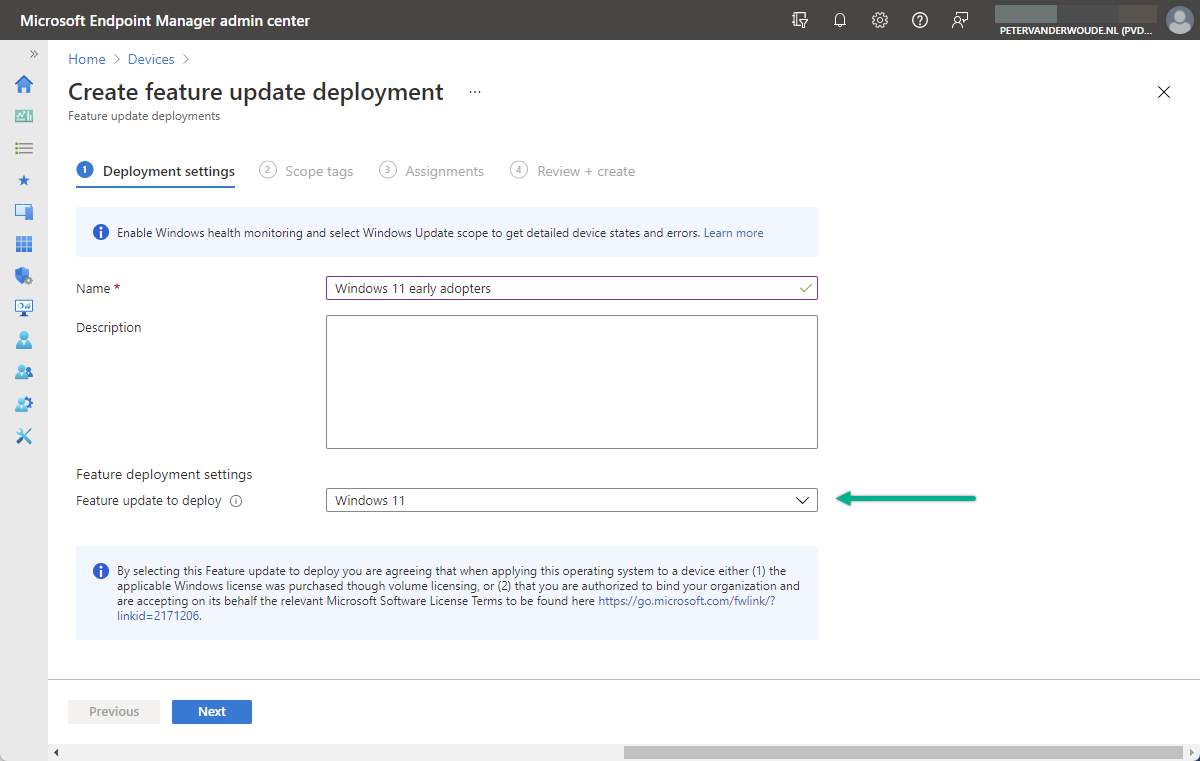
- On the Deployment settings page, provide the following information and click Next
- Name: Provide a valid name for the feature update deployment to distinguish it from similar deployments
- Description: (Optional) Provide a description for the feature update deployment to provide more information
- Feature update to deploy: Select Windows 11 to enable devices to upgrade to Windows 11
Note: Without this configuration a device with Windows 10 will not automatically upgrade to Windows 11.
- On the Scope tags page, configure the required scope tags and click Next
- On the Assignments page, add the created user group for the opt-in to Windows 11 and click Next
- On the Review + create page, review the configuration and click Create
User experience with the opt-in for Windows 11
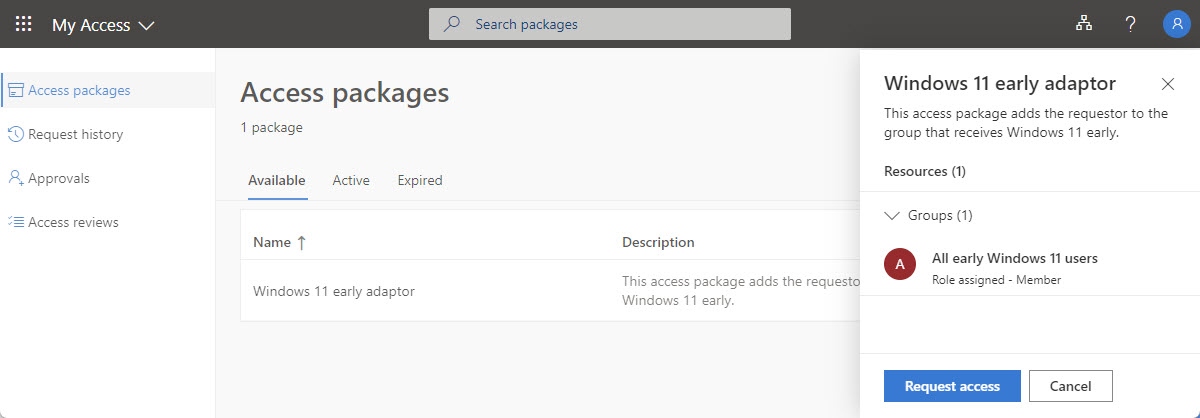
Once the access package is available and the feature update deployment is configured, the user can actually request access. The My Access portal – that is part of Azure AD entitlement management – can be used to achieve that. When the user navigates to that portal, an overview is shown of all the access packages that are available for that user. The user can select the required access package to get an overview of the resources that belong to that package (as shown below in Figure 3).
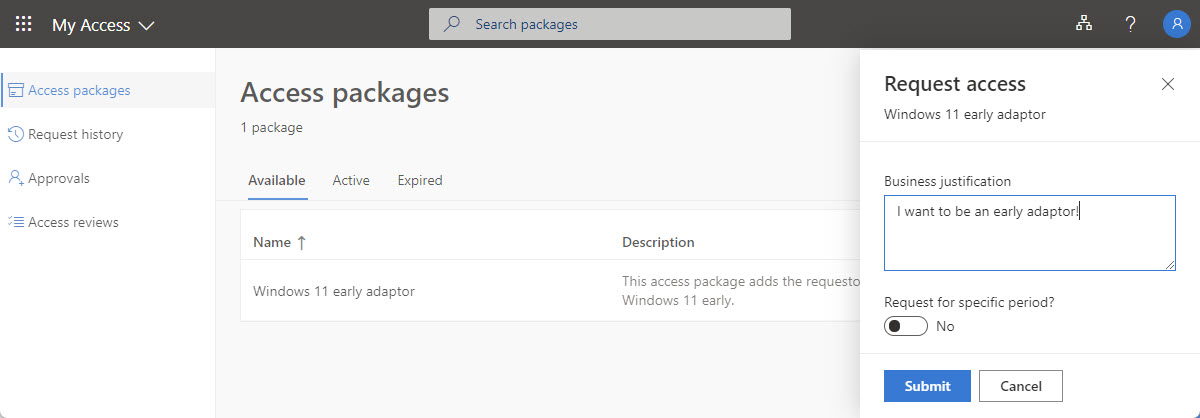
When the user selects Request access, additional information is requested and the access request can be submitted (as shown below in Figure 4). Immediately after that the flow is triggered to add the user to the required group. Once the user is added to the required group, Microsoft Intune will make sure that Windows 11 will become available for the user (assuming the hardware of the user is supported for Windows 11).
More information
For more information about feature update policies and entitlement management, refer to the following docs.
Hey Peter,
Hope you are well! You’re blogs have been they key to getting me on my way with intune.
Quick question how do you have your update rings setup with use of the windows 11 opt in group with reference to the option “upgrade windows 10 devices to latest windows 11 release” checked to no. Will the feature updates still be allowed through if this is set to no in the update ring? Do you target your rings to device groups or users as i imagine you would have to exclude the windows 11 optin group from the update ring?
Hi Jack,
This configuration relies on user groups for the assignment. That enables you to assign the use that opt-in. My upgrade settings are only on the feature update deployment.
Regards, Peter