This week is again all about the powerful combination of Microsoft Power Apps and Microsoft Power Automate with Microsoft Intune (and Microsoft Graph). In my previous post about introducing a mobile device manager app for Microsoft Intune, I relied on the standard available functionalities within the different products to show how easy it is to get started and to create your own app in Power Apps. Because of that starting point, I relied on providing application API permissions when accessing the Graph API. In that post, I also mentioned that there is another method available by using delegated API permissions when accessing the Graph API. Also, to be really honest, when an app in Power Apps is working with a signed-in user, it also makes more sense to work with delegated API permissions. When working with delegated API permissions, the effective permissions will be the least privileged permissions of the delegated API permissions and the permissions of the signed-in user. That means that the signed-in user can never have more permissions, then their own permissions, when using the app in Power Apps. That also means that role-based access should be in place to make sure that the users actually have the required permissions within Microsoft Intune.
Note: Another reason to use delegated API permissions could also be that the application API permissions are not available for the required action. In that case there is simply no other option.
For this post, I want to focus on how using delegated API permissions would differ from using application API permissions. The main difference is that a custom connector would be required – in my opinion – in Power Apps and Power Automate. That custom connector can be used in the different flows in Power Automate to eventually achieve the same as last week. To achieve that, I’ll cover the following subjects throughout this post (of which the last subject shows the difference in the audit logs):
- Create an app registration in Azure AD to provide the delegated permissions
- Create a custom connector for device management actions in Microsoft Intune
- Adjust the different flows in Power Automate to achieve a working app
- Show the difference in the Audit logs of Microsoft Intune
Important: For this post I choose to rely on delegated permissions, to make sure that only users with the required permissions can perform the different actions in the remote device manager app. That means that the users must have the required permissions to be able to use the remote device manager app.
Create an app registration in Azure AD to provide the permissions
The first action is – the same as last week – to create an app registration in Azure AD to provide the required permissions to the Graph API. That app registration contains two important configurations that are required for the custom connector. The app registration needs the correct permissions and the correct redirect URI and a client secret should be created for usage within the custom connector. The bullets below go through the minimal configuration that is required and will make sure that the correct information is available when creating the different flows.
- Open the Azure portal, navigate to Azure Active Directory > App registrations to create a new app registration with https://global.consent.azure-apim.net/redirect as a redirect URI and save the Directory (tenant) ID and the Application (client) ID for usage within the custom connector
- Navigate to API permissions, provide the app registration with at least the delegated API permissions of DeviceManagementManagedDevices.PrivilegedOperations.All and DeviceManagementManagedDevices.Read.All and grant admin consent for those permissions, to make sure that the connector will have the right delegated permissions to perform the required actions
- Navigate to Certificates & secrets, create a new secret and save the value for usage within the custom connector
Note: Make sure that only the delegated API permissions are specified. When both permissions – delegated API permissions and application API permissions – are specified, the application API permissions will be used.
Create a custom connector for device management
The second action is to create a custom connector. That connector is basically a proxy or wrapper around the API that allows the underlying service to interact with Power Automate. There are multiple methods for creating such a connector and it all depends on preferences. A lot is written around using Postman to do the biggest part of the work, but nowadays it’s not that difficult anymore with the built-in functionality either. Especially when the required queries are already available. That’s why I opt to go for the built-in functionality to create the custom connector. The following four steps walk through the process of creating the the custom connector. That basically describes the information for authenticating with the API, which – in this case – is the Graph API.
- Open make.powerapps.com (or flow.microsoft.com), navigate to Data > Custom connectors, use New custom connector > Create from blank and provide Intune device actions as name for the custom connector to start the creation of a new custom connector.
- On the General page, provide some generic information about the Icon and the Description of the custom connector and specify the following information to define the API that the connector should use.
- Scheme: Select HTTPS as the value
- Host: Specify graph.microsoft.com as the value
- Base URL: Leave the default of / as the value
- On the Security page, provide the authentication type and its configuration by specifying the following and click on Create connector to start the creation of the custom connector and to populate the redirect URL.
- Authentication type
- Choose what authentication is implemented by your API: Select the value of OAuth 2.0
- OAuth 2.0
- Identity Provider: Select Azure Active Directory as the value
- Client id: Provide Application (client) ID – as shown in Figure 1 – as the value
- Client secret: Provide Value – as shown in Figure 3 – as the value
- Login URL: Leave the default of https://login.windows.net as the value
- Tenant: Leave the default of common as the value
- Resource URL: Provide https://graph.microsoft.com/ as the value
- Scope: Leave the default of Scope as the value
- Redirect URL: Automatically populated with https://global.consent.azure-apim.net/redirect as the value after creating the connector
- Authentication type
- On the Definition page, provide the actions that the users can perform by using this custom connector. For this post the actions will provide the same capabilities that were available via the HTTPS actions in the different flows of my previous post.
Create an action to get the devices of a specific user
As part of creating the custom connector, the calls to the Graph API should be defined by using actions. The first action to define, is the call to the Graph API to get the devices that belong to a specific user. After adding an action to the custom connector, make sure to also update the connector. The following four steps walk through the process of creating that action.
- On the Definition page, of the just created custom connector, use New action to start with the creation of the action that will be used to get the devices of a specific user.
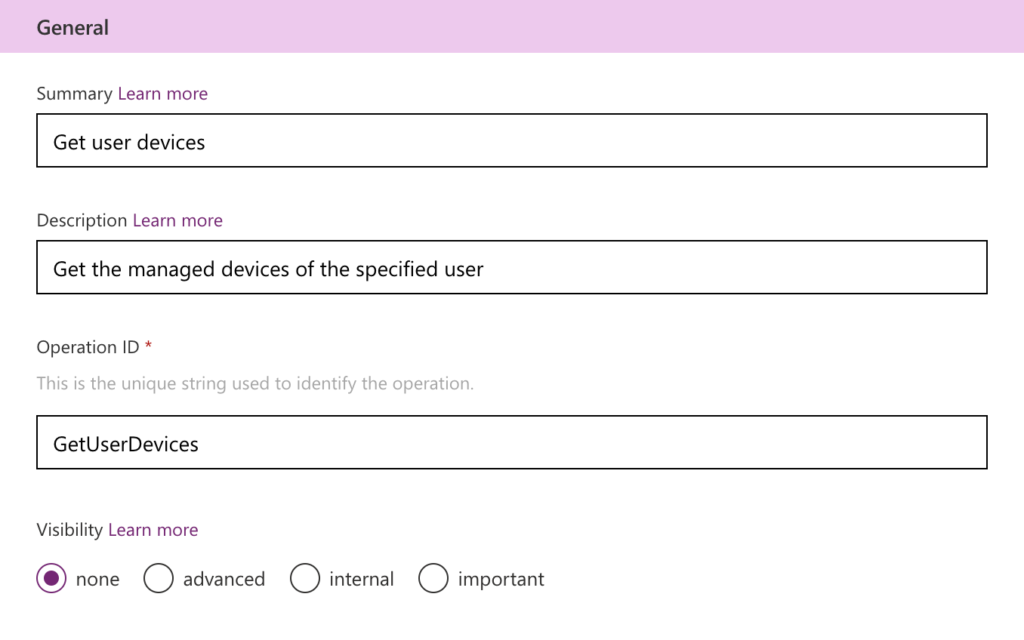
- In the General section, specify the general information of the new action. That can be achieved by providing the following information.
- Summary: Specify a summary of the action, something like: Get user devices. The summary will be used as the title of the action.
- Description: Specify a description of the action, something like: Get the managed devices of the specified user. The description will be used as a brief explanation of the action.
- Operation ID: Specify an operation Id of the action, something like: GetUserDevices. The operation Id will be a unique string to identify the action.
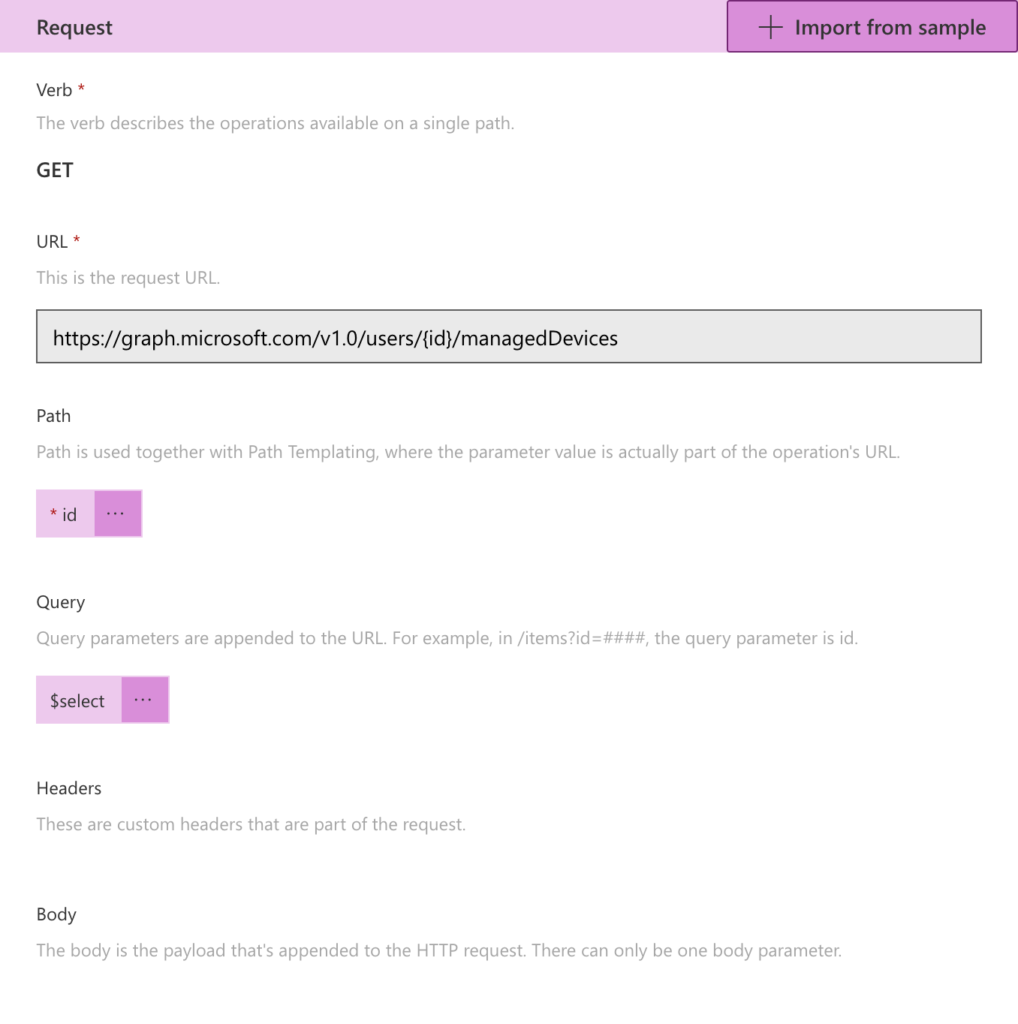
- In the Request section, specify the pre-requirements that are needed to perform the action (to make the request). That can be achieved by using Import from sample to specify the request URL and the verb. That will eventually result in the information as shown in Figure 5, in which path and query parameters are automatically filtered from the URL. That can be achieved by providing the following information when importing the sample.
- Verb: Select GET as value
- URL: Specify
https://graph.microsoft.com/v1.0/users/{id}/managedDevices?$selectas value
Note: The URL is the URI that was specified in the HTTP action of the flow in Power Automate. It can be literally a copy-paste, or similar to what is mentioned above, just make sure to only put single curly brackets around the variable and the select-statement itself isn’t important and will automatically simplify to $select.
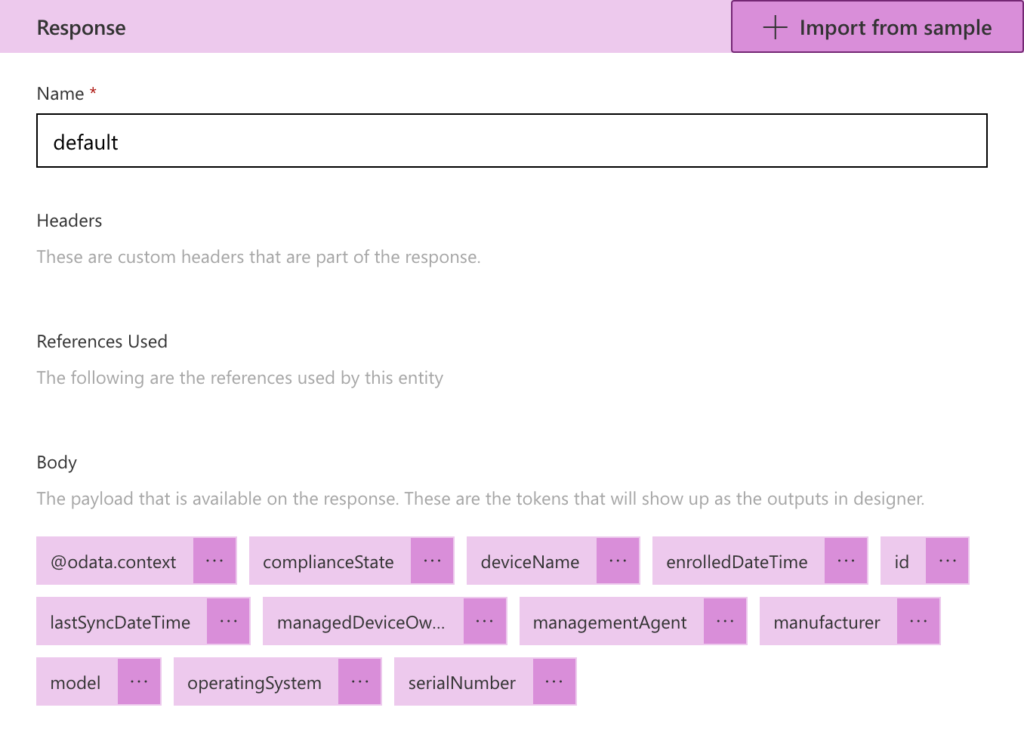
- In the Response section, specify the shape of response that should be returned by the connector with this action (when making the request). That can be achieved by using Add default response to specify the response. That will eventually result in the information as shown in Figure 6, in which the tokens are automatically added based on the provided body. That can be achieved by providing a body that can be retrieved by using Graph Explorer and using the URI that was specified in the HTTP action of the flow in Power Automate. An example is shown below.
Note: The ‘id‘ is can be either the id of the user account in Azure AD or the UPN of the user account.
{
     "@odata.context": "https://graph.microsoft.com/v1.0/$metadata#users('pvanderwoude%40petervanderwoude.nl')/managedDevices(id,deviceName,managedDeviceOwnerType,managementAgent,enrolledDateTime,lastSyncDateTime,manufacturer,model,serialNumber,operatingSystem,complianceState)",
     "value": [
         {
             "id": "b81938a3-a65d-4779-ae4f-00b46a5aebab",
             "deviceName": "28d0d0be-8b01-499b-9b47-3e435f13aa99",
             "managedDeviceOwnerType": "company",
             "managementAgent": "mdm",
             "enrolledDateTime": "2020-11-11T08:34:49Z",
             "lastSyncDateTime": "2020-11-11T12:10:02Z",
             "manufacturer": "Microsoft Corporation",
             "model": "Virtual Machine",
             "serialNumber": "8273-7480-0698-3787-0356-7834-13",
             "operatingSystem": "Windows",
             "complianceState": "noncompliant"
         }]
 }
Create an action to perform a remote action on a specific device
The second action – of the custom connector – to define, is the call to the Graph API to perform the selected remote action on the selected device. The following four steps – similar to the previous action – walk through the process of creating that action. After adding an action to the custom connector, make sure to also update the connector.
- On the Definition page of the just created custom connector, use New action to start with the creation of the action that will be used to get the devices of a specific user.
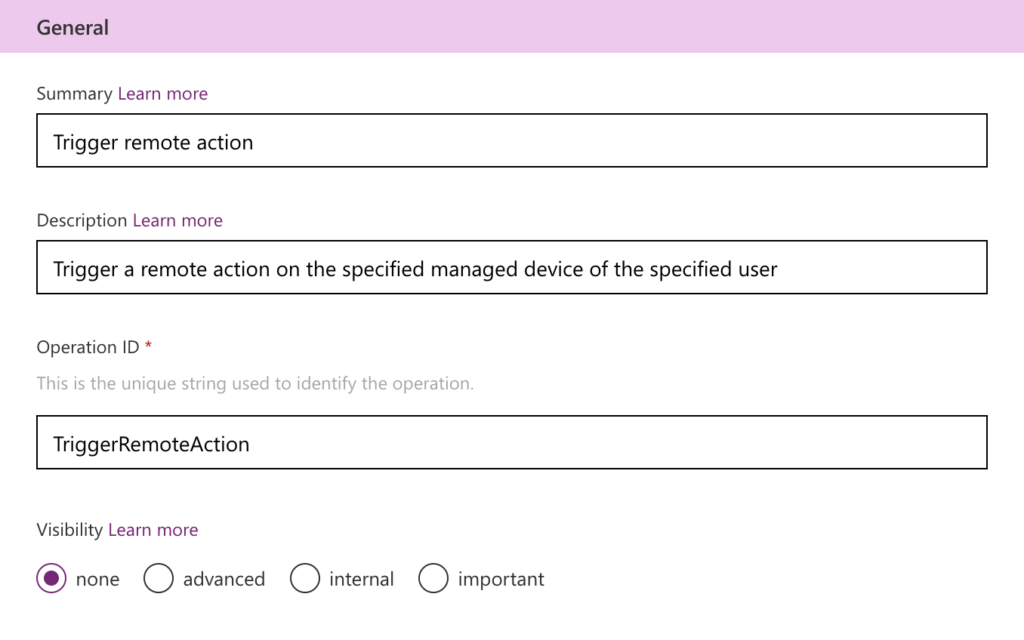
- In the General section, specify the general information of the new action. That can be achieved by providing the following information.
- Summary: Specify a summary of the action, something like: Trigger remote action. The summary will be used as the title of the action.
- Description: Specify a description of the action, something like: Trigger a remote action on the specified managed device of the specified user. The description will be used as a brief explanation of the action.
- Operation ID: Specify an operation Id of the action, something like: TriggerRemoteAction. The operation Id will be a unique string to identify the action.
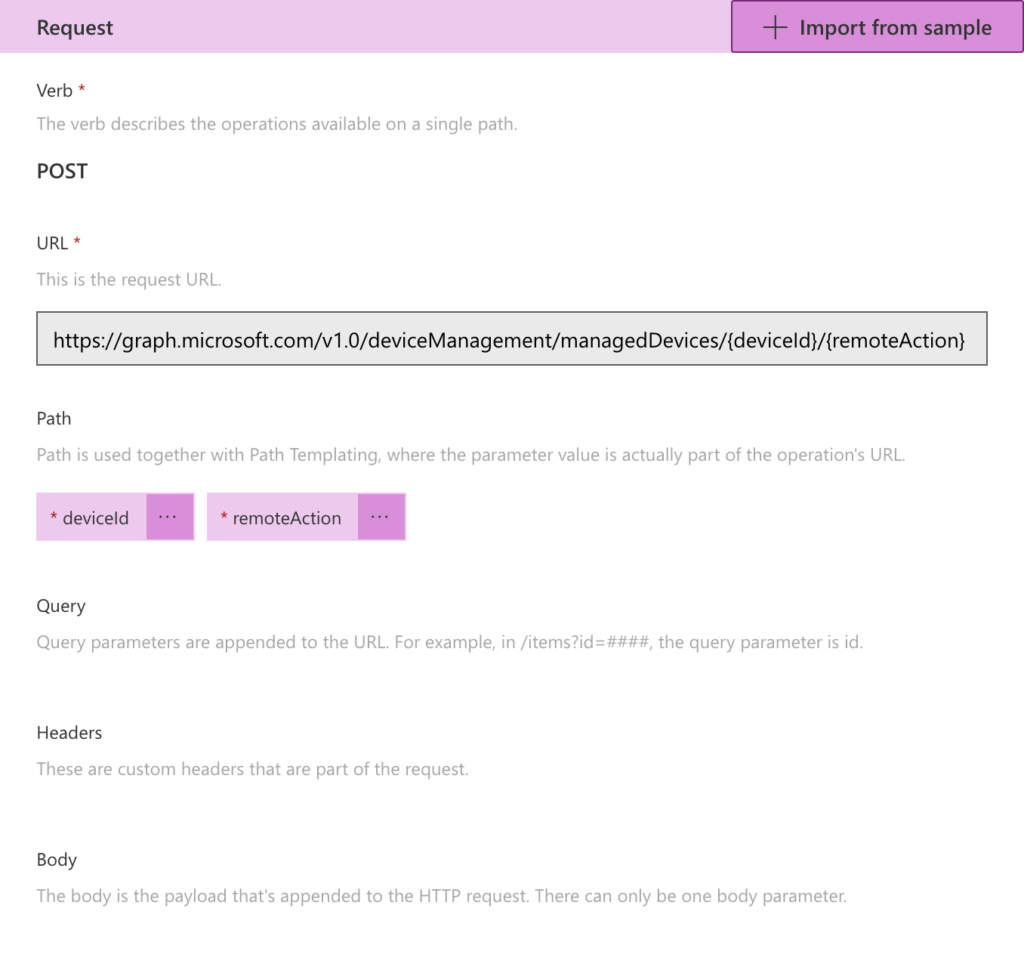
- In the Request section, specify the pre-requirements that are needed to perform the action (to make the request). That can be achieved by using Import from sample to specify the request URL and the verb. That will eventually result in the information as shown in Figure 8, in which path parameters are automatically filtered from the URL. That can be achieved by providing the following information when importing the sample.
- Verb: Select POST as value
- URL: Specify
https://graph.microsoft.com/v1.0/deviceManagement/managedDevices/{deviceId}/{remoteAction}as value
Note: The URL is the URI that was specified in the HTTP action of the flow in Power Automate. It can be literally a copy-paste, or similar to what is mentioned above, just make sure to only put single curly brackets around the variables.
- In the Response section nothing is required for this action
Adjust the different flows in Power Automate to achieve a working app
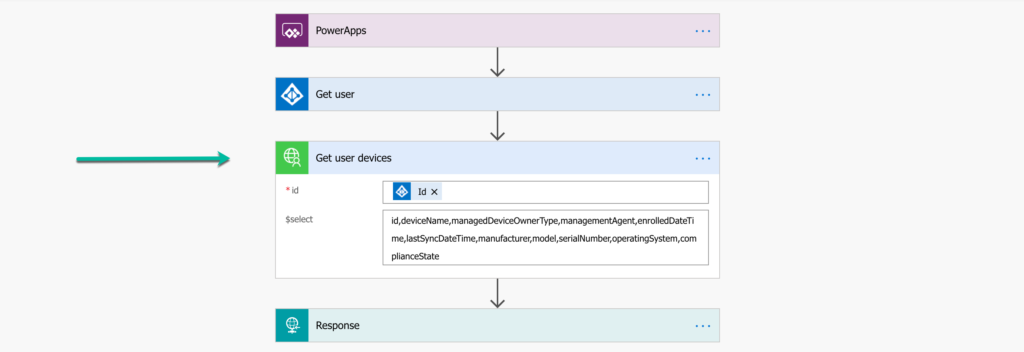
The third and last action is to adjust the flows in Power Automate. It’s also possible to use the custom connector directly in an app in Power Apps, but by adjusting the flows there is no need to adjust app. Also, the first action of the custom connector returns a response that should be filtered before it can be used within the app. So for that action there is also a technical reason. When looking at the first flow in Power Automate, there are three adjustments needed. Those adjustments are visible in Figure 9 and are described below the that figure in two bullets.
- Remove the HTTP – HTTP action and the Data Operations – Parse JSON action.
- Add the Intune device actions – Get user devices action. That action will use the custom connector to query the Graph API for the managed devices of the provided user and needs the following configurations of the different values.
- id: Select Dynamic content > (Get user) id as the value
- $select: Specify id,deviceName,managedDeviceOwnerType,managementAgent,enrolledDateTime,lastSyncDateTime,manufacturer,model,serialNumber,operatingSystem,complianceState as the value
Note: It’s also possible to remove the Azure AD – Get user action an to simply rely on the provided UPN.
When looking at the second flow in Power Automate, there are only three adjustments needed. Those adjustments are visible in Figure 10 and are described below that figure in two bullets.
- Remove the HTTP – HTTP action.
- Add the Intune device actions – Trigger remote action action. That action will use the custom connector to perform specified remote actions via the Graph API on the specified device and needs the following configurations of the different values.
- deviceId: Select Dynamic content > (Variables) deviceId as the value
- remoteAction: Select Dynamic content > (Variables) remoteAction as the value
After performing these adjustments to the flows in Power Automate – and saving those adjustments – the earlier created simple remote device manager app should now be working with delegated permissions.
Show the difference in the Audit logs of Microsoft Intune
Now let’s end this post by having a look at the Audit logs in Microsoft Intune. Those logs provide a clear overview of activities that generate a change in Microsoft Intune. That includes all the different create, update (edit), delete, assign, and remote actions events. Especially the latter is interesting to look at. Open the Microsoft Endpoint Manager admin center portal and navigate to Tenant administration > Audit logs, to have a look at those events. A brief overview is shown below in Figure 11. The main difference is the Initiated by (actor) information. When using application API permissions that field will be empty and when using delegated API permissions that field will show the user that performed the action. This is another important reason why using delegated API permissions is the preferred option, if possible.
Note: When both permissions – delegated API permissions and application API permissions – were specified, the bottom line would be registered as the event in the audit logs.
More information
For more information about the different subjects that are used throughout this post, refer to the following docs.


