This week is all about the latest addition to Microsoft Intune and that is organizational messages. Organizational messages enable organizations to send important messages to their users. That might sound similar to an already existing feature that would allow organizations to send custom notifications. There are, however, some major differences. One of the major challenges with custom notifications is that Microsoft Intune can’t guarantee the delivery of the message. Besides that, it’s only available for Android and iOS. That all changes with organizational messages. Minor detail, however, is that organizational messages rely on Windows 11. Besides that, it provides organizations with a new channel to communicate important messages to users. Important messages that can help users with a better understanding of their workplace, stay informed about updates and trainings, and much more. All based on standard templates that are available within Microsoft Intune. Depending on the configuration of the organizational messages, those messages can appear in visible places, like the Get Started app, the notification area, and right above the taskbar. This post will walk through the configuration of the prerequisites for the different organziational messages, followed with the configuration of the different organizational messages itself. This post will end with the user experience.
Important: At the moment of writing, the feature of sending organizational messages is in public preview.
Note: At the moment of writing, organizational messages is only available for Windows 11 devices.
Configuring pre-requisites for sending organizational messages
When looking at the pre-requisites of sending organizational messages, it starts with the platform. Windows 11 is the required platform that facilitates the technology to send organizational messages. Besides that, the different types of organizational messages (as-in: the different locations for organizational messages) also have different configuration requirements. The following settings are required to enable the features of sending organizational messages on Windows 11 devices.
| Setting | Value | Organizational message |
|---|---|---|
| Enable delivery of organizational messages (User) | Enabled | All messages |
| Allow Windows Spotlight (User) | Enabled | All messages |
| Allow Windows Spotlight (User) > Allow Windows Tips | Enabled | Taskbar messages |
| Allow Windows Spotlight (User) > Windows Spotlight on Action Center (User) | Enabled | Notification area messages |
| Disable Cloud Optimized Content | Disabled | Get Started app messages |
Note: Keep in mind that conflicting settings might be configured via configuration profiles and security baselines. When using security baselines the default configuration is that Block Windows Spotlight is set to Yes.
The easiest method for configuring the required settings, is by using the Settings Catalog. That contains all the required settings and can add all settings to a single profile. The following eight steps walk through the configuration of the required settings by using the available settings in the Settings Catalog. It configures all the settings that were summarized earlier.
- Open Microsoft Endpoint Manager admin center and navigate to Devices > Windows > Configuration profiles
- On the Windows | Configuration profiles blade, click Create profile
- On the Create a profile blade, provide the following information and click Create
- Platform: Select Windows 10 and later to create a profile for Windows 10 devices
- Profile: Select Settings catalog to select the required setting from the catalog
- On the Basics page, provide the following information and click Next
- Name: Provide a name for the profile to distinguish it from other similar profiles
- Description: (Optional) Provide a description for the profile to further differentiate profiles
- Platform: (Greyed out) Windows 10 and later
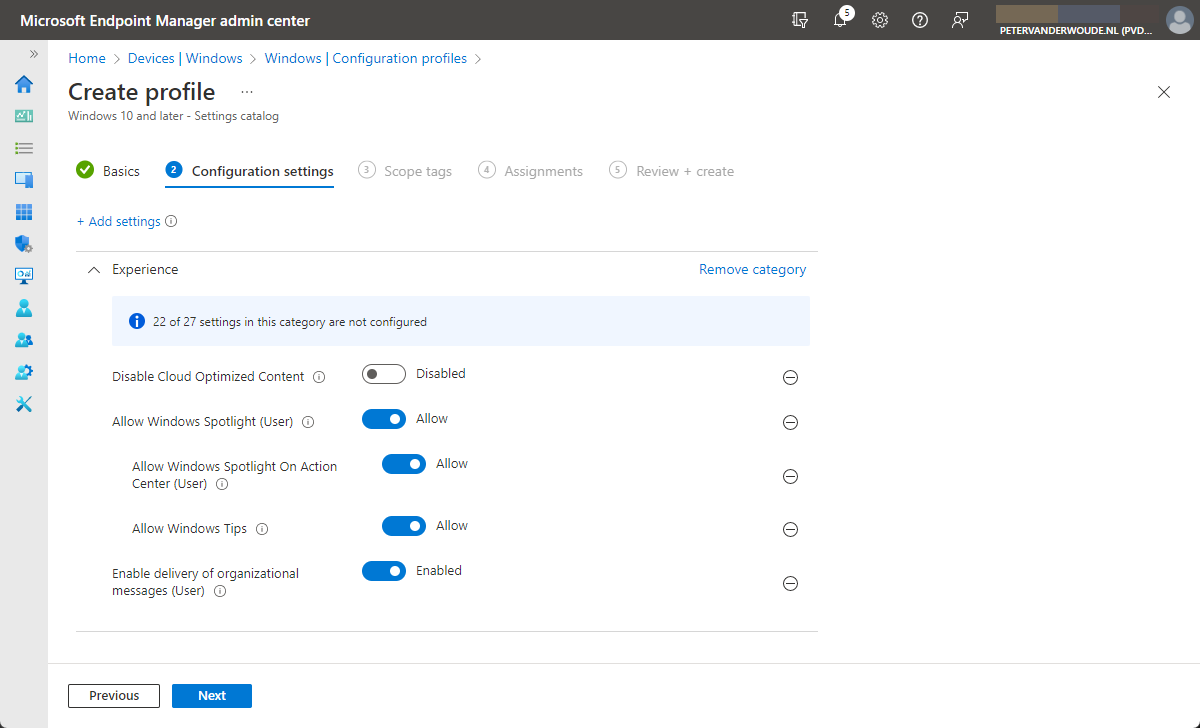
- On the Configuration settings page, as shown below in Figure 1, perform the following actions and click Next
- Click Add settings and perform the following in Settings picker
- Select Experience as category
- Select Enable delivery of organizational messages (User), Allow Windows Spotlight (User), Allows Windows Tips, Allow Windows Spotlight On Action Center (User), and Disable Cloud Optimized Content as setting
- Configure the selected setting with the following values
- Switch the slider with Enable delivery of organizational messages (User) to Enabled to allow any messages
- Switch the slider with Allow Windows Spotlight (User) to Enabled to allow any messages
- Switch the slider with Allows Windows Tips to Enabled to allows taskbar messages
- Switch the slider with Allow Windows Spotlight On Action Center (User) to Enabled to allow notification area messages
- Switch the slider with Disable Cloud Optimized Content to Enabled to allow Get Started app messages
- Click Add settings and perform the following in Settings picker
- On the Scope tags page, configure the required scope tags and click Next
- On the Assignments page, configure the assignment and click Next
- On the Review + create page, verify the configuration and click Create
Note: The setting Enable delivery of organizational messages (User) is currently only available for Windows 11 devices.
Creating and sending organizational messages
When looking at sending organizational messages, it starts with the possibilities. At this moment Microsoft Intune provides the capabilities to send three different types of organizational messages, 1) taskbar messages, 2) notification area messages, and 3) Get Started app messages. The following table provides a brief overview of those different types of messages.
| Message type | Description |
|---|---|
| Taskbar message | Taskbar messages appear attached to the taskbar of the user, on top of everything else on the desktop. The message repeats with a frequency that is set by the IT administrator until the user acts on it by selecting the included button to go to the website provided by the IT administrator. |
| Notification area message | Notification area messages will appear in the Notifications area of the user. The message repeats with a frequency that is set by the IT administrator until the user acts on it by selecting the included button to go to the website provided by the IT administrator. |
| Get Started app message | Get Started app messages appear in the Get Started app the first time the user runs it after their device is enrolled in Microsoft Intune. A good method for the adoption of new users in the organization, since it can direct them to info about benefits and structure, device tips, training, policies, and how to get tech support. There are also links to info about personalizing their device and setting up their profile. |
Besides the different organizational message types, there are also different message themes. Those themes differ per message type and basically provide the IT administrator with a configuration template. The following table provides a brief overview of those different themes in combination with the different message types.
| Message theme | Message type | Description |
|---|---|---|
| Get started with device | Get Started app (first message) | Theme to get users started with their device. |
| Help resources | Get Started app (second message) | Theme to get users to review helpful resources within in the organization. |
| Mandatory update | Taskbar message | Theme to prompt users to install a mandatory update. |
| Organizational HR training | Notification area message | Theme to prompt users to complete HR training. |
| Organizational policies | Get Started app (second message) | Theme to get users to review important organization policies. |
| Organizational skills training | Notification area message | Theme to prompt users to complete skill-specific training. |
| Organizational training | Notification area message | Theme to prompt users to complete training. |
| Organizational training | Get Started app (second message) | Theme to get users to review the key trainings available within their organization. |
| Organizational update | Notification area message | Theme to prompt users to install an update. |
| Review benefits | Get Started app (first message) | Theme to get users to review the benefits offered by their organization. |
| Review organization | Get Started app (first message) | Theme to get users to review their organziation (teammates). |
| Update browser | Notification area message | Theme to prompt users to update their browser. |
| Update device | Notification area message | Theme to prompt users to update their device. |
| Update VPN | Get Started app (second message) | Theme to get users to set up their VPN connection. |
The creation and sending of organizational messages is actually pretty straight forward. The following steps walk through the actions for creating a message, configuring the message content, scheduling the message and assigning the message.
- Open Microsoft Endpoint Manager admin center and navigate to Tenant administration > Organizational messages
- On the Tenant admin | Organizational messages page, select the Message tab and click Create
- On the Create message blade, provide the following information and click Create
- Message type: Select the message type by choosing between Taskbar, Notification area, and Get Started app. The differences between these message types are described in the table above.
- Message theme: Select the message them by choosing between the available themes related to the selected message type. The message theme for the Get Started app will be configured in the next step.
- On the Message page, see Figure 2 and Figure 3 below, provide the following information and click Next : Schedule
- Add logo: Select a logo of the organization that is conform the provided guidelines
- Provide a link for the message: Select the domain name for the link in the message
- Choose language to preview: Select the language that should be used in the message
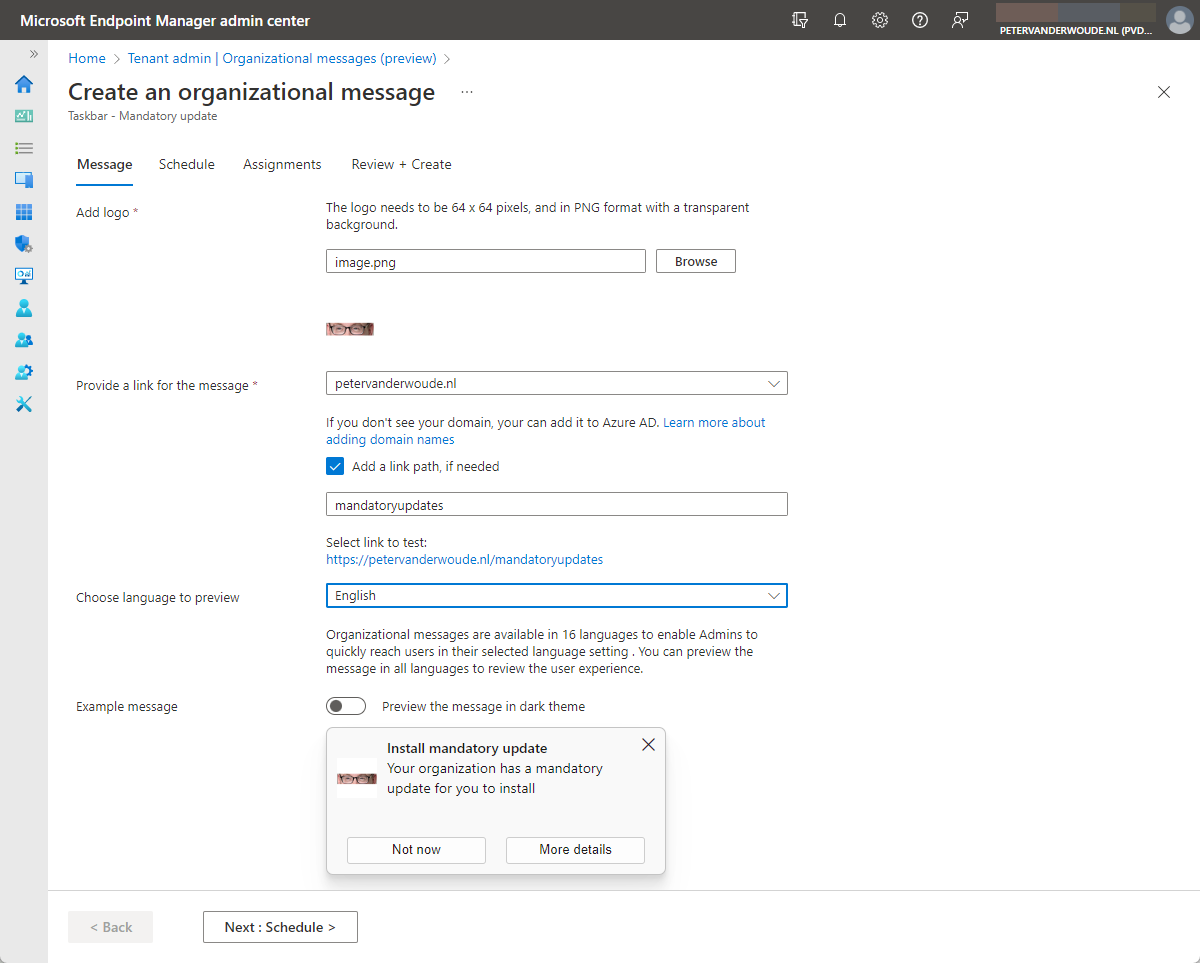
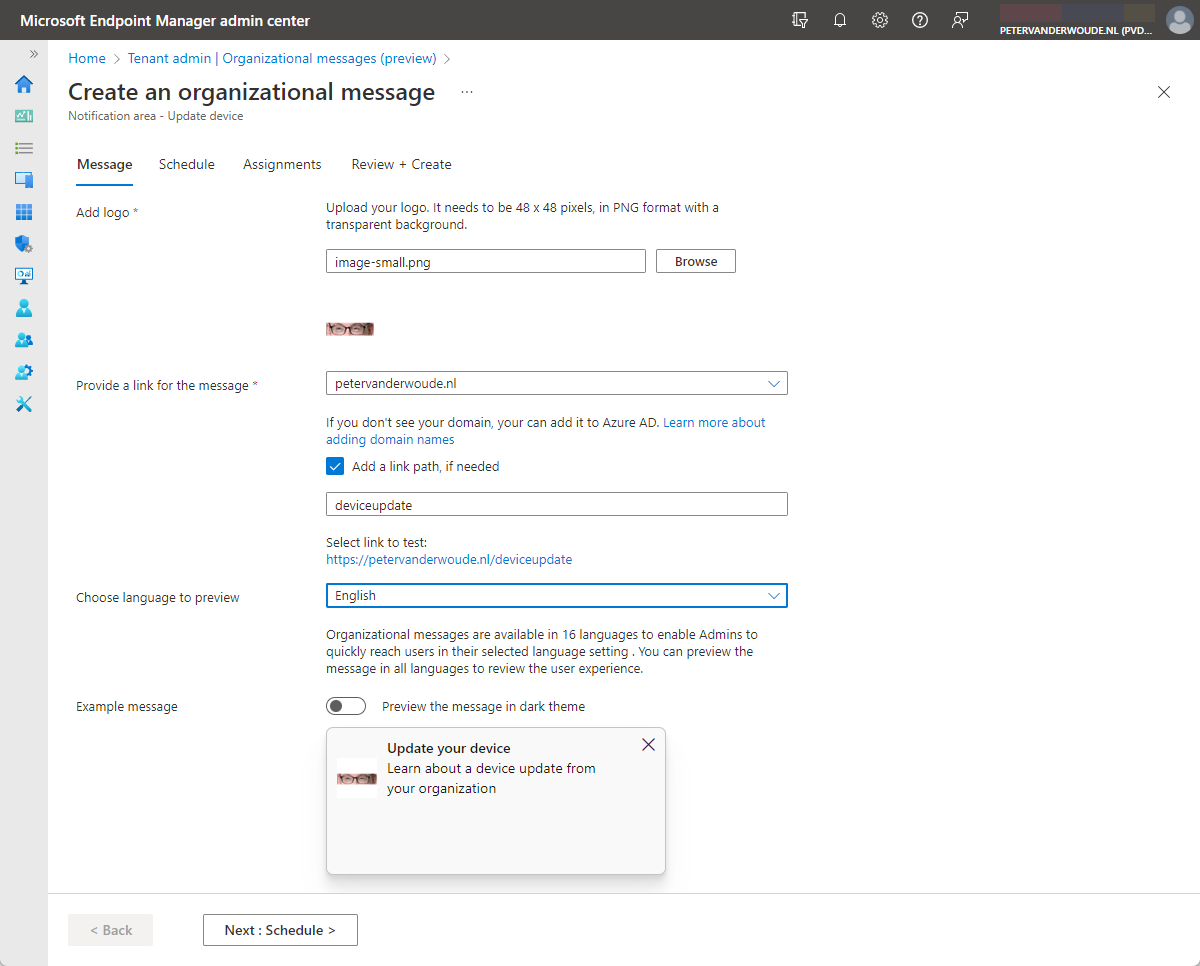
Note: For the Get Started app, this page also contains the configuration of the different message themes. There can be two different messages be configured for the Get Started app.
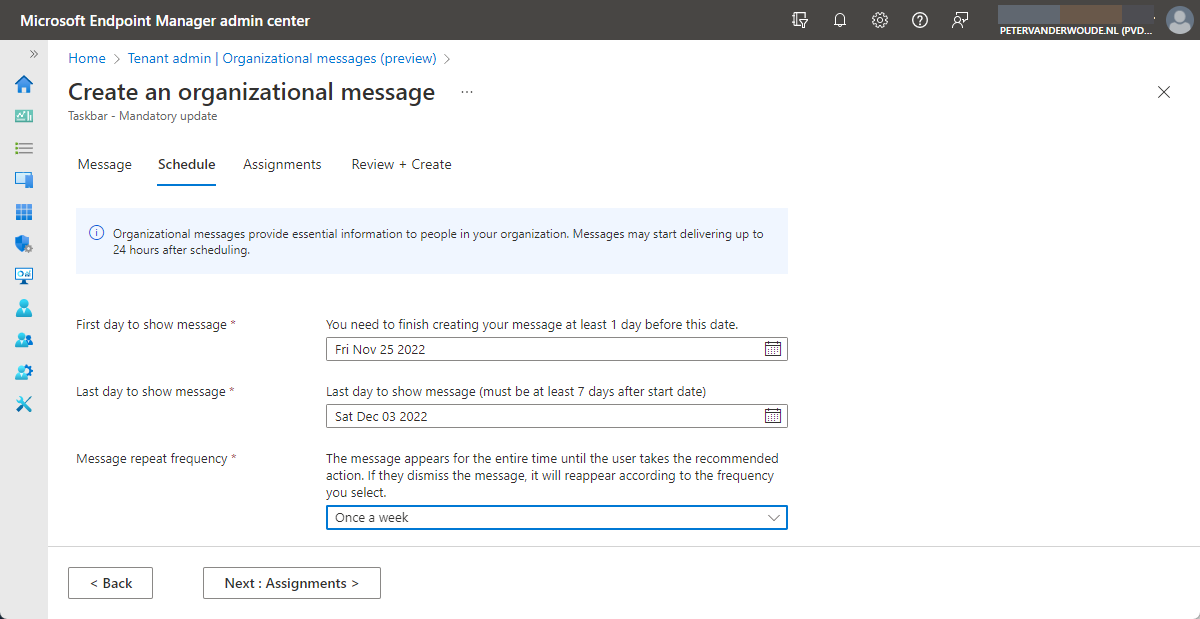
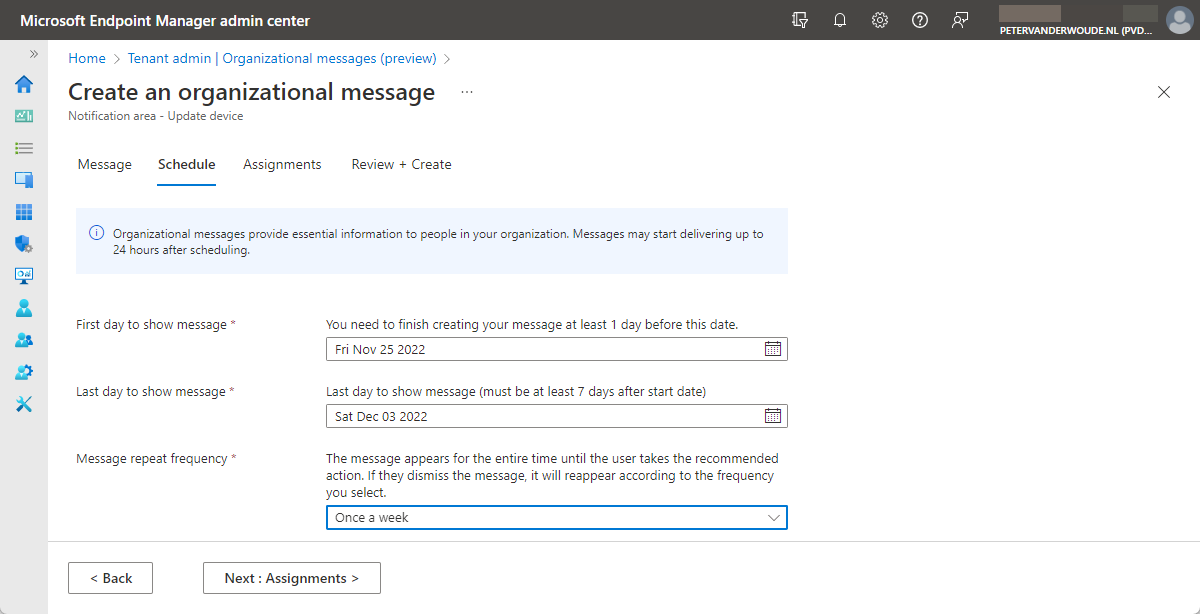
- On the Schedule page, see Figure 4 and Figure 5 below, provide the following information and click Next : Assignments
- First day to show message: Select the first day that this message should be shown
- Last day to show message: Select the last day that this message should be shown
- Message repeat frequency: Select the frequency that this message should be shown by choosing between Once a week, Once every two weeks, and Once a month
- On the Assignment page, configure the user group that contains the users to whom this message should be shown and click Next : Review + Create
- On the Review + Create page, review the configuration and click Create
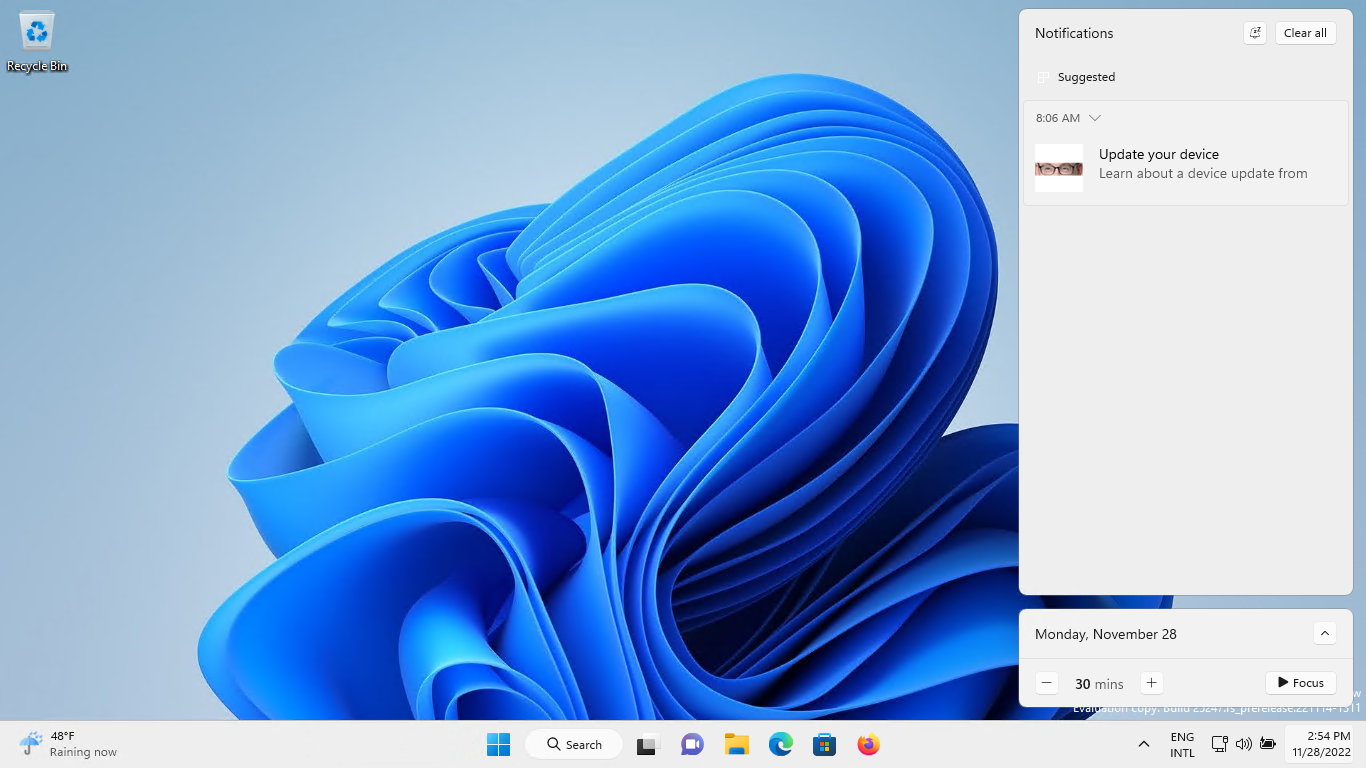
Experiencing organizational messages
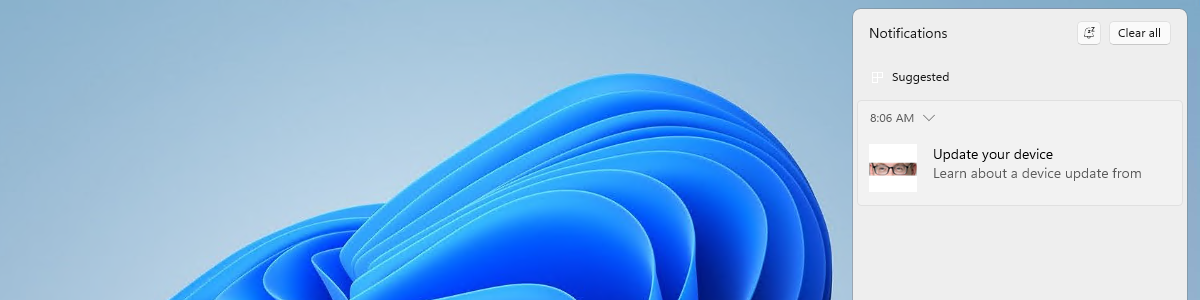
When looking at the user experience with organizational messages, it all starts with the Windows 11 device of the user. The user can receive a message in the Get Started app, the notification area, and right above the taskbar. Figure 6 provides an example of a of a Notification area message. The user can click on that message and will be navigated to the linked website. The idea is similar for the other available message types and the look-and-feel is similar to what is shown during the configuration in Microsoft Intune. A nice channel – with great potential – to inform users.
More information
For more information about the organizational messages feature in Microsoft Intune, refer to the following docs.
Hi Peter,
Just a suggestion, but you should also mention the big limitations as well.
Cannot customize the message text at all.
Cannot specify a link to a website in the message unless that link resides on a root level domain that is part of your verified domains in Azure Active Directory.
Cannot specify where the pop-up will display, as it’s hard coded into whatever template you’re using.
Hi Pete,
You are correct. It’s not the holy grail yet, but it does get most organizations started.
Regards, Peter
Hi Peter
Any solution that work on win 10?
I need to find a way to send notification to users
Hi David,
Not really from within the platform itself. That would require something like Teams.
Regards, Peter
something else that MS got that i could use to build a notification center for my users ?
Hi David,
Internally we’re using a lot of Adaptive Cards in Teams.
Regards, Peter