This week is all about enabling password-less sign-in with security keys on Windows 10. I know that a lot has been written about that subject already, but it’s that big that it still deserves a spot on my blog. Especially the Microsoft Intune configuration belongs on my blog. In this post I’ll show the required configurations that should be performed, by an administrator and the the user, to enable the user to use a security key as a sign-in method. My user will use a Yubikey 5 NFC security key. I’ll start this post with the authentication method policy that should be configured in Azure AD, followed by the steps for a user to register a security key. I’ll end this post by showing the different methods to configure security keys a sign-in method on Windows 10, by using Microsoft Intune, and the end-user experience.
Keep in mind that the best experience, for password-less sign-in with security keys, is on Windows 10 version 1903 or higher. This is caused by the fact that the PassportForWork CSP setting is introduced in Windows 10 version 1903.
Configure the authentication method
The first step in enabling password-less sign-in with security keys, is configuring the authentication method. Within Azure AD there is the Authentication method policy available, which is currently still in preview, that can be used to enable password-less authentication for users. Either all users, or a specific group of users. Within that policy it’s currently possible to enable FIDO2 security keys and Microsoft Authentication as password-less authentication options. The following three steps walk through the process of enabling FIDO2 security keys as a password-less authentication option for all users.
- Open the Azure portal and navigate to Azure Active Directory > Authentication methods > Authentication method policy (preview) to open the Authentication methods – Authentication method policy (preview) blade
- On the Authentication methods – Authentication method policy (preview) blade, select FIDO2 Security Key to open the FIDO2 Security Key settings blade
- On the FIDO2 Security Key settings blade, provide the following information and click Save
- ENABLE: Select Yes
- TARGET: Select All users (use Select users to only enable for specific users)
- Allow self-service set-up: Select Yes
- Enforce attestation: Select Yes
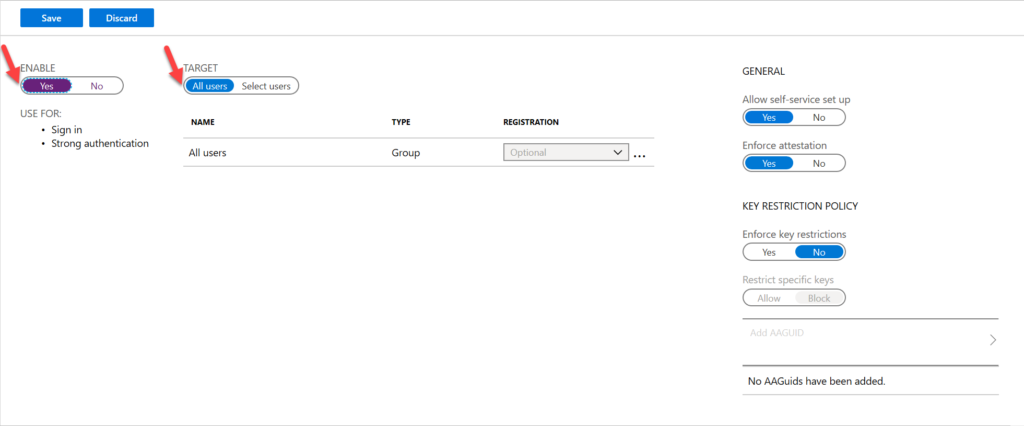
Figure 1: FIDO security keys
The key restriction policy settings are not working yet and should be left default for now.
Register security key as sign-in method
The second step is that the user must register a security key that can be used as sign-in method. That does require that the user already registered an Azure MFA method. If not, the user should first register an Azure MFA method. After registering an Azure MFA method, the following nine steps will walk the user through the process of adding an USB security key.
- Open the My Profile and navigate to Security info to open the Security info section
- On the Security info section, click Add method to open a dialog box
- On the Add method page, select Security key and click Add
- On the Security key page, select USB device and click Next
- A browser session will open to register the security key
- Insert the security key, touch it, provide a PIN and click Next
- Touch the security key another time and click Allow
- Provide a name for the security key and click Next
- On the Your all set page, click Done
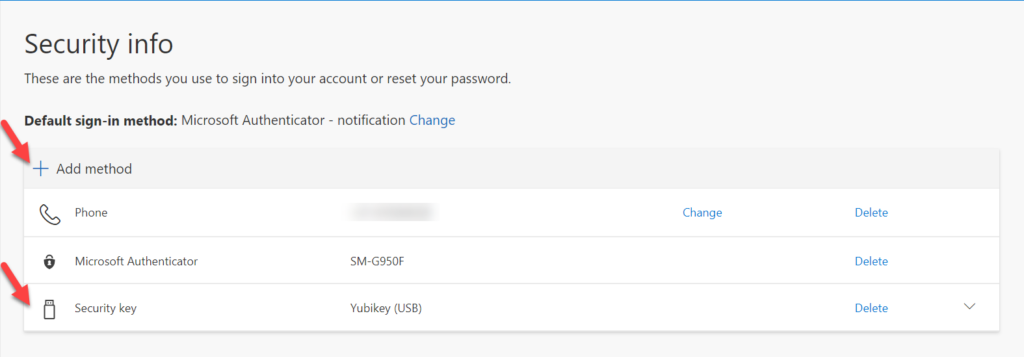
Figure 2: Register security key
After registering a security key as a sign-in method, the user can already use the security key as a sign-in method for browser sessions.
Configure security keys as a sign-in option
The third and last step is to configure security keys as a sign-in option on Windows devices. Within Microsoft Intune there are multiple methods for enabling security keys as a sign-in option on Windows 10 devices. It’s also good to keep in mind that, even though password-less sign-in is supported starting with Windows 10, version 1809, the following configuration options are all for Windows 10, version 1903 or later. The reason for that is actually quite simple, as the required setting (UseSecurityKeyForSignin) is introduced in the PassportForWork CSP with Windows 10, version 1903.
Using Windows enrollment (Windows Hello for Business) settings
The first configuration option is by using the Windows Hello for Business settings that are available within the Windows enrollment settings. Those settings actually enable the administrator to configure the use of security keys for sign-in independent of actually configuring Windows Hello for Business. The biggest challenge with this approach is that it can’t be slowly implemented, as it’s all or nothing. The following two steps walk through this configuration.
- Open the Azure portal and navigate to Microsoft Intune > Device enrollment > Windows enrollment > Windows Hello for Business to open the Windows Hello for Business blade
- On the Windows Hello for Business blade, select Enabled with Use security keys for sign-in and click Save
This setting requires Windows 10, version 1903, or later, and is not dependent on configuring Windows Hello for Business.
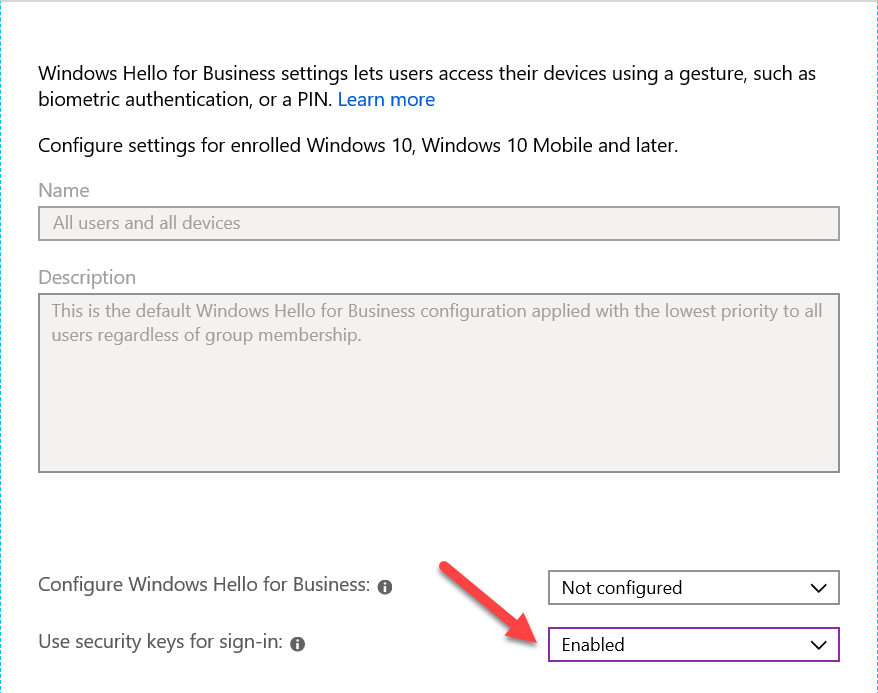
Figure 3: Windows enrollment settings
Using Device configuration (Identity protection) settings
The second configuration option is by using the Identity protection device configuration profile. The Identity protection device configuration profile, provides the same configuration options as the Windows Hello for Business settings. The biggest difference is that the Identity protection device configuration profile can be implemented by using groups, which allows a phased implementation (and differentiation). The following four steps walk through this configuration.
- Open the Azure portal and navigate to Microsoft Intune > Device configuration > Profiles to open the Devices configuration – Profiles blade
- On the Devices configuration – Profiles blade, click Create profile to open the Create profile blade
- On the Create profile blade, provide the following information and click Create
- Name: Provide a valid name
- Description: (Optional) Provide a valid description
- Platform: Windows 10 and later
- Profile type: Identity protection
- Settings: See step 4
- On the Windows Hello for Business blade, select Enable with Use security keys for sign-in and click OK;

Figure 4: Device configuration
This setting requires Windows 10, version 1903, or later, and is not dependent on configuring Windows Hello for Business
Use Device configuration (Custom) settings
The third and last option is by using a Custom device configuration profile. That Custom device configuration profile, is actually identical to the Identity protection device configuration profile. The only difference is that it’s a OMA-URI configuration, so no simple UI switch. Even though it’s good to mention this option, to remember what the actual configuration is that’s done on the background. The following four steps walk through this configuration.
- Open the Azure portal and navigate to Microsoft Intune > Device configuration > Profiles to open the Devices configuration – Profiles blade
- On the Devices configuration – Profiles blade, click Create profile to open the Create profile blade;
- On the Create profile blade, provide the following information and click Create;
- Name: Provide a valid name
- Description: (Optional) Provide a valid description
- Platform: Windows 10 and later
- Profile type: Identity protection
- Settings: See step 4
- On the Custom OMA-URI Settings blade, provide the following information and click Add to open the Add row blade. On the Add row blade, provide the following information and click OK (and click OK in the Custom OMA-URI blade);
- Name: Provide a valid name
- Description: (Optional) Provide a valid description
- OMA-URI: ./Device/Vendor/MSFT/PassportForWork/SecurityKey/UseSecurityKeyForSignin
- Data type: Select Integer;
- Value: 1
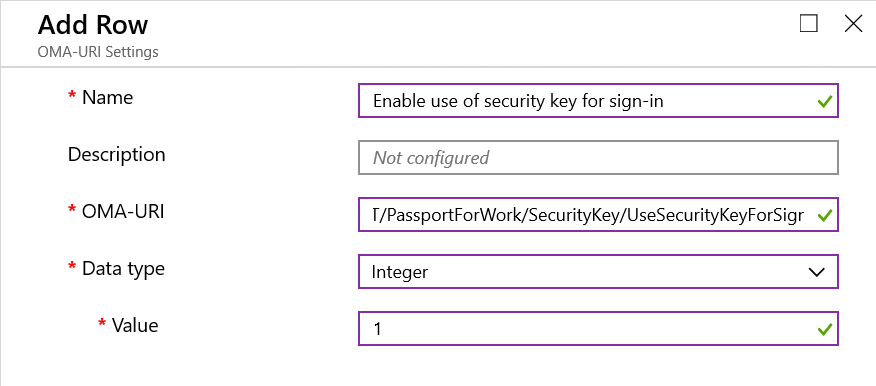
Figure 5: Custom configuration
This setting requires Windows 10, version 1903, or later, and is not dependent on configuring Windows Hello for Business
End-user experience
Let’s end this post by having a look at the end-user experience. Below on the first row it starts with a static example of the sign-in experience on Windows 10 and in a browser. The second row is an example of the password-less sign-in experience of an user on Windows 10, version 1903, using a Yubikey 5 NFC security key. I’m specifically showing the experience when using the Other user sign-in option, as it will show that the user doesn’t need to provide a username nor a password. The user only needs to have the security key and the related PIN.
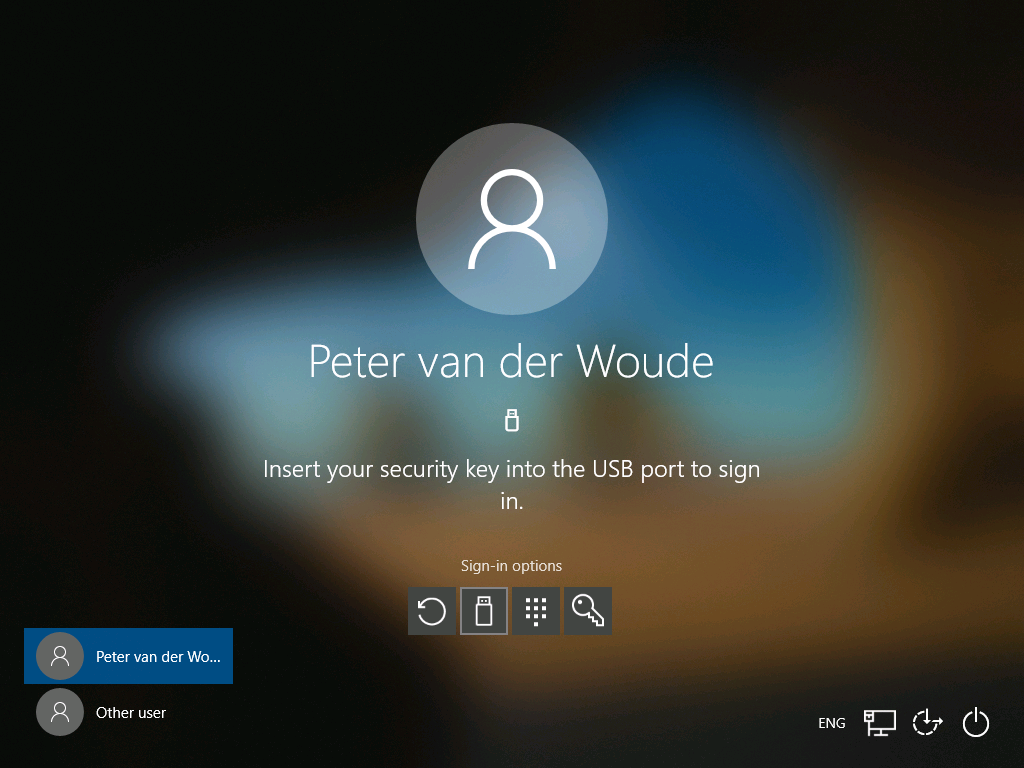
Figure 6: Windows 10 sign-in 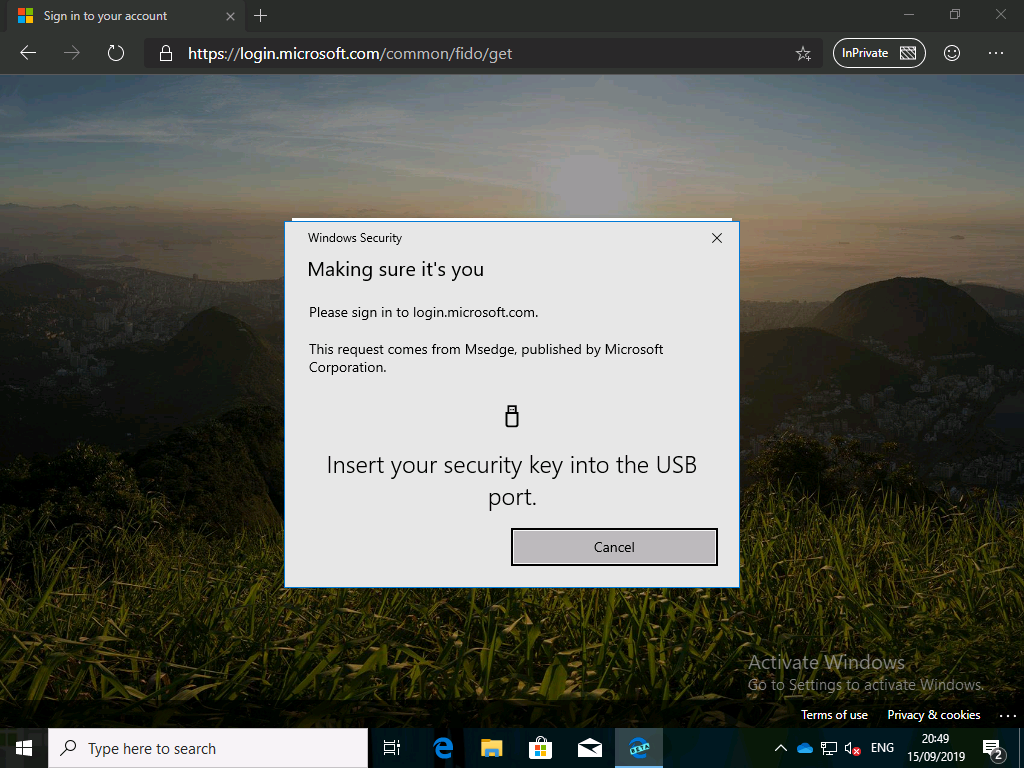
Figure 7: Browser sign-in 
Figure 8: Password-less sign-in experience
More information
For more information about password-less sign-in on Windows 10, see this doc named Enable passwordless security key sign in for Azure AD (preview).
Finally got my Feitian BioPass today for testing.
You give three setup options for enabling security key authentication on devices. In my case I already had configured the first option 2 months ago, but my device did not get the sign-in option until I added the OMA-URI.
Hi Coert,
Yes, I’ve noticed that at this moment the OMA-URI route also provides me with the biggest success rate.
Regards, Peter
I’m looking to do a phased deployment… “Using Device configuration (Identity protection) settings” appears to be what I want based on your post, but when you hover over the little “i” icon in Intune it says it enables it for all PCs in the tenant, which is scary…. So I think maybe you can’t do phased deployment using that approach?
Hi Steve,
I get your point, but from a logic perspective it should only apply to the assigned users/devices. If you want to be absolutely sure you might want to use a (free) support case.
Regards, Peter
From your post i understand the configuration of the security key uses Azure.
Is the passwordless login into Windows 10 Iot also possible when the windows pc does not have a internet connection available? Or does this depend on the type of security key?
Regards, Richard
Hi RichardB,
I don’t think that security keys are the right solution when you don’t have Internet. The security key is registered with the account of the user in Azure AD. You might want to look at other alternatives, like Windows Hello.
Regards, Peter
hi – how would I set the fido2 key up on behalf of a client, in the event the client does not have MFA authenticator set up on their phone…
Hi aleks,
The user needs to have at least one other MFA method configured to be able register a FIDO2 security key.
Regards, Peter
Hello Peter
Are there any restrictions concerning number of users using FIDO2?
We have Microsoft 365 Business Basic licences in hybrid deployment scenario. We’ve configured FIDO2 Security Key and it works well. Unfortunately only for 16 users :(. When I try to add 17th the Azure somehow hangs. It attemps “Saving authentication methods” but to no effect. 2 more hours has passed and it still trying to save the policy 🙂
Hi PSota,
I’m not a license expert, but to my knowledge passwordless authentication methods are even included with Azure AD free (see also: https://www.microsoft.com/en-ww/security/business/identity-access-management/azure-ad-pricing?market=af#coreui-contentrichblock-gtwdiwu)
Regards, Peter
Hi Peter,
We are working with some FIDO2 keys for admin usage, but run into the issue we can not use PowerShell with FIDO2 authentication because of a Conditional Access Policy that enforces us to use the FIDO2 key for authentication. Have you got around a way to get PowerShell to Authenticate with FIDO2 and the Condional Access Policy that enforces the use of FIDO2?
We want our admins to use FIDO2 as a security mechanism, but then they are not able to use Powershell unless you use PowerShell from the Azure Portal (web Powershell).
Hi Broem,
What’s the scenario? Day-to-day activities?
Regards, Peter