This week a blog post about easily configuring Windows Update for Business (WUfB). I call it easily, as I did a post about something similar about a year ago. That time It was required to configure everything with custom OMA-URI settings. Starting with Configuration Manager 1706, an easier configuration option is available for the most important settings, by using the Configuration Manager administration console. For Microsoft Intune standalone this was already available for a while. In this post I’ll walk through the easy configuration options for Microsoft Intune hybrid and standalone and I’ll end this post with the end-user experience.
Configuration
Now let’s start by walking through the configuration steps for Microsoft Intune hybrid and standalone. However, before doing that it’s good to mention that at this moment Microsoft Intune hybrid and standalone still use the “old” branch names and are not yet updated to the “new” channel name(s). Also, keep in mind that currently not all the WUfB-settings are easily configurable. There are even differences between Microsoft Intune hybrid and standalone. Having mentioned that, every WUfB-setting, available in the Policy CSP, can also still be configured via custom OMA-URI settings.
Microsoft Intune hybrid
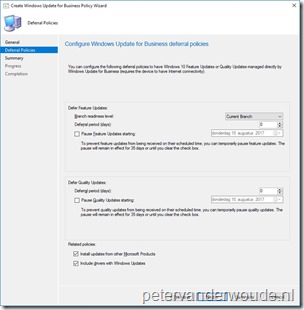
The configuration for Microsoft Intune hybrid must be done by using the Configuration Manager console. Simply walking through the wizard as shown below, will create the required policy. The policy can be deployed like a configuration baseline. The nice thing about the created policy is that it can be applied to devices managed via MDM and devices managed with the Configuration Manager client. The focus of this post is the devices managed via MDM.
Note: At this moment the policy can only be deployed to devices.
Microsoft Intune standalone
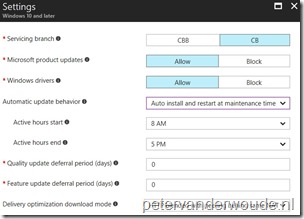
The configuration for Microsoft Intune standalone must be done by using the Azure portal. Simply walking through the blades, as shown below, will create the required update ring. The update ring can be assigned, after the creation, like anything else created in the Azure portal.
| 1 | Open the Azure portal and navigate to Intune > Software Updates > Windows 10 Update Rings; |
| 2 | On the Windows 10 Update Rings blade, select Create to open the Create Update Ring blade; |
| 3 | On the Create Update Ring blade, provide unique name and select Settings to open the Settings blade; |
| 4 |
Note: Depending on the choice made with Automatic update behavior, Active hours start and Active hours end can change to Scheduled install day and Scheduled install time. |
| 5 | Back on the Create Update Ring blade, select Create; |
Note: It’s good to mention that it’s also possible to use the pause functionality for quality and feature updates without using custom URI settings. That can be achieved by selecting the created update ring and choosing Pause Quality or Pause Feature.
End-user experience
Important: The end-user experience is based on the current experience on Windows 10, version 1709 (RS3), which is currently available as Insider Preview build (build 16251).
I used Windows 10, version 1709 (RS3), for the end-user experience as it provides a clear view on the applied update policies. The examples below are based on the available settings in the different consoles. Below on the left is of a Microsoft Intune hybrid environment and below on the right is of a Microsoft Intune standalone environment. The show overview is available by navigating to Settings > Update & security > Windows Update > View configured update policy.
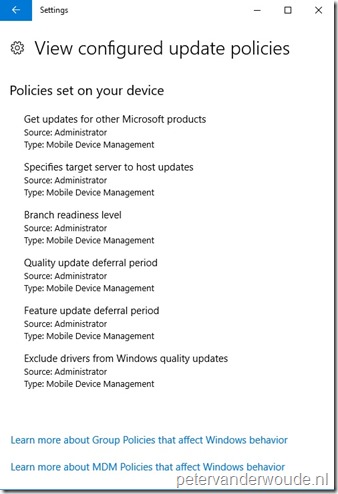 |
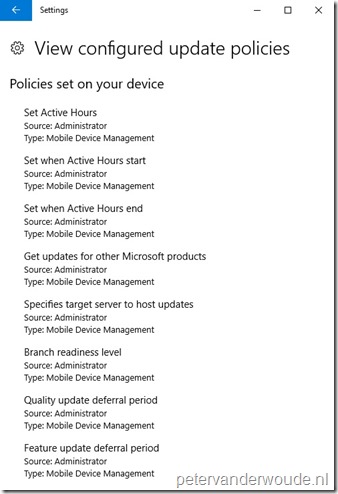 |
Another interesting place to look, is the registry. This is on the end-user device, but is more of interest for administrators. Starting with Windows 10, version 1607, the WUfB-configuration, configured via MDM, is available in the registry via HKEY_LOCAL_MACHINE\Software\Microsoft\PolicyManager\current\device\Update. The examples below are based on the available settings in the different consoles. Below on the left is of a Microsoft Intune hybrid environment and below on the right is of a Microsoft Intune standalone environment.
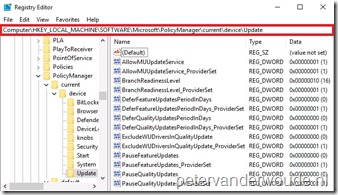 |
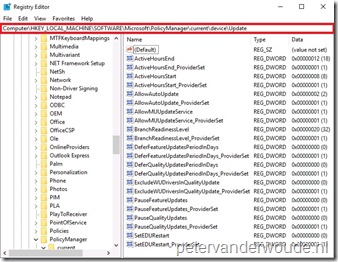 |
More information
For more information about Windows Update for Business and how it can be configured via Microsoft Intune hybrid and standalone, please refer to the following articles:
- Integration with Windows Update for Business in Windows 10: https://docs.microsoft.com/en-us/sccm/sum/deploy-use/integrate-windows-update-for-business-windows-10
- How to configure Windows Update for Business settings with Microsoft Intune: https://docs.microsoft.com/en-us/intune/windows-update-for-business-configure
- Policy CSP: https://docs.microsoft.com/en-us/windows/client-management/mdm/policy-configuration-service-provider#policies
- Configure Windows Update for Business: https://docs.microsoft.com/en-us/windows/deployment/update/waas-configure-wufb
Hi do I really need intune to get this working? If so is this a costless subscription
Hi Gert,
You do need Microsoft Intune (or other third-party MDM) when you want to do these configurations on MDM managed devices. You don’t need it if you simply want to use Windows Update for Business.
Peter
Hi Peter
I am facing an issue with the windows version 1809 where I set the Feature update deferral period to 210 days and all the policies are getting applied successfully other than FeatureUpdatesPauseStartDateTime policy which is showing the error of 0x87d1fde8-Remediation failed. Kindly suggest.
Hi Arshdeep,
Which setting are you referring to?
Regards, Peter
Hi Peter,
Interesting article. I have a question regarding rollout.
I have 3 Update rings in Intune (IT, UA and Prod) and we are running in a hybrid environment with local AD leading.
Would you do a Windows update rollout on user or on device ?
Hi Erwin,
As you want to make sure that the device is up-to-date, no matter who uses it, I would say that in general a device based rollout makes the most sense.
Regards, Peter
Yes, that’s what I thought but that makes it complicated to keep the groups up to date. As some devices should not be part of the Prod group, but only part of the IT or UA group. On userlevel it is easier to create Dynamic groups for this. Any suggestions ?
Hi Erwin,
Did you look into (automatically) tagging your devices and creating dynamic groups based on that?
Regards, Peter
Hi Peter,
Yes I did look into that, but it’s not working for me. As we have 4 domains synced to 1 Azure environment and I only need to maintain the machines for EMEA. These machines are in separate OU’s that are not synced with Azure (only users and devices). I need to figure out how to get this rolled out on a proper way 🙂
Hi Erwin,
Is there nothing that makes those devices unique?
Regards, Peter
Hi Peter,
The only thing that’s unique on the devices is the device name. For now I have “solved” it with local AD groups, containing the devices, synced to Azure and assigned to the correct Update Ring. It is extra work to add new PC’s to the correct group, but for now the “only” option. I will investigate further to see if I can find a proper solution for this.
Regards, Erwin
Great to hear that you found a workable solution for now, Erwin!