This week a blog post about the addition of a new discovery method, as Configuration Manager 1706 introduces the Azure Active Directory User Discovery. This discovery method enables organizations to search Azure AD for user information. It adds the cloud-only users to the Configuration Manager environment and it adds additional attributes to the existing on-premises user objects. The attributes that are discovered are objectId, displayName, mail, mailNickname, onPremisesSecurityIdentifier, userPrincipalName and AAD tenantID. In this post I’ll show how to configure the Azure Active Directory User Discovery and I’ll show a couple of challenges that I faced during the configuration. I’ll end this post with the administrator experience. The configuration options for the administrator and the important places for the administrator to look for the additional information.
Configuration
Let’s start with the configuration, which actually can be as simple as walking through a wizard. During the steps shown below, I’ll show the required steps for the initial cloud services configuration. Some screenshots will indicate that I’ve got multiple cloud services configured already. Before starting with the configuration, it’s good to mention that I always create a separate web app for every cloud service. By doing that I make sure that every web app only has the required permissions for it’s specific use case. Having said that, follow the next steps to configure the Azure Active Directory User Discovery by creating new web apps.
| 1 |
Open the Configuration Manager administration console and navigate to Administration > Overview > Cloud Services > Azure Services; |
| 2 |
On the Home tab, click Configure Azure Services to open the Azure Services Wizard; |
| 3 |
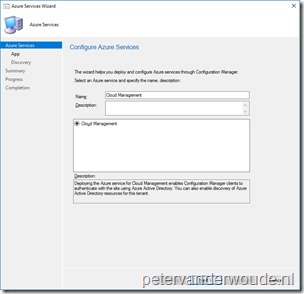 On the Azure Services page, select Cloud Management and click Next; On the Azure Services page, select Cloud Management and click Next;
Note: When this is the first cloud services that is configured, this page also contains the option to select OMS Connector, Upgrade Readiness Connector and Windows Store for Business. |
| 4 |
On the App Properties page, click Browse with Web app to open the Server App dialog box; |
| 5 |
On the Server App dialog box, click Create to open the Create Server Application dialog box; |
| 6 |
On the Create Server Application dialog box, provide the following information and click OK to return to the Server App dialog box;
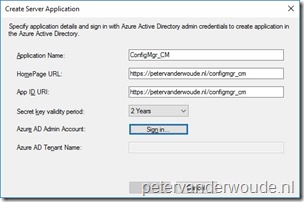 Application Name: Provide a friendly name for the app (max 200 characters); Application Name: Provide a friendly name for the app (max 200 characters);- HomePage URL: Provide the homepage URL for the app (max 200 characters);
- App ID URI: Provide the identifier URL for the app (max 200 characters);
- Secret key validity period: Select 1 Year or 2 Years for the key validity period;
- Azure AD Admin Account: Sign in with the tenant administrator account;
- Azure AD Tenant Name: Automatically populated after signing in;
Note: Once a web app is already created for the cloud management service, pressing OK will result in an informational message stating “An Azure AD Web App already exists for this Tenant. Use the pre-existing app and then click OK” |
| 7 |
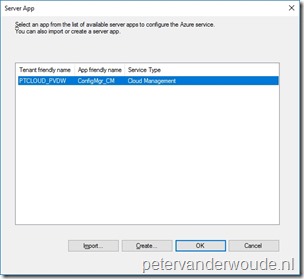 Back on the Server App dialog box, select the just created web app and click OK to return to the App Properties page. Back on the Server App dialog box, select the just created web app and click OK to return to the App Properties page. |
| 8 |
Back on the App Properties page, click Browse with Native Client app to open the Client App dialog box; |
| 9 |
On the Client App dialog box, click Create to open the Create Client Application dialog box; |
| 10 |
On the Create Client Application dialog box, provide the following information and click OK to return to the Client App dialog box;
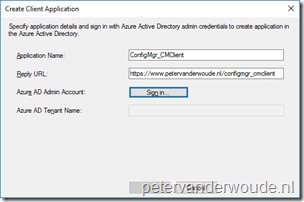 Application Name: Provide a friendly name for the app (max 200 characters); Application Name: Provide a friendly name for the app (max 200 characters);- Reply URL: Provide the reply URL for the app (max 200 characters);
- Azure AD Admin Account: Sign in with the tenant
administrator account;
- Azure AD Tenant Name: Automatically populated after signing
in;
|
| 11 |
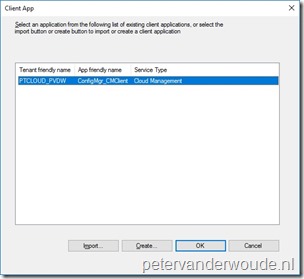 Back on the Client App dialog, select the just created native app and click OK to return to the App Properties page; Back on the Client App dialog, select the just created native app and click OK to return to the App Properties page; |
| 12 |
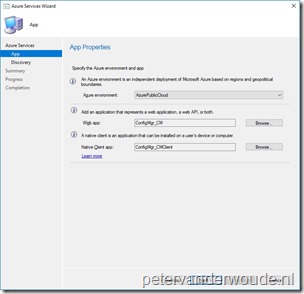 Back on the App Properties page, verify the created and selected apps and click Next; Back on the App Properties page, verify the created and selected apps and click Next; |
| 13 |
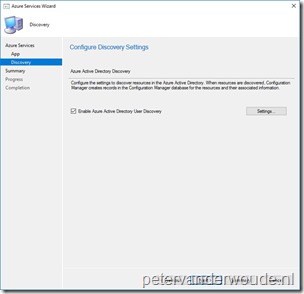 On the Configure Discovery Settings page, select Enable Azure Active Directory User Discovery and click Next; On the Configure Discovery Settings page, select Enable Azure Active Directory User Discovery and click Next;
Note: Click Settings to configure the full discovery polling schedule and the delta discovery. The default schedule for the full discovery is once every 7 days and the default interval for the delta discovery is an interval of every 5 minutes.
|
| 14 |
On the Confirm the settings page, click Next; |
| 15 |
On the Completion page, verify the results and close the wizard. |
Challenges
During my initial configuration of the Azure Active Directory User Discovery , I encountered a few challenges. The most important challenges that I faced, are the following.
| 1 |
 Unauthorized error: After the Azure Active Directory User Discovery started, it immediately failed with an unauthorized error message. This was related to the permissions of the just created web and native app. The permissions were set correctly. However, it needed a trigger, by clicking Grant Permissions, to grant the permissions for all the accounts in the directory. Unauthorized error: After the Azure Active Directory User Discovery started, it immediately failed with an unauthorized error message. This was related to the permissions of the just created web and native app. The permissions were set correctly. However, it needed a trigger, by clicking Grant Permissions, to grant the permissions for all the accounts in the directory. |
| 2 |
Unknown error: After the Azure Active Directory User Discovery started with a successful authentication, it failed again. This time with an unknown error message. This was related to an orphaned user account in Azure AD. For some reason Azure AD still contained an user account that was already removed from the on-premises AD, a long time ago. Removing the orphaned user account from Azure AD solved this challenge. |
Administrator experience
Now let’s end this post with the most interesting part, the administrator experience. From an administrative perspective, this configuration introduces at least the following new items.
| 1 |
 Discover method: One of the most interesting items is the new Azure Active Directory User Discovery. After the configuration is finished the discovery method can be found by navigating to Administration > Overview > Cloud Services > Azure Services. Selecting the cloud management Azure service, provides the option Run Full Discovery Now. The properties of the cloud management Azure service, provide the option to reconfigure the discovery configuration of the Azure Active Directory User Discovery (as shown on the right). Discover method: One of the most interesting items is the new Azure Active Directory User Discovery. After the configuration is finished the discovery method can be found by navigating to Administration > Overview > Cloud Services > Azure Services. Selecting the cloud management Azure service, provides the option Run Full Discovery Now. The properties of the cloud management Azure service, provide the option to reconfigure the discovery configuration of the Azure Active Directory User Discovery (as shown on the right). |
| 2 |
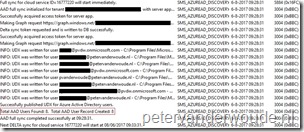 Log file: One of the most important items is the new log file SMS_AZUREAD_DISCOVERY_AGENT.log. This log files provides the information about the full and delta discoveries of the Azure Active Directory User Discovery (as shown on the right). The nice part is that the log files also provides information about the Microsoft Graph requests that it uses for the discovery. Log file: One of the most important items is the new log file SMS_AZUREAD_DISCOVERY_AGENT.log. This log files provides the information about the full and delta discoveries of the Azure Active Directory User Discovery (as shown on the right). The nice part is that the log files also provides information about the Microsoft Graph requests that it uses for the discovery. |
| 3 |
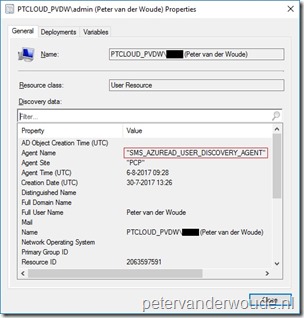 Cloud-only users: The most useful item is the availability of the cloud-only users in the on-premises environment. These users can be recognized by only having the Agent Name of SMS_AZUREAD_USER_DISCOVERY_AGENT (as shown on the right). The availability of the cloud-only users in the Configuration Manager environment, and the availability of the new attributes for existing users, enables a whole lot of new scenarios. Most of these scenarios are related to managing Windows 10 Azure AD joined devices with an Configuration Manager client. Cloud-only users: The most useful item is the availability of the cloud-only users in the on-premises environment. These users can be recognized by only having the Agent Name of SMS_AZUREAD_USER_DISCOVERY_AGENT (as shown on the right). The availability of the cloud-only users in the Configuration Manager environment, and the availability of the new attributes for existing users, enables a whole lot of new scenarios. Most of these scenarios are related to managing Windows 10 Azure AD joined devices with an Configuration Manager client. |
| 4 |
 User properties: The overall most interesting, most important and most useful item is by far the information in the database. The main user tables and views now contain additional fields for cloud-related information. Some nice information can be found on the right, were I used a simple query to get information about user that contain attributes from the Azure Active Directory User Discovery. The query I used here was: User properties: The overall most interesting, most important and most useful item is by far the information in the database. The main user tables and views now contain additional fields for cloud-related information. Some nice information can be found on the right, were I used a simple query to get information about user that contain attributes from the Azure Active Directory User Discovery. The query I used here was:
SELECT Unique_User_Name0,User_Principal_Name0,AADTenantID,AADUserID,CloudUserId
FROM v_R_User
WHERE AADTenantID IS NOT NULL
|
More information
For more information about the Azure AD user discovery and how to use and configure it, please refer to the following articles:


1 thought on “A new discovery method: Meet the Azure Active Directory User Discovery!”