Last week Microsoft announced the ability to deploy Win32 apps via Microsoft Intune during Microsoft Ignite. That takes away one of the biggest challenges when looking at modern management and Microsoft Intune. I know that I’m not the first to blog about this subject, but I do think that this subject demands a spot on my blog. Besides that, I’ll show in this post that the configuration looks a lot like deploying apps via ConfigMgr. Not just from the perspective of the configuration options, but also from the perspective of the configuration challenges when the installation contains multiple files. In this post I’ll show the configuration steps, followed by the end-user experience, when deploying a customized Adobe Reader DC app (including the latest patch).
Pre-process Win32 app
The first step in deploying Win32 apps via Microsoft Intune is using the Microsoft Intune Win32 App Packaging Tool to pre-process Win32 apps. Wrap the Win32 app. The packaging tool wraps the application installation files into the .intunewin format. Also, the packaging tool detects the parameters required by Intune to determine the application installation state. After using this tool on apps, it will be possible to upload and assign the apps in the Microsoft Intune console. The following six steps walk through wrapping the Adobe Reader DC app, including some customizations and the latest patch.
| 1 | Download the Microsoft Intune Win32 App Packaging Tool. In my example C:\Temp; |
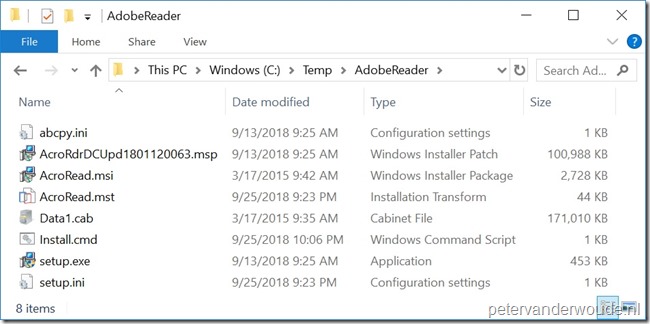
| 2 | Create a folder that contains the Adobe Reader DC installation files (including the latest MSP and the MST that contains the customizations). In my example C:\Temp\AdobeReader; |
| 3 | Create an installation file that contains the complete installation command and place that file in the directory with the installation files. In my example I created an Install.cmd in C:\Temp\AdobeReader that contains msiexec /i “%~dp0AcroRead.msi” TRANSFORMS=”%~dp0AcroRead.mst” /Update “%~dp0AcroRdrDCUpd1801120063.msp” /qn /L*v c:\InstallReader.log ; |
| — |  |
| — | Note: This method is similar to an easy method in the ConfigMgr world to make sure that the installation process would look at the right location for the additional files. |
| 4 | Open a Command Prompt as Administrator and navigate to the location of IntuneWinAppUtil.exe. In my example that means cd \Temp; |
| 5 | Run IntuneWinAppUtil.exe and provide the following information, when requested
|
| — |  |
| — | Note: Even though I will use a command file to trigger the installation, it’s important to specify the MSI as setup file. That will make sure that, during the configuration in Microsoft Intune, the information will be preconfigured based on the information of the MSI. |
| 6 | Once the wrapping is done. The message Done!!! will be shown. In my example a file named AcroRead.intunewin will be created in C:\Temp. |
| — |  |
Note: It’s possible to use something like 7-Zip to open the created AcroRead.intunewin file. Besides content, that file contains a Detection.xml file that shows the detected information of the installation file.
Configure Win32 app
Now let’s continue by looking at the actual configuration steps, within Microsoft Intune, to configure the Win32 app. The following 17 steps walk through all the steps to configure the Win32 app, by using the .intunewin file. After configuring the app, make sure to assign the app to a user group.
| 1 | Open the Azure portal and navigate to Intune > Client apps > Apps to open the Client apps – Apps blade; |
| 2 | On the Client apps – Apps blade, click Add to open the Add app blade; |
| 3 | On the Add app blade, select Windows app (Win32) – preview to show the configuration options and select App package file to open the App package file blade. |
| 4 |  On the App package file blade, select the created AcroRead.intunewin as App package file and click OK to return to the Add app blade; On the App package file blade, select the created AcroRead.intunewin as App package file and click OK to return to the Add app blade; |
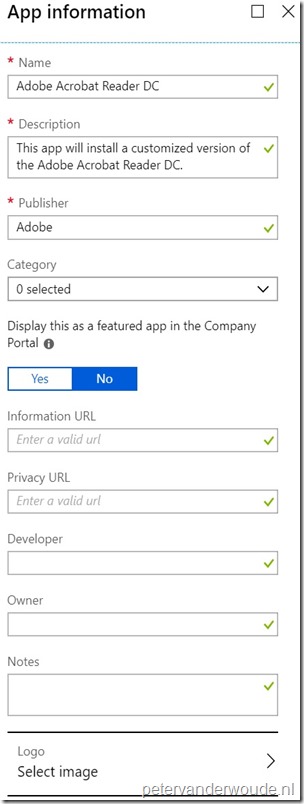
| 5 | Back on the Add app blade, select App information to open the App information blade; |
| 6 |
Note: The remaining information regarding the Information URL, the Privacy URL, the Developer, the Owner, the Notes and the Logo is optional. |
| 7 | Back on the Add app blade, select Program to open the Program blade; |
| 8 |  On the Program blade, change the Install command to “Install.cmd”, verify the Uninstall command and click OK to return to the Add app blade; On the Program blade, change the Install command to “Install.cmd”, verify the Uninstall command and click OK to return to the Add app blade; |
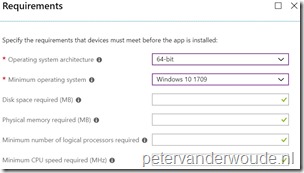
| 9 | Back on the Add app blade, select Requirements to open the Requirements blade; |
| 10 |
|
| 11 | Back on the Add app blade, select Detection rules to open the Detection rules blade; |
| 12 | On the Detection rules blade, select Manually configure detection rules and click Add to open the Detection rule blade. |
| 13 | 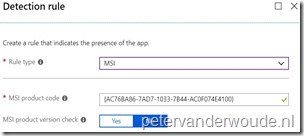 On the Detection rule blade, select MSI as Rule type, verify the pre-provisioned MSI product code and click OK to return to the Detection rules blade; On the Detection rule blade, select MSI as Rule type, verify the pre-provisioned MSI product code and click OK to return to the Detection rules blade; |
| 14 | Back on the Detection rules blade, click OK to return to the Add app blade; |
| 15 | Back on the Add app blade, select Return codes to open the Return codes blade; |
| 16 | 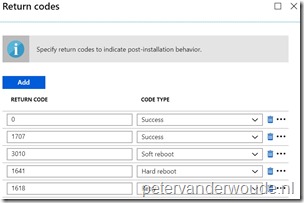 On the Return codes blade, verify the preconfigured return codes and click OK to return to the Add app blade; On the Return codes blade, verify the preconfigured return codes and click OK to return to the Add app blade; |
| 17 | Back on the Add app blade, click Add to actually add app. |
Note: The Intune Management Extension will be used for installing the Win32 app. That also means that the process regarding detection, download and installation, of the Win32 app, can be followed in the IntuneManagementExtension.log file.
End-user experience
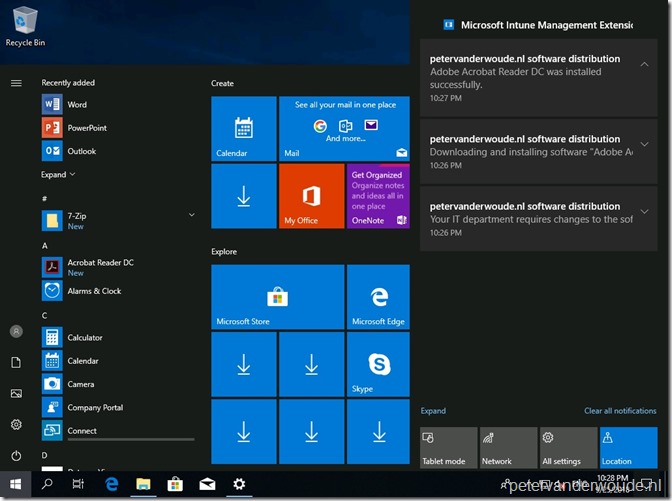
Let’s end this post by looking at the end-user experience. The user will receive a notification that changes are required, followed by a notification that a download is in progress, followed by a notification about a successful installation. All three stages are shown below. After the last message, the Start Screen shows the newly installed Adobe Reader DC app. Also, in this case, the Desktop doesn’t show the default desktop icon, which I removed using the customization file (MST).
More information
For more information about the Microsoft Intune Win32 App Packaging Tool, please refer to the GitHub location here.
I was very happy when this was announced last week.
When do you expect it is available in all tenant.
Hi Ronald,
I can only say soon and according to this article (https://techcommunity.microsoft.com/t5/Enterprise-Mobility-Security/Sneak-peek-Public-preview-of-Win32-application-deployment-using/ba-p/264460) it should be as soon as in the next Intune release.
Regards, Peter
Hi Peter, very nice post as always. We do not see the Windows app (Win32) – preview option (yet?). Do you know if we can already make that available to us?
Hi Ronald,
I can only say soon and according to this article (https://techcommunity.microsoft.com/t5/Enterprise-Mobility-Security/Sneak-peek-Public-preview-of-Win32-application-deployment-using/ba-p/264460) it should be as soon as in the next Intune release.
Regards, Peter
Do you have any information about how to enable this preview feature on an Intune tenant?
I for the love of me can’t find the option to turn on preview features or opt-in.
Hi Niclas,
I can only say that it will be available soon and according to this article (https://techcommunity.microsoft.com/t5/Enterprise-Mobility-Security/Sneak-peek-Public-preview-of-Win32-application-deployment-using/ba-p/264460) it should be as soon as in the next Intune release.
Regards, Peter
Hi Peter i miss the limitations of the current win32 app deploy. Maybe worth to add them?
No user context app installation
No system context installation without user logged on
No dependency support
No supersedence
Hi RKast,
The idea of the post is really only about showing the possibilities and not really about pros and cons. Having said that, You’ve now posted some of the current limitations 🙂
Regards, Peter
Can you supress the notifications?
Hi RKast,
At this moment you cannot suppress the Intune notifications on the device (only the screens of the installation itself).
Regards, Peter
Hej Peter, Very nice post indeed. I have tryed packaging JRE 8 ver. 181.exe with the tool and deployed it with intune. Works as a charm! Thanks for a very good post. : -)
Good to hear Ido and thank you for the kind words!
Yes good post and as with any first release (in preview as well) it will be limited. Looking forward to new revisions as this is an excellent start.
Thank you, Miguel! The next Intune update actually already contains the first revisions.
Thank you Peter. What are those revisions?
Other question, is there any documentation or best practice how to update an already deployed win32 app
Hi Ronald,
The first revision are just released with the latest update (see also the what’s new page of Intune).
Regards, Peter
Hi Peter,
Could you use a powershell script rather than a batch file?
Hi Kevin,
Keep in mind that this post is just an example, using something like PowerShell should also be possible.
Regards, Peter
Hi Peter,
In step #3 you reference MST and MSP files for your Install.cmd. Is the Intune Win32App Packaging tool actually wrapping those file into the .intunewin file? If so, is there a way to tell if they are being included? If not, are you including/referencing the MST and MSP files during the install?
Hi Niles,
Yes, the MST and MSP files are part of the .intunewin file and are referenced by using the old-school install.cmd.
Regards, Peter
Thank you, that is what I took away from your article and the GitHub post. However, I do not think my install.cmd is working when wrapped in this manner. Running the script directly from the CMD either in or outside of the install.cmd file works fine. So I am not sure if I am missing a step. Here is the content of my install.cmd.
msiexec.exe /i TeamViewer_Full.msi /qn importregfile=1 & TIMEOUT 30 & “C:\Program Files (x86)\TeamViewer\TeamViewer.exe” assign –api-token “APITOKEN” –group “TEST” –grant-easy-access –alias %COMPUTERNAME%
Again, running this as is or complied inside the install.cmd from the command prompt work fine, just not when I try to deploy it from Intune via Win32. I do get the Intune Management Extension alerts but the app never installs.
Please advise,
Niles
Hi Niles,
Does the installation start? If not, you might want to use the %~dp0 in front of the MSI.
Regards, Peter
Hi Peter,
Thank for getting back to me. I have since resolved this issue but was away over the weekend so I was not able to confirm. Are good friend Whitespace was to blame. 🙂
Good news! Thank you for letting us know, Niles!
Hi Peter,
Win32 Apps do not appear to run elevated. I have a script that needs to import a reg file during installation and it fails to import. The behavior is the same (as expected) when I run in manually, “Access denied”, as the local user. However, the application does install successfully.
Thoughts?
Hi Niles,
You can configure the install behavior (user versus device) in the program section of the configuration.
Regards, Peter
Hi Peter,
That option is greyed out? In your screenshot for this section, I noticed quotes around “install.cmd”. Is that required? If so, the option for System vs User is still greyed out.
Please advise.
Hi Niles,
It could be that it has to do with the app that was wrapped. In my case it was an MSI.
Regards, Peter
Hi Peter,
My file is also an MSI. The files contained in the folder are as follows,
install.cmd
teamviewer.msi
teamviewer_settings.reg
This is the command that I am running,
IntuneWinAppUtil -c “C:\Temp\TeamViewer\Help Desk” -s TeamViewer_Full.msi -o “C:\Temp\TeamViewer\Temp\Help Desk” -q
I just tried removing the *.reg file but no change on the “Install behavior” slider.
Thoughts?
Hi Niles,
You might want to use the %~dp0 variable before the name of your MSI.
Regards, Peter
Hi Peter, great article, thanks for taking the time.
My MSI pulls info from a config file during installation. The config file doesn’t need to specified as part of the installation command, the MSI just requires that the config file is located in the same directory as the MSI at the time of installation.
So for step 8 I will simply have “msiexec /i /qn” which works fine when installing via the command line (providing the .conf file is in the same directory as the MSI as mentioned above).
Will the steps in this article still work for me? Will it include my .conf file in the intunewin file as part of the pre-processing step 5? I hoped to see it mentioned in either the output (pre-processing step 6 above) or in the .xml file output. Unfortunately I can’t see it mentioned in either.
I would test this myself but I won’t get access to intune for several weeks and would really appreciation knowing sooner.
Thank you in advance.
Hi Guy,
The wrapper wraps all the files that are part of the specified source folder.
Regards, Peter
Hi Peter,
Adding the %~dp0 variable, if I did not right, did not make any changes.
INSIDE INSTALL.CMD:
msiexec.exe /i “%~dp0\TeamViewer_Full.msi” /qn importregfile=1
or should it be set here,
IntuneWinAppUtil:
IntuneWinAppUtil -c “C:\Temp\TeamViewer\Help Desk” -s “%~dp0\TeamViewer_Full.msi” -o “C:\Temp\TeamViewer\Temp\Help Desk” -q
Hi Niles,
You should remove the backslash (“\”) between the variable and the name of the MSI.
Regards, Peter
Hi Peter,
Some strange thing is happening or i just plain dont understand ?
I create a folder Adobe with all files in it, the setup and the cmd script etc.
When i run IntuneWinAppUtil and enter the source folder, setup msi file and output the intunewin file get’s created OK.
When i open the intunewin file with 7zip and look into the Content folder i only see the Adobe MSI file but the CMD file and rest are missing, is this expected behaviour ?
Hi RKast,
All the files of your source folder should be available.
Regards, Peter
Hi Peter,
I’ve been able to successfully package and deploy various applications. Although recently I have found that for a particular office the applications have not consistently deployed. I suspect that it might be connectivity to some Intune endpoints.
What would you recommend to check? I’ve seen the Microsoft Connectivity Analyzer tool, would that help?
Cheers
Hi Richard,
Is it an office with network equipement? If so, I would start by looking their for drops, etc.
Regards, Peter
Hi Peter,
How does Intune take care of packages that has dependencies? Can i wrap 2 msi into one intunewin file?
Thanks and regards
WaiYin
Hi WaiYin,
No. That intellegence is not coming from Intune. You either need to create it yourself, or wait for the coming update of the Intune services that will allow you to configure dependencies.
Regards, Peter
Hi Peter,
Thanks a bunch for you informative blog! Do you know if it is possible to use interactive win32-packages? In some situations I need to deploy a package that requires user input. It seems win32-packages only run hidden.
Thanks! Indy
Hi Indy,
I haven’t looked at that yet.. What are your experiences?
Regards, Peter
Thanks for the good guides! I have an application that I have successfully pushed to my device via the instructions above. If my device already has a version of this application but I want to install the latest version, is there a way to do this? There is no update software within the application, so I tried creating another application with the new MSI, however when I assign the new app to my device, it will not install the newer version of the app.
Hi Jeremy,
At this moment there is no intelligence to act on update or upgrade scenarios. You need to configure (or script) the required update yourself.
Regards, Peter
Hello Peter,
I have a question about a software package that is installed in the root of the C drive (C: \ TimeWriterV5-Pro). And one of the subfolders contains the configuration and license. This license must be copied manually to the underlying folder. Can I make an intune installation file from this entire folder using the Win32 App Packaging Tool? So that this is also automatically deployed to the clients from Intune (office 365)?
So what I would like is the following: I have the application Timewriter already installed and configured on 1 client. The application (TimeWriter) only uses files within its own directory (C: \ TimeWriterV5-Pro) and is therefore not dependent on other files on the computer, and TimeWriter does not use the registry. With intune, I would like all clients to be automatically provided with the entire folder, including the underlying folders. and updates can be downloaded automatically without admin rights. Is this possible?
Thank you in advance for a response.
Hi Damon,
Yes, you should be able to package the content together with a simple batch file(or PowerShell script) that will copy the content.
Regards, Peter
Hi Peter,
Thanks for the great posts over the years.
I have followed all the instruction here, yet i am not able to get the .msp file update the Adobe version. So I tested the cmd running by itself. When running the cmd in PS, I get error “The installation package could not be open…”
My folder before creating the .intunewin file looks exactly like yours.
When I ran, setup.exe \setup.ini in PS everything works as expected. It installs and updates as well.
But again running via Intune, it only installs the default version, the outdated one. No update installed.
I been trying several way for couple of weeks now, but no go. Tried Reader and DC pro both, but same results.
Without the .msp file command runs just fine in PS. When I add the .msp file it gives the error as above.
cmd -> msiexec /i “%~dp0AcroPro.msi” TRANSFORMS=”%~dp0AcroPro.mst” /Update “%~dp0iupdate.msp
Tried it on 3 different machines as well.
What could it be?
Hi Dipesh,
Did you copy-and-paste the command line directly from my blog? If so, you might have to adjust the quotes (“”) around the files.
Regards, Peter
Hi Peter,
I have tried to follow the exact same steps in an attempt to include a key file. However, the app fails to be deployed from Intune. Do you have any clue what the reason could be for the App deployment to fail? Cheers, Erona
Hi Erona,
Have you looked at the logs of the Intune Management Extensions?
Regards, Peter
Maybe we missed something, after the app updates we are getting notifications this install is failing on clients, those clients which the app is already installed. Do we need to keep the package updated or is there a setting where if it’s already installed it will not try to install again. Any ideas?
Hi Carl,
The detection rule should make sure that the app is detected when it’s already installed.
Regards, Peter
i need to install the application which contains .exe file and two .ini files. Hence i wrap the application with all these three files. However i can see the the ini files are not getting copied in the program files . i assume intunewin push the .ini files while installation but in my case this is not happening . Can somebody help me?
Hi Shirish,
Wrapping the files only makes sure that you can use the files on the device. However, if you don’t have an action that copies the files, or something like that, it will simply be removed again.
Regards, Peter
does anybody had succes creating a intuneapp form teamviewer.exe files?
created a app with intunewinapputil but no luck getting it installed with intune. stays on status installing
adding a teamviewer.msi in intune installed right away. but are subscription doesn’t allow a msi for costum modules. only .exe.
can you help convert the exe to intuneapp?
Hi Mattheas,
Without testing it, I would say that it shouldn’t be an issue. Did you very the logs on the device?
Regards, Peter
Hi Peter,
I did the same steps ,,but i am getting an extra step
Do you want to specify catalog folder (Y/N)?
If I say Y,,then it asks,
“Specify folder name-”
If I say N,,then intuneWin file was created , but at the time of adding app intune wont accept that file.
I am not able to go ahed .
please help
Thanks .
Hi Shalini,
Depending on the app, it should be possible to simply specify N (or bypass by using the full command).
Regards, Peter
Hi Peter,
Thanks for the guide.
I have a quick query please: I have all my files in C:\PDFSetup. I have an installscript.bat file which has the following:
msiexec /i “C:\PDFSetup\PDF1_enu_Setup.msi” TRANSFORMS=”C:\PDFSetup\PDF1_enu_Setup.mst” /qn
Do I need to keep the C:\Temp in the path or can I remove before wrapping in to the .intunewin file? Will it still work if I remove the C:\Temp and replace with:
msiexec /i “PDF1_enu_Setup.msi” TRANSFORMS=”PDF1_enu_Setup.mst” /qn
I noticed you have %~dp0 variable in your script.
Hi Westy,
The %~dp0 variable is a specific batch variable which is often used to refer to the current directory of the running script.That’s an easy method to make the correct referral.
Regards, Peter
All good stuff but you now Scripts ar not supportet by Win32 Apps!
https://docs.microsoft.com/en-us/troubleshoot/mem/intune/software-distribution-best-practices
Unsupported scenario: Deploy scripts or batch files
The Intune service is usually used to deploy .msi or .exe files. Microsoft doesn’t support using Intune to deploy custom scripts or batch files.
Any Win64 Variable is not avalible.
Hi René,
That article is referring to the old Windows PC client.
Regards, Peter
Hi Peter,
You saved my life! I was tired of trying to make a Teamviewer 15 deployment which requires absolute paths for the configuration files and there was no way to get it to work.
I saw your post and I did the test with the installation using a cmd script and the execution paths %~dp0 (I didn’t know about them ngl) and saved me from having to reconfigure all of my clients!
If someone by any chances comes here for the same I quote (.msi, config file and .cmd on the same folder):
msiexec /i “%~dp0TeamViewer_Host.msi” /qn CUSTOMCONFIGID=XXX APITOKEN=XXX SETTINGSFILE=”%~dp0ConfigFile.tvopt”
Thank you very much for your post.
Greetings from Spain,
Enrico.
Thank you for the information Enrico!
Regards, Peter
“Do you want to specify catalog folder (Y/N)?”
What IS a catalog folder? Is there anywhere in Microsoft literature which describes it?
Hi Brian,
The files in the catalog folder are used as a catalog file on Windows 10 S mode (see also: https://github.com/Microsoft/Microsoft-Win32-Content-Prep-Tool)
Regards, Peter
I was lazy and copy/pasted from step 3 the quoted text into a notepad, then replaced what I needed. Turns out notepad copied the fancy quote font and unsurprisingly, the install.cmd failed. I typed it out like a normal person, and it worked. Just FYI, in case some other lazy individual runs across this, msiexec does not like fancy quotes.
Thank you for the mention Garr. Sadly that’s indeed a known thing.
Regards, Peter
Thankyou for this thread, it was helpful and I was able to install TV 15 as Enrico. Thanks for the informative blog.
Hello Peter,
Just curious in your .cmd file you don’t use a “\” between the %~dp0 and the filename. Is that on purpose? Does using this negate needing to use the backslash as would typically be used?
Thanks!
John
Hi John,
Apologies for the late reply, as I was enjoying my vacation. That is indeed on purpose. The backslash is not needed when using that variable.
Regards, Peter
Thanks, i was noticing that too
Hi John,
msiexec /i “%~dp0nitro_pro13_x64.msi” TRANSFORMS=”%~dp0nitro_pro13_x64.mst” /qn /L*v c:\InstallNitro.log ;
I will testing this command for Nitro. Quick question. since install.cmd is stored in temp directory. How will it deploy to Intune enrolled? How will other devices pick up that install.cmd?
Hi Alan,
You wrap the installation files and upload it the Microsoft Intune. After that you deploy the app to the devices and Intune will provide the content.
Regards, Peter
Hey Peter thank for the descriptions. I liked learning how to do it manually but what about using a packaging program to save time, is it worth it? I saw an ad for a win32 app packaging and deployment called milkybyte.com but im sure there are lots out there. Which app packager is the best and why would you package manually instead of with a 3rd party if they are inexpensive?
Thank you for the content Peter this has been helpful to get started. I will check your other topics because i think they will be relevant to me too
Hi Milo,
That totally depends on what you want to use the packaging program for. For just creating Win32 package (.intunewin), I would not get 3rd party tooling.
Regards, Peter
Hi Peter,
I love your blog. I learn a ton from you so thank you.
I have a situation where I need to deploy a Win32 app and thanks to your walk through, it is very easy. However, I have to run powershell to uninstall a product that will mess up the ability for the Win32 app to run. Is it possible to call a powershell script from within the Install.cmd prior to the line containing the msiexec command?
Hi David,
Theoratically, yes. However, you might want to look at using a separate Win32 app for a cleaner result.
Regards, Peter
After spending more than 6 hours, trying to deploy Acrobat Reader DC Standard via Intune your method was the only one which works.
Thank you very much !!!!!
Keep attention to the semicolons. When you copy them and paste them they are wrong because of the html format.
” WRONG
” RIGHT
Thank you, Patrick!
Peter,
Your articles have been great for helping me learn how to deploy apps with intune. I’m not finding any documentation on this particular subject so I thought I’d bounce off of you if you have a moment.
I can successfully install an msi using a CMD file and msiexec. However, I learned that there might be a consumer version of the software installed on certain PC’s which has to be removed before I can install the commercial version.
In the CMD file, is it possible to launch a powershell command to uninstall the consumer version (assuming it exists) before the msiexec runs? If so, will the process pause to wait for the results of the uninstall or does the msiexec command run immeditaly afterward?
I hope this makes sense. Thanks for sharing all your knowledge!
Hi David,
That could be an option, as you can basically script anything together. Personally, I would first look an see if you could create a separate app for that and rely on the app model functionalities.
Regards, Peter
Hi Peter
Could you please point me to a reference for the “app model functionalities”? If not available, can you give me a high level definition of what that means?
I’ve run across another requirement where the application requires .Net 6.x or higher. One machine did not have that installed so the install failed. Any recommendations on how to check for that and if not available, perhaps install it before the app tries to install?
Love your blog…thank you.
Hi David,
I was referring to the abilities to configure, requirements, dependencies, detections and supersedence, for applications. So, when another app is required to be installed, you can configure it as a dependency.
Regards, Peter
Hi David,
I’m trying to deploy custom Forticlient vpn package, wrapped msi and mst with the install cmd command together via intune tool, the install process is starting but it seems to fail.
im pasting the cmd file name in the install command in the intune package build as you mentioned above in the article.
my command is:
msiexec /i “%~dp0FortiClient.msi” TRANSFORMS=”%~dp0FortiClient.mst” /qn /L*v c:\FortiClinet\InstallFortiClinet.log
Hi Artiom,
What does your package look like? And also, do you see anything in the logs?
Regards, Peter