This week a blog post about a very nice new app type in Microsoft Intune standalone. The Office 365 Pro Plus Suite (Windows 10) app type. This app type makes it very easy to assign Office 365 ProPlus apps to managed Windows 10 by utilizing the Office CSP. Additionally, it also allows the installation of the Microsoft Project Online desktop client, and Microsoft Visio Pro for Office 365. I know, I’m not the first to write about this app type, nor will I be the last, but this app type needs all the attention it can get. It’s that nice. I’ll start this post with some prerequisites and important information, followed by the configuration. I’ll end this post with the administrator experience.
Good to know
Before starting with the configuration of the new app type, it’s good to know the following current limitations and requirements.
- Devices must be running Windows 10, version 1703 or later. That version introduced the Office CSP;
- Microsoft Intune only supports adding Office apps from the Office 365 ProPlus 2016 suite;
- If any Office apps are open when Microsoft Intune installs the app suite, end-users might lose data from unsaved files. At this moment the end-user experience is not that pretty;
- When the Office apps are installed on a device that already has Office installed, make sure to be aware of the following:
- It’s not possible to install the 32-bit and the 64-bit Office apps on the same device;
- It’s not possible to install the same version of the Click-to-run, and MSI versions of Office on the same device;
- When an earlier version of Office is installed, using Click-to-Run, remove any apps that must be replaced with the newer version;
- When a device already has Office 365 installed, assigning the Office 365 ProPlus 2016 suite to the device might mean that the Office subscription level must be changed.
Configuration
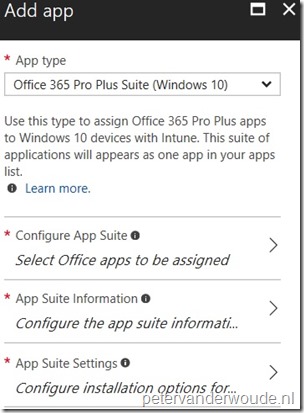
After being familiar with the current limitations and requirements, let’s continue with the configuration. The 10 steps below walk through the configuration of the Office 365 Pro Plus Suite (Windows 10) app type. After creating the app type, assign the app like any other app. Keep in mind that at this moment the app can only be assigned as Required, Not applicable or Uninstall. Available is currently not an option.
| 1 | Open the Azure portal and navigate to Intune > Mobile apps > Apps; |
| 2 | Select Add to open the Add app blade; |
| 3 |  On the Add app blade, select Office 365 Pro Plus Suite (Windows 10) as App type to add the Configure App Suite, the App Suite Information and the App Suite Settings sections; On the Add app blade, select Office 365 Pro Plus Suite (Windows 10) as App type to add the Configure App Suite, the App Suite Information and the App Suite Settings sections; |
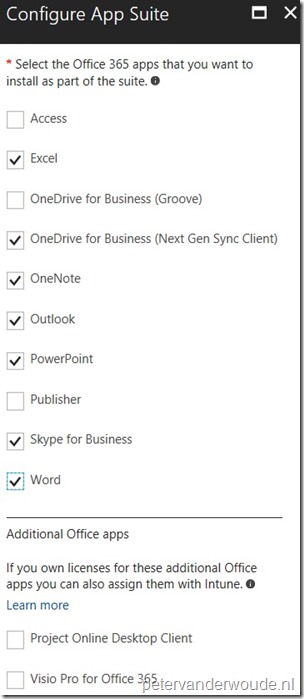
| 4 | On the Add app blade, select Configure App Suite to open the Configure App Suite blade; |
| 5 |  On the Configure App Suite blade, select the Office 365 apps that must be installed and click OK to return to the Add app blade; On the Configure App Suite blade, select the Office 365 apps that must be installed and click OK to return to the Add app blade; |
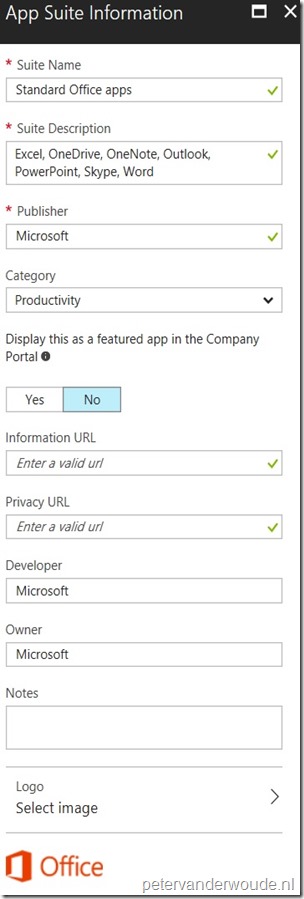
| 6 | Back on the Add app blade, select App Suite Information to open the App Suite Information blade; |
| 7 |
|
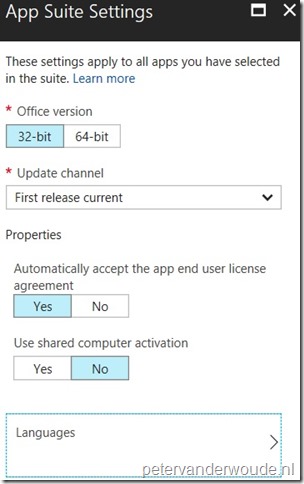
| 8 | Back on the Add app blade, select App Suite Settings to open the App Suite Settings blade; |
| 9 |
|
| 10 | Back on the Add app blade, click Add; |
Note: After adding the app suite it cannot be edited anymore. To make adjustments, delete the app suite and create a new. That makes it important to think about the configuration before creating one.
Administrator experience
Usually I’ll end this type of posts with the end-user experience, but in this scenario there is not much to see. I can show something like the running installation process or the installed products, but that’s not that exciting as it’s simply there. Having said that, from an administrator perspective there are some interesting things to look at. Let’s start with the most interesting one, which is actually available on the end-user device, the Office CSP key in the registry. This key can be found at HKEY_LOCAL_MACHINE\SOFTWARE\Microsoft\OfficeCSP and is shown below.
Within this registry entry, it actually shows the content of the configuration XML in the default of the key. This enables me to have a look at the default values used during the installation of the Office apps. Besides the values configured in the app type. Below is the configuration XML that belongs to my installation. It basically shows 3 options that are not configurable, ForceUpgrade, Product ID and Display Level. Knowing these values should help with explaining the installation behavior.
<Configuration>
<Add Channel=”FirstReleaseCurrent” ForceUpgrade=”TRUE” OfficeClientEdition=”32″>
<Product ID=”O365ProPlusRetail”>
<ExcludeApp ID=”Access” />
<ExcludeApp ID=”Groove” />
<ExcludeApp ID=”InfoPath” />
<ExcludeApp ID=”Publisher” />
<ExcludeApp ID=”SharePointDesigner” />
<Language ID=”nl-nl” />
<Language ID=”en-us” />
</Product>
</Add>
<Display Level=”None” AcceptEULA=”TRUE” />
<Property Name=”SharedComputerLicensing” Value=”0″ />
</Configuration>
Also interesting to look at, from an administrator perspective, is the installation status in the Azure portal. Simply navigating to Intune > Mobile apps > Apps install status and selecting the assigned app, will provide an overview as shown below.
More information
For more information about the Office CSP and using Microsoft Intune to deploy Office 365 ProPlus, please refer to the following articles:
- Office CSP: https://docs.microsoft.com/en-us/windows/client-management/mdm/office-csp
- How to assign Office 365 ProPlus 2016 apps to Windows 10 devices with Microsoft Intune: https://docs.microsoft.com/en-us/intune/apps-add-office365


Hi Peter,
I realise this is an old post but I am looking for your opinion on a solution regarding deployment of Office 365 suite to many users globally.
Our company utilizes 17 languages across the estate. Each office across the globe currently has their own language packs and proofing tools installed. Now that the company is moving to Intune MDM we need a solution to deploy Office 365 suite to all users with their language packs and proofing tools. So far it looks like I have 3 options unless you can offer up a forth:
1) Deploy the Office 365 with ALL languages. Only downside here is the assumed size of the app package deployment. This might not be a good idea for offices with poor connectivity to the internet but is still an option nontheless.
2) Scrap deploying Office 365 via the Intune app category method and instead deploy office via win32 app method. That way we use the Office deployment tool and xml files to install office 365 suite with CTR but we can control which languages are deployed per office. We could use security groups here to seperate. Only problem is the ESP (Enrollment Status Page). We currently configure this to require the installation of office before the desktop is accessible. If we have multiple win32 office applications assigned to multiple groups of users globally we cant really enforce our ESP page app installation rules.
3) Deploy Office 365 using the Office 365 app category and use the configuration designer within the app. We would need to setup 17 different apps for all 17 languages. Only difference here is we then also setup 17 ESP pages for office. Whilst this will probably work I am worried about the admin overhead having this setup. Do you see customers with multiple ESP pages in your experience? Or is the general best practice to have just one ESP page.
Let me know your thoughts.
Thanks
Gavin
2)
Hi Gavin,
By default, Intune will install the same language as the default language of the Operating System.
Regards, Peter
Ok that is true. But we have a requirement to have additional languages in different regions around the world.
For example, our company standard globally is English, but in Moscow they require the Russian proofing tools as they deal with documents in Russian. Then for Paris office the default is English for the OS, same as the company standard, but they further require French for proofing.
Makes sense?
But I guess ideally we do not want to deploy an Office 365 app with 17 languages in it right?
Agree. Installing 17 languages on every device would be far from ideal, unless disk space doesn’t matter. Regarding your ESP note, keep in mind that Win32 apps are also tracked during ESP.
Regards, Peter
Interested to know how you would solves this Peter. Seems our only option is all languages in the Office 365 app.
Hi Gavin,
It really depends on many factors. Deploying all languages can be the easiest from an admin perspective, but might be disrupting for the user (longer installation time, more disk space). Separate apps can be more work from an admin perspective, but more user friendly.
Regards, Peter