After the release of Windows 8 last week we can already start thinking about migrating. When I’m thinking about migrations I always like the computer-refresh scenario’s where we can use hard-links. In this post I will show a basic task sequence to capture user files and settings, either offline or online, with help of hard-links. I already showed the basics of that in an earlier post last year when ConfigMgr 2012 was still in Beta. Since then the Wizard screens have not changed so I will not show that again, but I will show some more information about what happens.
Prerequisites
To support migrating to Windows 8 we need ConfigMgr 2012 SP1 (which is currently still CTP) in place with at least the following packages:
- Boot Image package, of at least version 6.2.xxxx
- ConfigMgr client package
- USMT 5.0 package, of at least version 6.2.xxxx
- Image package, which can be the default install.wim of Windows 8
Basic steps
To create a task sequence that can migrate to Windows 8 we can use the following steps (for screenshot see my earlier post of last year):
- Right-click the Task Sequence node and select Create Task Sequence.
- On the Create a New Task Sequence page, select Install an existing image package and click Next.
- On the Task Sequence Information page, fill in a Task sequence name, Browse for the Boot image and click Next.
- On the Install Windows page, browse for the Image package, uncheck Partition and format the target computer before installing the operating system, (optional) uncheck Configure task sequence for use with Bitlocker, (optional) fill in a Product key, (optional) select Always use the same administrator password and click Next.
- On the Configure Network page, (optional) select Join a domain, Browse for the Domain and Domain OU, Set an Account and click Next.
- On the Install ConfigMgr page, Browse for the ConfigMgr client Package, (optional) fill in the Installation Properties and click Next.
- On the State Migration page, select Capture user settings, Browse for the USMT Package, select Save user settings locally, (optional) uncheck Capture network settings, (optional) uncheck Capture Microsoft Windows settings and click Next.
- On the Install Updates page, click Next.
- On the Install Applications page, click Next.
- On the Summary page, click Next.
- On the Progress page, just wait…
- On the Confirmation page, click Close.
Advanced steps
The basic steps will create a task sequence that will only perform it’s capture while the task sequence is running online (Full OS). Also notice that the task sequence already sets the ‘extra’ task sequence variable OSDStateStorePath to the value %_SMSTSUserStatePath%. But when we also want to be able to perform an capture while the task sequence is running offline (WinPE), we need to make the following small adjustments.
-
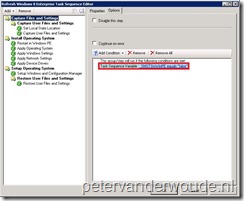 Select the Capture Files and Settings Group, go to the Options tab and Remove the Conditions (or remove the whole top Group).
 Explanation: This is necessary to make it possible to also capture user files and settings in WinPE.
-
Select the Capture User Files and Settings Step (optional: change the name), go to the Options tab and add the condition of _SMSTSInWinPE equals FALSE.
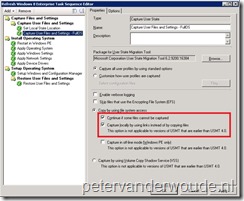 Explanation: This is necessary to make this step only run in FullOS. This step will run the following scanstate command: C:\_SMSTaskSequence\Packages\<ID>\amd64\scanstate.exe C:\_SMSTaskSequence\UserState /o /localonly /efs:copyraw /c /hardlink /nocompress /l:C:\Windows\CCM\Logs\SMSTSLog\scanstate.log /progress:C:\Windows\CCM\Logs\SMSTSLog\scanstateprogress.log /i:C:\_SMSTaskSequence\Packages\<ID>\amd64\migdocs.xml /i:C:\_SMSTaskSequence\Packages\<ID>\amd64\migapp.xml
 -
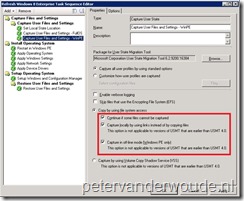 Add an extra Capture User State Step (optional: change the name), select Copy by using file system access and check Continue if some files cannot be captured, Capture locally by using links instead of copying files and Capture in off-line mode (Windows PE only). Now go to the Options tab and add the condition of _SMSTSInWinPE equals TRUE.
 Explanation: This is necessary to make this step only run in WinPE.This step will run the following scanstate command: C:\_SMSTaskSequence\Packages\<ID>\amd64\scanstate.exe C:\_SMSTaskSequence\UserState /o /localonly /efs:copyraw /offlineWinDir:C:\WINDOWS /c /hardlink /nocompress /l:X:\WINDOWS\TEMP\SMSTSLog\scanstate.log /progress:X:\WINDOWS\TEMP\SMSTSLog\scanstateprogress.log /i:C:\_SMSTaskSequence\Packages\<ID>\amd64\migdocs.xml /i:C:\_SMSTaskSequence\Packages\<ID>\amd64\migapp.xml
-
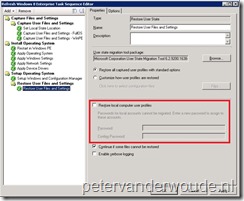 To complete the overview, I’ll show here the default values of the restore settings. (Optional) Select Restore local computer user profiles and give in a password.
 Explanation: This step will run the following loadstate command: C:\_SMSTaskSequence\Packages\<ID>\amd64\loadstate.exe C:\_SMSTaskSequence\UserState /ue:<computername>\* /c /hardlink /nocompress /l:C:\WINDOWS\CCM\Logs\SMSTSLog\loadstate.log /progress:C:\WINDOWS\CCM\Logs\SMSTSLog\loadstateprogress.log /i:C:\_SMSTaskSequence\Packages\<ID>\amd64\migdocs.xml /i:C:\_SMSTaskSequence\Packages\<ID>\amd64\migapp.xml
I still remember creating all batch files to perform these actions. Now they are possible out of the box!
Result
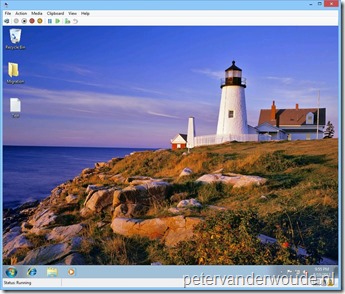
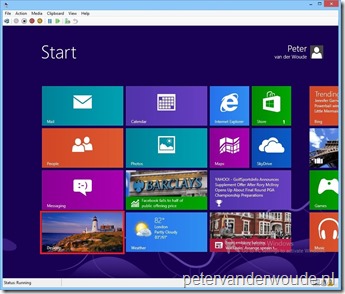
Now running this task sequence from either Full OS or WinPE will result in something like the example under here. In this example I migrated some files, folders and background. This last one will show as first in the new Windows 8 machine.
| Before | After |
 |
 |
Hi Peter,
I did follow exact your guide, but after migration was all my application. data files, domain member and etc, away. Do you have any Idea why?
I cannot login any more on my computer
Best regards
Nick
Hi Nick,
It sounds a lot like your task sequence did not finish successfully. Please check the SMSTS log file for more information.
Peter