This week is about something relatively new, but especially something rather unknown. And that is Test Base for Microsoft 365 (Test Base). Test Base is a validation service based in a secure Azure environment, that enables Software Vendors (SVs) and System Integrators (SIs) to validate their applications against pre-released Windows security and feature updates. The best part is that it also enables customers and partners to do the same. That enables organizations to automatically test their critical business app with the upcoming Windows security and feature updates. A sort of automated testing. That helps organizations to be even better prepared for the upcoming Windows security and feature updates. This post is to create more awareness for Test Base and to make sure that organization are aware of the existence. That’s achieved by going through the creation of a Test Base Account, the creation of a test package and uploading that test package to the Test Base Account. This post will end with the results of testing the package.
Create a Test Base Account
The first step, to get started with Test Base, is to create a Test Base Account. That account provides the managed cloud environment that will be used for testing the provided packages on the latest Windows security and feature updates. The following four steps walk through the steps of creating a Test Base Account.
- Open the Azure portal and navigate to Test Base for Microsoft 365 > Create Test Base account
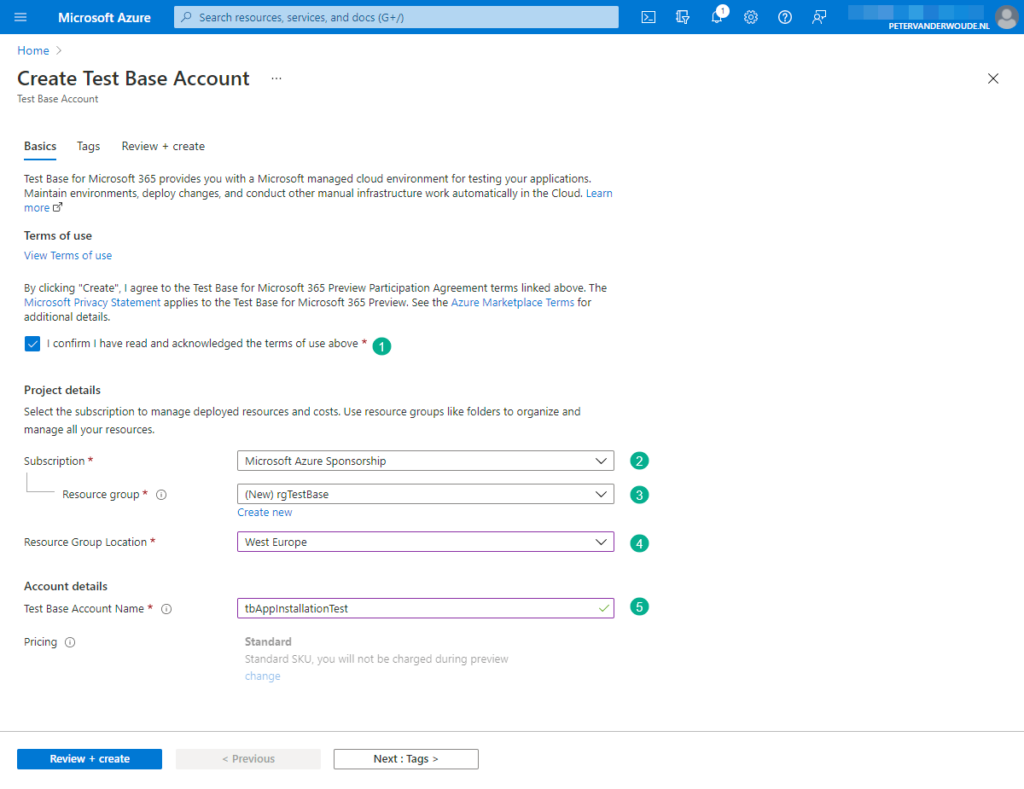
- On the Basics page, as shown below in Figure 1, provide the following information and click Next : Tags
- Select I confirm I have read and acknowledged the terms of use above (1)
- Subscription (2): Specify the subscription that should be used to manage the resources and costs
- Resource group (3): Specify the resource group that should be used to manage the resources
- Resource Group location (4): (Optional) Specify the location of the resource group, when creating a new resource group
- Test Base Account Name (5): Specify a name for the Test Base account to identify the related resources
- Pricing (6): In the current preview, Test Base is free of charge. Once general available, make sure to configure the correct pricing model
- On the Tags page, provide an tags that should be applied to the Test Base account resources and click Next : Review + create
- On the Review + create page, verify the provided information and click Create
Note: An alternative method to get started with Test Base is via the Microsoft Endpoint Manager admin center portal and clicking on the link Get started on Test Base when creating a new Windows app (Win32).
Create a package that contains the binaries
Once the Test Base Account is created, it can be used for actually testing packages with the critical apps. That can be achieved by running an Out-of-Box test or a Functional test. Depending on the chosen test – more about that when describing the upload of test packages – the IT administrator must create scripts that perform the different parts of the tests. For now, this post will focus on the Out-of-Box test and that requires at least a script to install the app, launch the app and close the app. Besides that, an additional script to uninstall the app is optional. When looking at Adobe Acrobat Reader DC as an example, the following table contains example script lines that can be used for the different actions.
| Name | Script |
|---|---|
| Install | Start-Process -FilePath "AcroRdrDCx642100520060_en_US.exe" -ArgumentList "/sAll /rs /msi /qn EULA_ACCEPT=YES REBOOT=REALLYSUPPRESS" |
| Uninstall | Start-Process -FilePath "msiexec.exe" -ArgumentList "/x {AC76BA86-1033-1033-7760-BC15014EA700} /qn REBOOT=REALLYSUPPRESS" |
| Launch | Start-Process -FilePath "C:\Program Files\Adobe\Acrobat DC\Acrobat\Acrobat.exe" |
| Close | Stop-Process -Name "Acrobat" -Force |
Note: The shown script snippets perform the minimal required actions. For more predictable behavior make sure to add some error handling, to return the actual result of the action.
For the next step, it’s also important how the files are organized and put together in a ZIP-file. That information is used for constructing the correct command lines for performing the different test actions. When looking at the Adobe Acrobat Reader DC example, Figure 2 provides an overview of the contents of the example test package. That includes a folder (1), an installer (2) and the different scripts (3, 4, 5, 6). Together that makes the created ZIP-file. This information is important for constructing the tasks when uploading the package.
Upload a package to the Test Base Account
Once the Test Base Account is created and the ZIP-file is created, a package can be uploaded. That package can be used for performing the mentioned Out-of-Box test for Adobe Acrobat Reader DC as an example. The following six steps walk through the steps for uploading the package and the configuration of the package and the test.
- Open the Azure portal and navigate to Test Base for Microsoft 365 > Select the just created Test Base account > Upload new package
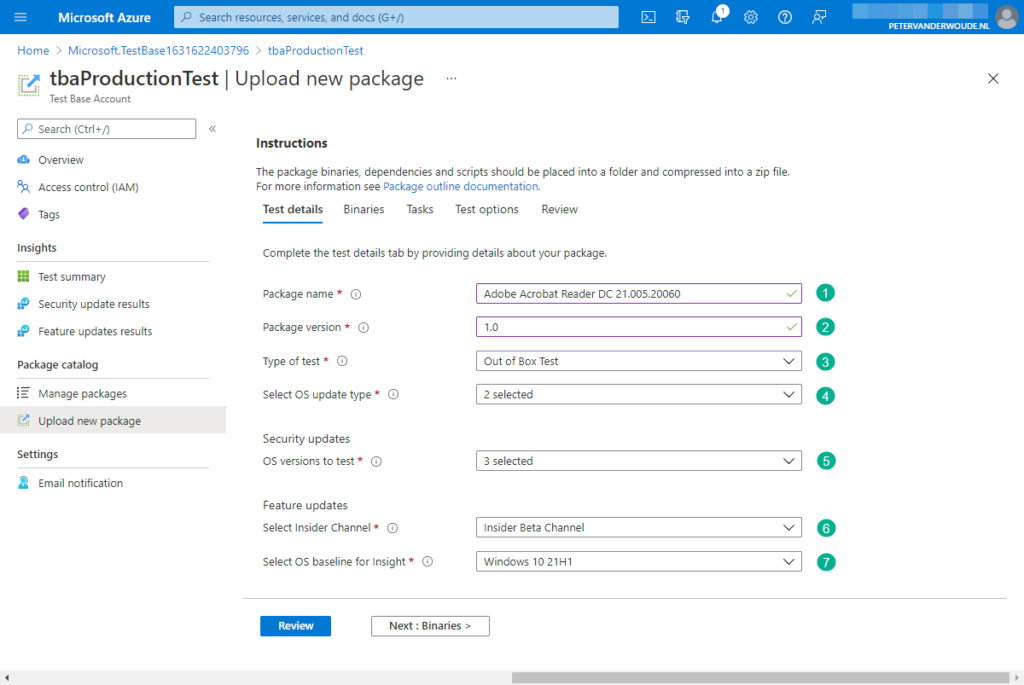
- On the Test details page, as shown below in Figure 3, provide the following information and click Next : Binaries
- Package name (1): Specify a name for the package to easier identify the package
- Package version (2): Specify a version for the package to easier identify the package
Note: The combination of the package name and the package version should be unique within the organization.
- Type of test (3): Choose between Out-of-Box (OOB) test – that performs an install, launch, close and uninstall action with the package – and Functional test – that performs any custom scripted action with the package – to specify the test that should be performed for the package
- Select OS update type (4): Select Security updates – that enables the package to be tested with pre-release monthly security updates – and/or Feature updates – that enables the package to be tested with pre-release feature updates – to specify the Windows version that should be used when testing the package
- OS versions to test (5): Select the specific Windows versions that should be used when testing the package
- Select Insider Channel (6): (Only for Feature updates) Select the Windows Insider Program Channel that should be used when testing the package (currently only Insider Beta Channel)
- Select OS baseline for Insight (7): (Only for Feature updates) Select the Windows version that should be used as a baseline for comparing the results of testing the package
- On the Binaries page, select the earlier created ZIP-file that contains the binaries of the package and click Next : Tasks
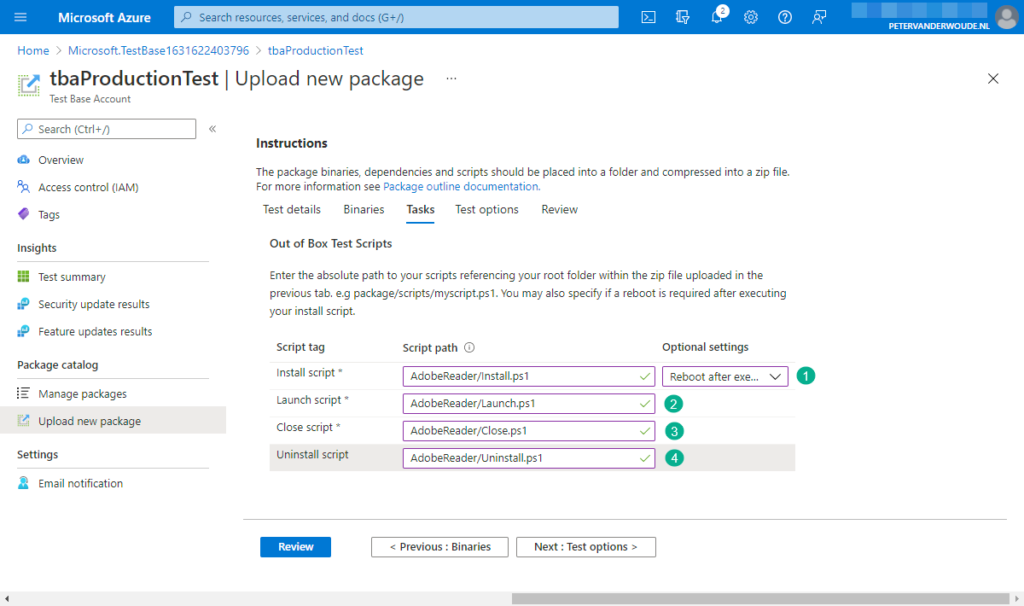
- On the Tasks page, as shown below in Figure 4, provide the following information and click Next : Test options
- Install script (1): Specify AdobeReader/Install.ps1 as the script path and select Reboot after execution to trigger the installation of the app and a restart to finalize the installation of the app
- Launch script (2): Specify AdobeReader/Launch.ps1 as the script path to trigger the launch of the app
- Close script (3): Specify AdobeReader/Close.ps1 as the script path to trigger closing the app
- Uninstall script (4): Specify AdobeReader/Uninstall.ps1 as the script path to trigger the uninstallation of the app
Note: The script path is based on the location of the script in the ZIP-file. In this example of Adobe Acrobat Reader DC, the files are in the folder named AdobeReader (as shown in Figure 2).
- On the Test options page, click Next : Review
- On the Review page, verify the provided information and click Create
Verifying the test results of the package
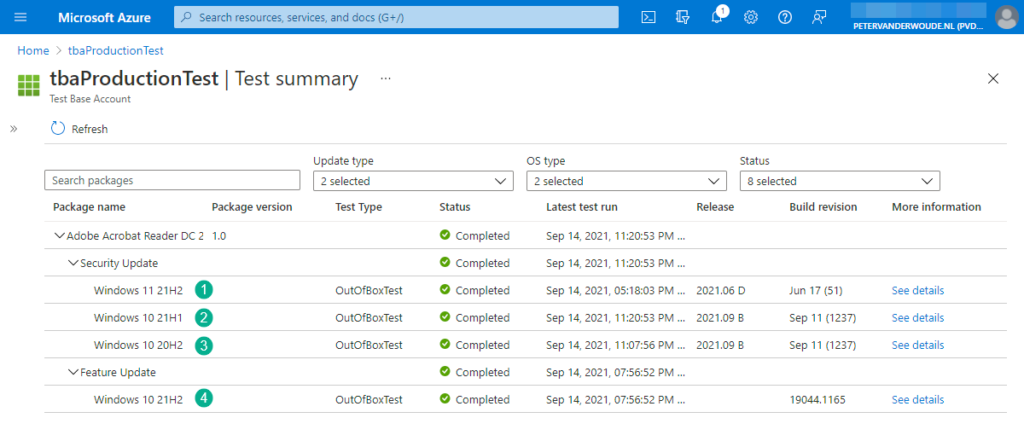
By far, the best part of Test Base is the test summary. The summary is available by navigating to Test summary in the Test Base Account. After a while that provides a great overview of the test results for the created package on the specified upcoming Windows security (1, 2, 3) and feature (4) updates. Clicking on See details will provide even more details about the specific update. And that provides even more options for more details. Clicking on See details with Script execution, provides all the details about the execution of the different scripts. That provides, by far, the nicest piece of information, as it provides Video files! Those video files, contains videos of the different scripts. A video with the install, a video with the launch and close, and a video with the uninstall. Just really awesome information. Besides that, it also provides Log files that can even include custom log files. And, of course, an overview of all the execution results.
Note: Keep in mind that it can take a while for the test summary is available. That behavior makes perfect sense as the provided package and scripts will be executed on all the specified upcoming Windows security and feature updates.
More information
For more information about Test Base for Microsoft 365, refer to the following docs.


2 thoughts on “Getting started with Test Base for Microsoft 365”