It’s been a few weeks since my last blog post, but here is a new one again. This time my blog post will be about running a Service Management Automation (SMA) Runbook during a task sequence. I will show this functionality by using an example scenario of moving a computer to a different OU. A bit more than a year ago I did something similar but then via a Orchestrator Runbook, so this time I will take it a level further. For some, maybe even most, people and companies it might be a level to far, for now, but I would like to share it anyway. As I like ConfigMgr, PowerShell and automation, I like to prefer SMA above Orchestrator. Also, SMA will become more and more commonly used.
Create the SMA Runbook (PowerShell Workflow)
![]() Let’s start with creating the SMA Runbook that will move a computer to a different OU. Like I mentioned in my previous post about using SMA Runbook with ConfigMgr, runbooks in SMA are Windows PowerShell workflows that run on Automation Worker servers. They provide the ability to automate administrative processes for managing and deploying cloud servers, or any other function that a Windows PowerShell script can perform.To configure the Move-Computer PowerShell workflow, follow the next steps:
Let’s start with creating the SMA Runbook that will move a computer to a different OU. Like I mentioned in my previous post about using SMA Runbook with ConfigMgr, runbooks in SMA are Windows PowerShell workflows that run on Automation Worker servers. They provide the ability to automate administrative processes for managing and deploying cloud servers, or any other function that a Windows PowerShell script can perform.To configure the Move-Computer PowerShell workflow, follow the next steps:
- Copy the following script and save it as Move-Computer.ps1.
workflow Move-Computer
{
    param ([String]$ComputerName,
           [String]$OUName)

    $TargetOU = Get-ADOrganizationalUnit -Filter {name -eq $OUName}
    $TargetComputer = Get-ADComputer $ComputerName
    Move-ADObject $TargetComputer.DistinguishedName `
        -TargetPath $TargetOU.DistinguishedName
}
- In the Service Management Portal, navigate to AUTOMATION.
- In the automation screen, click RUNBOOKS, click IMPORT and the IMPORT RUNBOOK –popup will show.
- Browse to Move-Computer.ps1 and click Open, followed by clicking the √.
- Back in the automation screen, click RUNBOOKS and select Move-Computer.
- In the move-computer screen, click AUTHOR, click DRAFT and click PUBLISH.
- On the message Are you sure that you want to save and publish the runbook? Runbook: ‘Move-Computer’, click YES.
Create a PowerShell script (and make it available) to start the SMA Runbook
Now It’s time to take a look at the options for running a SMA Runbook during a task sequence. Luckily SMA comes with a set of cmdlets for managing SMA Runbooks. For making these cmdlets available during a task sequence there are the following options:
- Import the module from a network location; On a system where System Center 2012 R2 Service Management Automation PowerShell is installed, it can be found at C:\Windows\System32\WindowsPowerShell\v1.0\Modules\Microsoft.SystemCenter.ServiceManagementAutomation.
- Import the module from a package; This package needs the contents of C:\Windows\System32\WindowsPowerShell\v1.0\Modules\Microsoft.SystemCenter.ServiceManagementAutomation of a system where System Center 2012 R2 Service Management Automation PowerShell is installed.
- Install System Center 2012 R2 Service Management Automation PowerShell during the task sequence.
I choose to go for the second option, because that will keep my client machine as clean as possible. Now copy the following PowerShell script, save it as Start-Runbook.ps1 and add it to an old-school package (in my case the same package as the one that includes the PowerShell module for SMA), so it can be made available during a task sequence.
param (
    [Parameter(Mandatory=$true)][string]$ComputerName,
    [Parameter(Mandatory=$true)][string]$OUName,
    [switch]$WaitForCompletion
)

Import-Module .\Microsoft.SystemCenter.ServiceManagementAutomation.psd1

$JobId = Start-SmaRunbook -WebServiceEndpoint "https://<ServerName>" `
    -Name Move-Computer -Parameters @{"ComputerName"=$ComputerName; `
        "OUName"=$OUName}

if ($WaitForCompletion) {
    $Status = (Get-SmaJob -WebServiceEndpoint "https://<ServerName>" `
        -Id $JobId).JobStatus
    while ($Status -ne "Completed") {
        Start-Sleep 5
        $Status = (Get-SmaJob -WebServiceEndpoint "https://<ServerName>" `
            -Id $JobId).JobStatus
    }
}
This script will first start the Move-Computer runbook and, as I like the option in the Execute Runbook task sequence step of Wait for the runbook to finish before continuing, I also added a switch to this PowerShell script to WaitForCompletion. Specifying this option with the script will put the script in a loop of checking the status of the runbook, until the status is completed.
Put the task sequence together
Now there is a package with the PowerShell script (and the SMA PowerShell module) that will start the SMA runbook to move a computer to a different OU. The last thing to do now is to create a standard Install an existing image package task sequence and to edit it to make sure the following step are included:
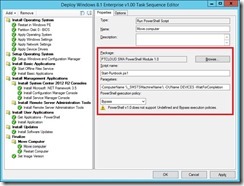
 Add a step Run PowerShell Script with the following settings:
- Package: <NameOfPackageThatContainsTheScript>
- Script name: Start-Runbook.ps1
- Parameters: -ComputerName %_SMSTSMachineName% –OUName <AnOUName> -WaitForCompletion
- PowerShell execution policy: Bypass
Note: The WaitForCompletion switch is optional. Only use it when the task sequence has to wait for the SMA runbook to complete.