This week is all about deploying and configuring the Azure VPN Client app on Windows devices. The Azure VPN Client app can be used to connect to any Azure VPN gateway. That provides access to specific Azure virtual networks, even when working from a remote location. That can useful in many different situations. The great part is that, nowadays, the Azure VPN Client app can be deployed and configured by using Microsoft Intune. At least, when using Microsoft Entra ID for authentication. In that case, it’s possible to make it all automatically available to user. The only action left for the user is to authenticate. To achieve that, there are a few specific configurations required. This post will walk through the main configurations regarding the authentication for the gateway, and the distribution and configuration of the Azure VPN Client app. This post will end with the user experience.
Important: This post is only applicable when using Microsoft Entra ID for authentication on the Azure VPN gateway.
Note: This post assumes that an Azure VPN gateway is already available, of a SKU that allows Microsoft Entra ID for authentication and OpenVPN (SSL) for the tunnel.
Authorizing the Azure VPN application
When looking at Microsoft Entra authentication, on the Azure VPN gateway, it starts with authorizing the Azure VPN application. That will allow the Azure VPN application to sign in and read user profiles. To authorize the Azure VPN application, it’s important to provide admin consent. That can be achieved by simply using the URL below and providing admin consent. Good to know is that the client_id, in that URL, is the same in every tenant and represents the Azure VPN application.
https://login.microsoftonline.com/common/oauth2/authorize?client_id=41b23e61-6c1e-4545-b367-cd054e0ed4b4&response_type=code&redirect_uri=https://portal.azure.com&nonce=1234&prompt=admin_consentNote: Alternatively, the point-to-site configuration, of the Azure VPN gateway, provides a direct link to the authorization URL for the Azure VPN application (as shown further below with number 7 in Figure 1).
Configuring authentication for the gateway
Another thing when looking at Microsoft Entra authentication, on the Azure VPN gateway, is actually configuring the Azure VPN gateway to use Microsoft Entra ID for authenticating users. That configuration can be achieved by using the point-to-site configuration of the VPN gateway. The following four steps walk through configuring Microsoft Entra ID as the authentication type.
- Open the Azure portal and navigate to Virtual network gateways and select the specific Azure VPN gateway
- On the page of the VPN gateway, select Point-to-site configuration and click Configure now
- On the Point-to-site configuration page, as shown below in Figure 1, specify the following information and click Save
- Address pool (1): Specify the address pool that should be used for clients that connect to the VPN gateway
- Tunnel type (2): Select OpenVPN (SSL) as the tunnel type
- Authentication type (3): Select Azure Active Directory as the authentication type
- Tenant (4): Specify
https://login.microsoftonline.com/{TenantID}/as the tenant - Audience (5): Specify
41b23e61-6c1e-4545-b367-cd054e0ed4b4, the Azure VPN application, as the audience - Issuer (6): Specify
https://sts.windows.net/{TenantID}/, the STS of the tenant, as the issuer
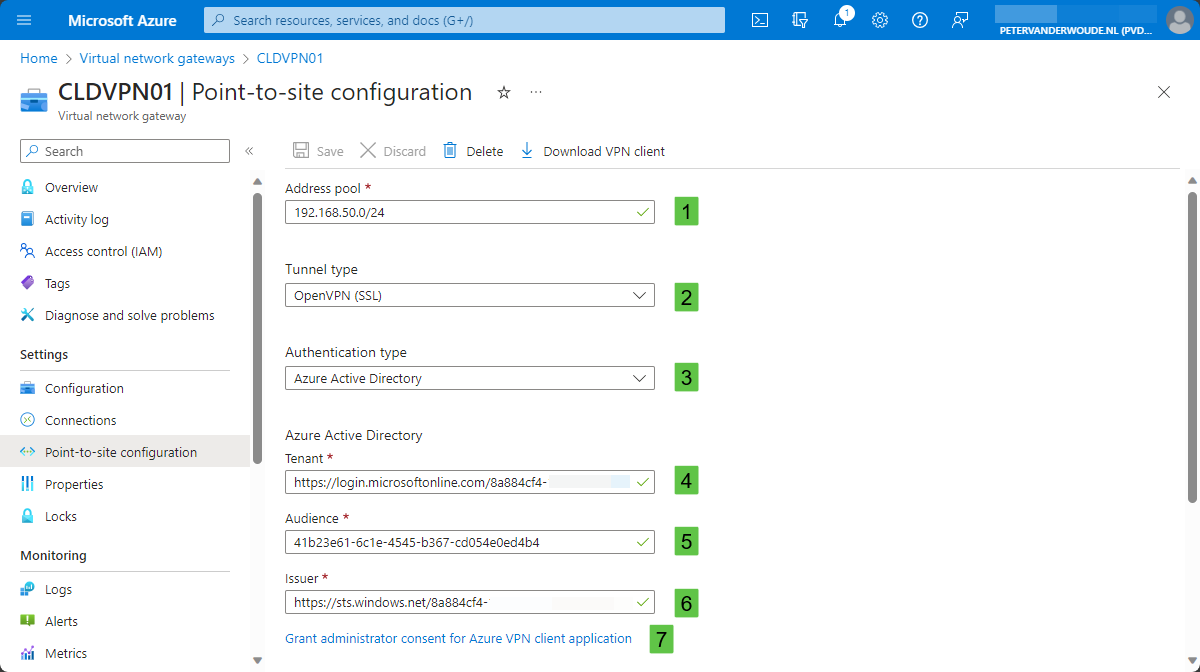
- On the same page, now click on Download VPN Client to download an XML-file with the client configuration
Note: The downloaded VPN client configuration is required for the configuration of the Azure VPN client app.
Deploying the Azure VPN Client app
Once the Azure VPN gateway is configured, it’s time to look at the client configuration on Windows devices. That configuration starts with the deployment of the Azure VPN Client app. Luckily, that app is simply available via the Microsoft Store. That makes it relatively easy to use Microsoft Intune for the deployment. The following six steps walk through that process.
- Open the Microsoft Intune admin center and navigate to Apps > Windows
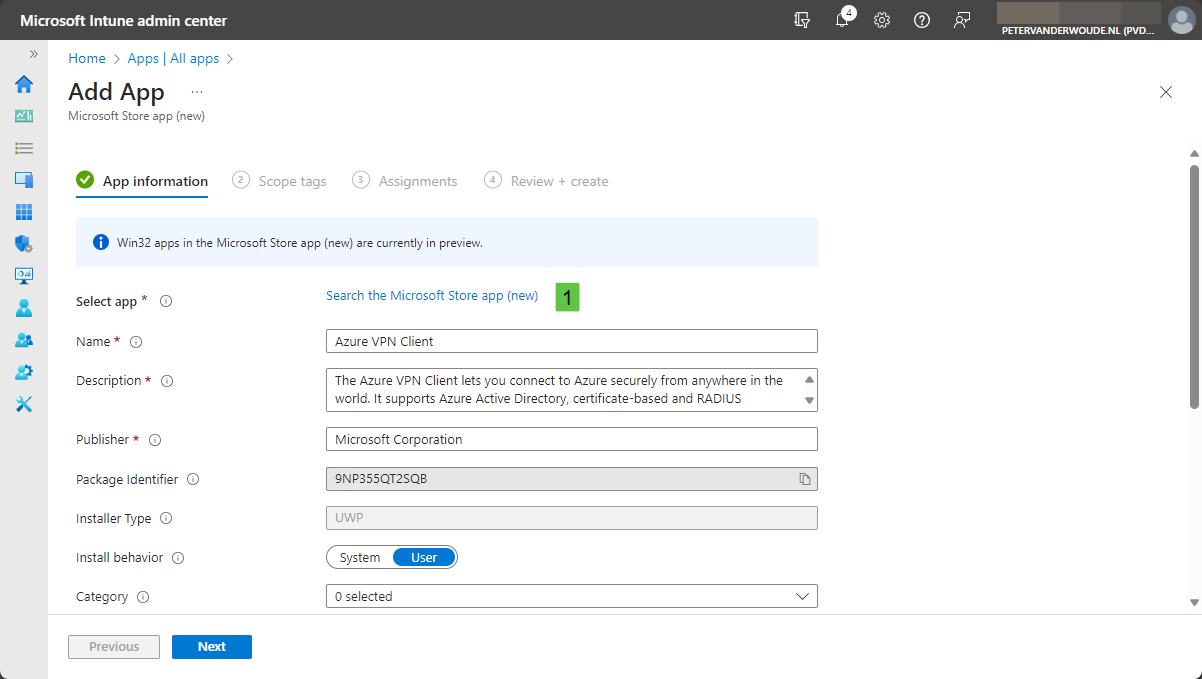
- On the Windows | Windows apps page, click Add, select Microsoft Store app (new) as App type and click Select
- On the App information page, as shown below in Figure 2, select (1) Azure VPN Client as app and click Next
- On the Scope tags page, configure the applicable scopes and click Next
- On the Assignments page, configure the assignment and click Next
- On the Review + create page, verify the configuration and click Create
Note: Make sure to configure and icon in step 3, to make the app visually more appealing in the Company Portal app.
Constructing the Azure VPN Client configuration
When looking at the configuration of the Azure VPN Client app, and with that, the VPN client configuration, it starts with constructing that configuration. But before doing that, it’s important to know the starting point of the configuration. From a Windows perspective that’s the VPNv2 CSP. That CSP contains the ProfileXML node that can be used to provision the XML schema for all the fields of the Azure VPN gateway. Below is an example of an XML-file that can be used for that purpose. To use that example for the configuration, make sure to be familiar with the following:
RememberCredentials– This boolean can be used to cache the credentials.AlwaysOn– This boolean can be used to configure the always-on functionality.TrustedNetworkDetection– This comma separated string can be used to identify the trusted network.DeviceTunnel– This boolean can be used to make it a device tunnel profile.RegisterDNS– This boolean can be used to allow registration in DNS.ServerUrlList– This semicolon-separated list can be used to specify servers in URL, hostname, or IP format. In this case, that should be the server from the earlier downloaded configuration (available in thefqdnnode).CustomConfiguration– This HTML-encoded XML-blob can be used to specify the configuration. In this case, that should be a copy-paste from the earlier downloaded configuration.PluginPackageFamilyName– This string can be used to specify the Package Family Name of the SSL-VPN plugin app. In this case, that should be of the Azure VPN Client app.
<VPNProfile>
   <RememberCredentials>true</RememberCredentials>
   <AlwaysOn>true</AlwaysOn>
   <TrustedNetworkDetection>corp.petervanderwoude.nl</TrustedNetworkDetection>
   <DeviceTunnel>false</DeviceTunnel>
   <RegisterDNS>false</RegisterDNS>
   <PluginProfile>
     <ServerUrlList>azuregateway-9d530069-55c3-4206-852f-5e4f1c3f2b2f-a02df632c26a.vpn.azure.com</ServerUrlList>
     <CustomConfiguration>
       <!--<Provide the contents of the downloaded VPN client>-->
     </CustomConfiguration>
     <PluginPackageFamilyName>Microsoft.AzureVpn_8wekyb3d8bbwe</PluginPackageFamilyName>
   </PluginProfile>
</VPNProfile>
Deploying the Azure VPN Client configuration
After constructing the configuration, it’s time to look at the deployment of the Azure VPN Client configuration. For that purpose, the earlier mentioned ProfileXML node in the VPNv2 CSP can be used. Luckily, Microsoft Intune provides the ability to create a Custom profile. That profile type can be used to configure settings that are not directly available within Microsoft Intune, but that are available within the Windows platform. In this case, the VPNv2 CSP. The required OMA-URI contains the name of the profile that’s configured in the downloaded client configuration (available in the name node). With that information, simply walk through the following nine steps to create the required Azure VPN Client configuration.
- Open the Microsoft Intune admin center and navigate to Devices > Windows > Configuration profiles
- On the Windows | Configuration profiles page, click Create > New policy
- On the Create a profile page, provide the following information and click Create
- Platform: Select Windows 10 and later as value
- Profile type: Select Templates as value
- Template name: Select Custom as value
- On the Basics page, provide a unique Name to distinguish the profile from other custom profiles and click Next
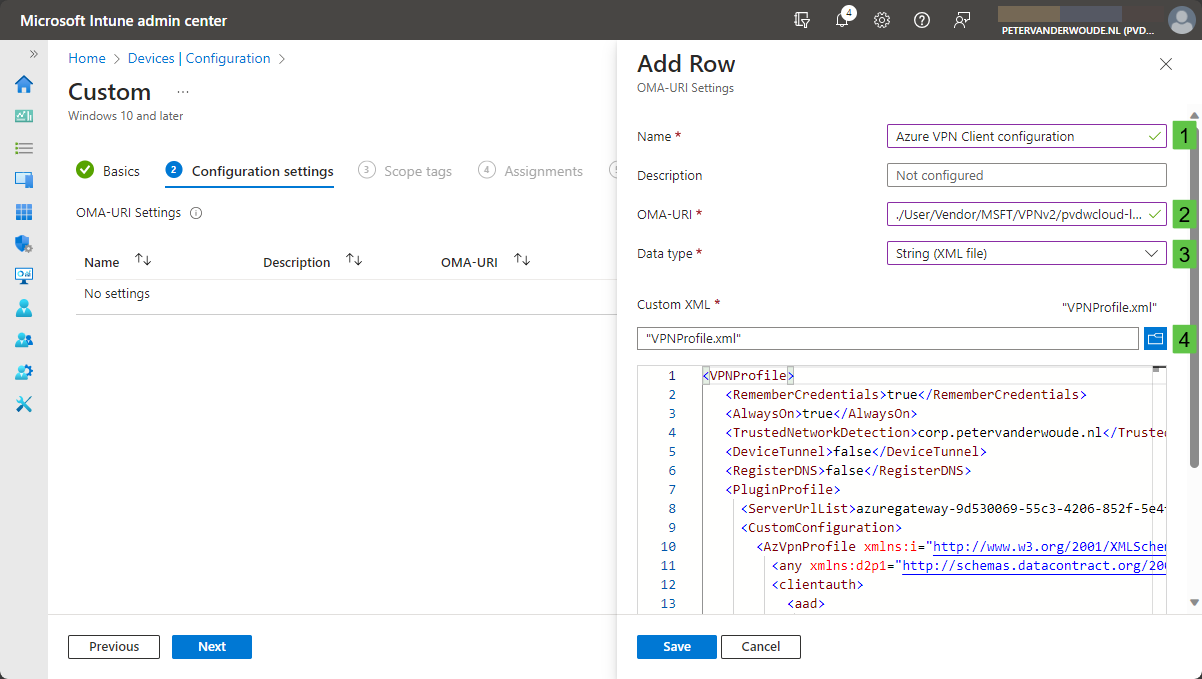
- On the Configuration settings page, as shown below in Figure 3, add a row for the following custom setting and click Next
- OMA-URI setting – This setting is used to configure Azure VPN on Windows devices
- Name (1): Provide a name for the OMA-URI setting to distinguish it from other similar settings
- Description: (Optional) Provide a description for the OMA-URI setting to further differentiate settings
- OMA-URI (2): Specify ./User/Vendor/MSFT/VPNv2/{ProfileName}/ProfileXML as value to configure Azure VPN
- Data type (3): Select String (XML file) as value
- Value (4): Select the created XML-file as value to set the required Azure VPN configuration
- On the Scope tags page, configure the applicable scopes and click Next
- On the Assignments page, configure the assignment and click Next
- On the Applicability rules page, configure the applicability rules and click Next
- On the Review + create page, verify the configuration and click Create
Note: At some point in time this setting might become directly available within Microsoft Intune.
Experiencing the configured Azure VPN Client app
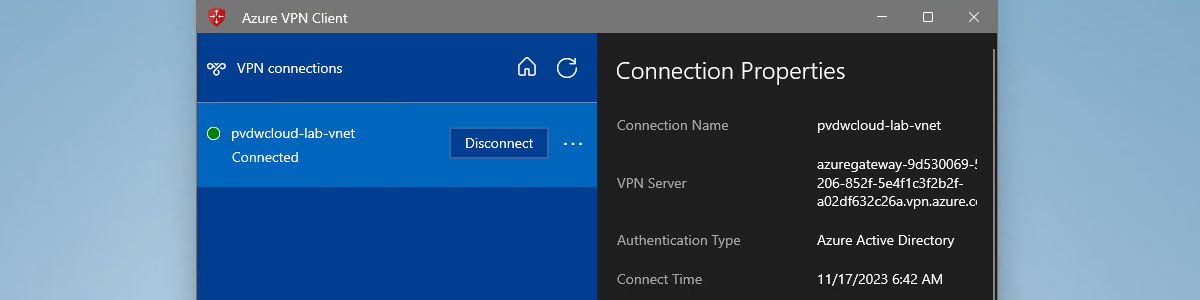
When all the required configurations are in place, it’s time to look at the configuration results. As soon as the Azure VPN Client app is installed and the Azure VPN Client configuration is applied, the user will receive a notification to authenticate on the Azure VPN Client app. Clicking on that notification will bring the user to the app, and simply clicking on Connect will prompt the user for authentication. Now the user can select their credential and click Continue. After that, the connection will be established (as shown below in Figure 4). The connection properties should relate to the applied configuration. When closing the app, the user will be prompted that the VPN connection will also be disconnected. That’s not a problem, as it will automatically reconnect again.

Note: During testing, the order of deploying the Azure VPN Client app and the Azure VPN Client configuration doesn’t matter. In either case, the configuration will be applied and available within the app.
More information
For more information about the Azure VPN client app and the related configurations, refer to the following docs.
- About Azure Point-to-Site VPN connections – Azure VPN Gateway | Microsoft Learn
- Configure Microsoft Entra tenant and settings for P2S VPN connections: Microsoft Entra authentication: OpenVPN – Azure VPN Gateway | Microsoft Learn
- Create an Intune profile for Azure VPN clients – Azure VPN Gateway | Microsoft Learn
- VPNv2 CSP – Windows Client Management | Microsoft Learn
Great article! We did exactly this and the only issue I’ve found so far is when changes need to be made to the profile. I’ve found uploading a new XML with changes made to the DNS servers, for example, don’t propagate to the user’s client.
Thank you for that information, Josh!
I’ve indeed had some similar experiences when adjusting the server.
Regards, Peter
Thanks for the interesting article.
We have offered this solution to several customers. With varying results.
Some customers encounter strange problems after we offer the XML file via the custom profile (OMA-URI). The connection is fine, but the connection is broken several times during the day. This seems to be because the profile is automatically overwritten, causing connections to be interrupted. More info: https://directaccess.richardhicks.com/category/oma-uri/
Looks like a Bug in Windows 11. Maybe good to know.
Thank you for sharing your experience, Martijn.
Regards, Peter
A small note:
We have noticed here that assigning store apps (as required) can lead to considerable performance problems during autopilot enrollment or even cause timeouts. This is probably due to the fact that store apps are installed in the user phase of enrollment, and not in the device-phase where apps with the install-context “System” are installed. This is even more true if these are also added as “Block device use until required apps are installed if they are assigned to the user/device” in the corresponding esp profile.
It might therefore be worth considering ensuring that all apps that are “Required” are already installed in the device-phase of the enrollment. We even skip / deactivate the account setup phase here without any significant disadvantages.
Ref.: https://www.inthecloud247.com/speed-up-your-autopilot-deployments-by-disabling-the-account-setup-phase/
Thank you for sharing, Knecht. It’s indeed always a fine balance to figure out the most efficient method for distributing devices and apps.
Regards, Peter
Hey Peter,
When I add the VPN profile manually it works fine but when it’s deployed via Intune it requires the user to authenticate. The user gets Kerberos ticket and still asks for authentication.
Have you come across an issue like this?
Thanks,
Hi mj,
Is it a new configuration, or are you trying to adjust an existing configuration? Reason for asking is that the Azure VPN client app has some issue when adjusting the already applied configuration.
Regards, Peter
Hi Peter,
It’s a new configuration – we are currently AOVPN moving to AzureVPN.
Thanks,
Hi mj Formolie,
And what do you mean with “it requires the user to authenticate“? What is the user experience?
Regards, Peter
Hi Peter,
Just to follow on from mj Formolie’s comment, I believe I’m experiencing the exact same behavior. We’ve been using Azure VPN P2S for a while with Intune pushing the XML profile, and have had difficulty previously with making changes to existing profiles.
In this instance, I’ve created an entirely new profile (new device configuration profile in Intune, new XML config with slight variation). Intune will deploy the profile to the device (Windows 10), but it does not appear in the Azure VPN client, and only appears in the Window VPN settings as a profile. Connecting to this profile through the Windows VPN settings prompts –
‘User interaction required to complete Azure Active Directory authentication’, and a notification appears stating as such from the Azure client. The profile fails to appear in the client however.
Hi Matt,
So, for my understanding, you’re issue is with making adjustments to existing profiles? If so, I’ve seen the same. At least for Windows 10 devices.
Regards, Peter