Its been a while since my previous blog post, so I had some time to collect information for a couple of blog posts and this is the first one! I like it when this are being done automatically. So this week I’m not going to write a PowerShell script myself, but I use a tool to generate it for me. In this blog post I will show the global steps that can be used to create a complete deployment of Windows Embedded 8 Standard with the Write Filter enabled and configured.
Create Windows Embedded 8 Standard Image
The first thing that we have to do is to create a Windows Embedded 8 Standard Image. This can be done by following the next three steps:
- Create a boot media with the Image Builder Wizard.
- In the Windows Setup of the Image Builder Wizard supply the following information.
- On the Windows Setup page, click Install now.
- On the Enter the product key to activate Windows page, enter the product key and click Next.
- On the License terms page, select I accept the license terms and click Next.
- On the Choose how to create your image page, select Use a template, select Template Device ThinClient and click Next.
- On the Choose a language and other preferences page, select the following and click Next.
- Language to install: English (United States).
- Time and currency format: Dutch (Netherlands).
- Keyboard or input method: United States-International.
- On the Summary of drivers and features page, click Next.
- (Optional) Select Modify Drivers or Modify Features to add additional drivers or features.
- On the Where do you want to install Windows page, select a drive and click Next.
- Capture the image via either a capture media or a combination of sysprep and imagex/ dism.
Take a look at the following links for the download of the Image Builder Wizard and more information:
Download Windows Embedded 8 Standard: http://www.microsoft.com/en-us/download/details.aspx?id=37019
Example about creating a custom image: http://msdn.microsoft.com/en-us/library/jj979453(v=winembedded.81).aspx
Create Write Filter Settings
The next thing that we have to do is to create the Write Filter settings. There can be a lot written about this tool, but the main thing is that it can remotely connect to a thin client, apply the Write Filter settings, and generate a PowerShell script with all the specific Write Filter settings.
Take a look at the following links for the download of the Embedded Lockdown Manager and more information:
Download Embedded Lockdown Manager: http://www.microsoft.com/en-us/download/details.aspx?id=37020
Example about creating custom settings: http://msdn.microsoft.com/en-us/library/jj980221(v=winembedded.81).aspx
Deploy Windows Embedded 8 Standard with Write Filter enabled via a Task Sequence
 Now the best part comes, we’re going to use the previously created image and script in a task sequence. It all starts with a standard Install an existing image package task sequence. Now edit the task sequence and make sure the following configurations are included:
- Edit the step Apply Operating System, select Apply operating system from a captured image and select the captured image.
- Add a step Set Task Sequence Variable with the following settings:
- Task Sequence Variable: SMSTSPostAction
- Value: cmd /c shutdown /r /t 60 /f
- (Needed with HP Thin clients) Add a step Run Command Line with the following settings:
- Command line: bcdedit /set {current} bootstatuspolicy ignoreallfailures
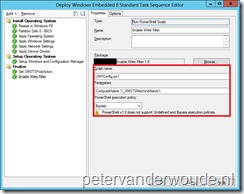
- Add a step Run PowerShell Script with the following settings:
- Package: <NameOfPackageThatContainsWriteFilterScript>
- Script name: <NameOfTheWriteFilterScript>
- Parameters: –ComuterName %_SMSTSMachineName%
- PowerShell execution policy: Bypass
The most important part is the SMSTSPostAction. Setting this variable makes sure the system will restart after the task sequence is done. This is important for two reasons, one it is needed to finish the Write Filter configuration and two it is needed to make sure that the task sequence will finish successful.
Hi Peter,
I’m trying to deploy a Windows Embedded 7 image from Lenovo (VXL) via sccm 2012 r2 – but have hard time to figure what the best approach is. Hope you can give me some hints.
In my case I do a wim capture of the Lenovo factory image.
I’m stuck on how to handle the unattended.xml file provided by Lenovo/VXL.
Which approach would be the right one?
1. sysprep factory image with vendor unattended.xml (SCCM seems to ignore syspreped image with an answer file – if its not specified in the task sq.). Maybe this is by design I dont know. 🙂
2. sysprep factory image without any answer file and then add it doing OSD
Do you know if Embedded answer files is supported in SCCM.?
Regards
Anders Jensen
I’m usually not a big fan of factory images, as they often include many pieces of software that only interfere with the deployment process. Most of the times the vendors also deliver a deployment guide and tooling (haven’t had a Lenovo thin client, yet, so I can’t say for sure in this case).
Also, Windows Embedded should also be able to work with an answer file.
Hello,
I can not found the UWFConfig.ps1.
Can you send me the fine.
Thank you so much.
BR
Peter
Hi Peter,
That file is the output of the configuration tool.
Regards, Peter