This week it’s time for a short blog post about customizing Software Center. And not without reason. About two years ago I did a post about setting the company logo in the new Software Center. I received many reactions on that post about why a Microsoft Intune subscription configuration was required to set a company logo in Software Center. I had no answer. Now that time is over! Starting with Configuration Manager, version 1710, it’s super easy to customize Software Center with Client Settings. Including the company logo! In this post I’ll walk through the available configuration options and I’ll show the end-user experience. Including an additional bonus about the Software Center icons.
Configuration
Starting with Configuration Manager, version 1710, it’s super easy to add company branding elements to Software Center and it’s super easy to specify the visibility of tabs in Software Center. An administrator can now add a Software Center specific company name, set a Software Center configuration color theme, set a company logo in Software Center, and set the visible tabs in Software Center. The following three steps walk through the available easy configuration options.
| 1 |
Open the Configuration Manager administration console and navigate to Administration > Overview > Client Settings; |
| 2 |
Now either open/create a new Custom Client Device Settings and select the Software Center section, or open open the Default Client Settings and select the Software Center section; |
| 3 |
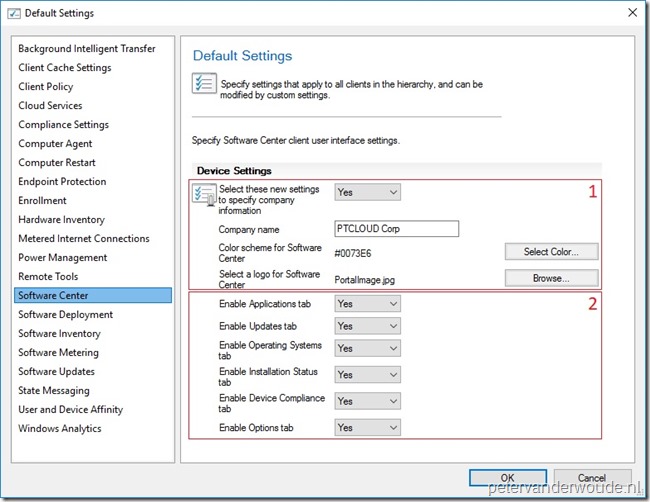
In the Software Center section, it’s possible to configure the following settings;
- Select these new settings to specify company information: Set to Yes to enable the Software Center customization settings;
- Company name: Provide a valid company name;
- Color scheme for Software Center: Select a valid color;
- Select a logo for Software Center: Browse to the company logo;
- Enable Applications tab: Set to Yes to enable the Application tab;
- Enable Updates tab: Set to Yes to enable the Updates tab;
- Enable Operating Systems tab: Set to Yes to enable the Operating Systems tab;
- Enable Installation Status tab: Set to Yes to enable the Installation Status tab;
- Enable Options tab: Set to Yes to enable the Options tab;
|
|
 |
Note: The logo must be a JPEG or PNG of 400×100 pixels with a maximum size of 750 KB.
End-user experience
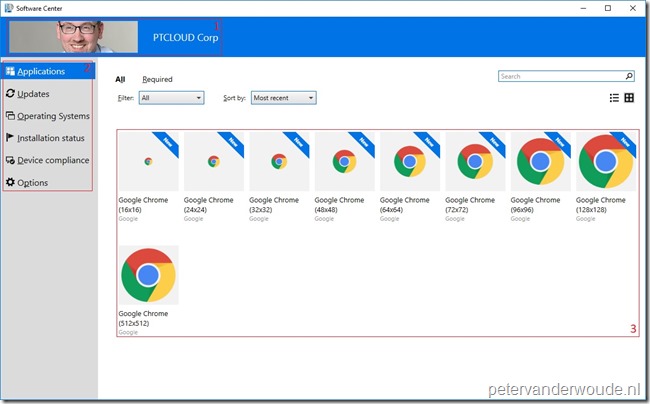
Now let’s have a look at the end-user experience. To show how the Software Center configuration relates to the actual look-and-feel, I would like to highlights the three sections as shown below.
| 1 |
The first section shows the configured Company name, the configured Color scheme and the configured Logo. This relates to the first section of the Client Settings shown above; |
| 2 |
The second section shows the enabled tabs. This relates to the second section of the Client Settings shown above; |
| 3 |
BONUS: The third section shows the updated Software Center icons experience. Software Center will no longer distort icons that are larger than 250×250. Administrators can now set an icon with a pixel dimensions of up to 512×512, and it displays without distortion. |
|
 |
Like this:
Like Loading...
Related


Hi Peter, thanks for the great post.
Side question, do you know if we can filter applications in software center by administrative categories, or other in other to help users find/see what they have faster.
Thank you in advance and don’t hesitate if you have any questions
Hi Stephane,
At this moment not via Software Center, only via the Application Catalog.
Regards, Peter
Will Intune Settings still overrule the Client settings when it comes to the Software Center ?
Hi Henrik,
I haven’t specifically tested that, but, to my knowledge, the Client Settings should be leading.
Regards, Peter
Hi Henrik
Have you ever tried to remove a configured Company Logo from the Default Agent Setting? (to default blank setting)
For example: Customer wants to configure the logo. afterwords they realize, that the logo isn’t shiny on the Portal and they want to remove it.
Thanks, Daniel