This week is another follow-up on the first few weeks of this year. Those weeks the focus was on monitoring the status of the different connectors, certificates, tokens and deployments, while this week the focus is on more than just monitoring. This week will be about non-compliant devices marked to retire. That means querying information and actually performing an action. When looking at device compliance policies, the IT administrator can configure the actions for non-compliance. One of those actions is to configure Retire the noncompliant device. That action, however, won’t actually retire the device and will only add the device to the Retire Noncompliant Devices view. Once added to that view, there is still a manual action required by the IT administrator to actually retire the device or to clear the retire of the device. The idea of this post is to make sure that those devices are automatically brought to the attention of the IT administrators and to provide actionable buttons.
This post walks through the main components that are required to query the non-compliant devices that are marked to retire in Microsoft Intune and to post that information via an adaptive card in a Microsoft Teams chat, by using an Azure Logic App. That adaptive card will provide the IT administrator with the available actions for those non-compliant devices and the Azure Logic App will eventually be used to perform the selected action. Throughout this post the following components are described and shown.
- Creating a key vault to store the credentials
- Creating an app registration to provide the permissions
- Creating a workflow to get the non-compliant devices and to perform an action on those devices when needed
- Experiencing the adaptive card to get a feeling with the result
Creating a key vault to store the credentials
The first action is to create a Key vault in Azure to provide a location to securely store the secret for retrieving a token in the workflow. That Key vault contains at least one important configuration that is required for the workflow. That configuration is that the Key vault needs to contain an access policy to provide access to the managed identity of the Logic app. The bullets below go through the minimal configuration that is required for usage within the workflow.
- Open the Azure portal, navigate to Key vaults to create a new Azure Key Vault
- Navigate to Access policies and add an access policy for the managed identity of the Logic app with at least the Secret Management Operations > Get permission
Tip: Use the List permission to make the stored secrets in the Key vault selectable within the workflow.
Note: Keep in mind that the Logic app must be created before it can be provided with the correct permissions.
Creating an app registration to provide the permissions
The second action is to create an App registration in Azure AD to provide the minimum required permissions to Microsoft Graph. That App registration contains two important configurations that are required for the workflow. Those configurations are that the App registration needs (1) the correct permissions and that (2) a client secret should be created for retrieving a token in the workflow. The bullets below go through the minimal configuration that is required and will make sure that the correct information is available when creating the workflow.
- Open the Azure portal, navigate to Azure Active Directory > App registrations to create a new App registration and save the Directory (tenant) ID and the Application (client) ID for usage within the workflow
- Navigate to API permissions, provide the app registration with at least the application API permissions of DeviceManagementConfiguration.Read.All, DeviceManagementConfiguration.ReadWrite.All and grant admin consent for those permissions, to make sure that the workflow will have enough permissions
- Navigate to Certificates & secrets, create a new secret and save the value in the created Key vault
Tip: Only provide the App registration with the least permissions that are required to get the job done.
Note: The DeviceManagementConfiguration.Read.All permissions are required for querying the non-compliant devices that are scheduled to retire and the DeviceManagementConfiguration.ReadWrite.All permissions are required for performing the action on the non-compliant devices.
Creating a workflow to get the non-compliant devices and to perform an action on those devices when needed
The third action is to create a workflow in a Logic app. The workflow will use the created Key vault to retrieve the secret and will use the created App registration to query Microsoft Graph with the minimal required permissions. The idea of the example workflow is to query for the non-compliant devices that are scheduled to retire in Microsoft Intune and to post an adaptive card in Microsoft Teams about those devices. After that the IT administrator can respond to the adaptive card by choosing an action. That action will be performed on the non-compliant device by the Logic app. To get started, make sure that a Logic app and the related workflow are created. The main actions for that are described below.
- Open the Azure portal and navigate to Logic apps to create a new Logic app, by simply walking through the steps of specifying the Basics (Resource Group, Region and more), the Hosting (Storage, Plan and more), the Monitoring and the Tags. Once created, select the Logic app, navigate to Workflows and add a new Stateful workflow.
Querying for non-compliant devices and posting an adaptive card
Once the framework (the Logic app and the workflow) is in place, it’s time to actually start with the configuration of the workflow. The first part of that workflow is used to query Microsoft Intune (via Microsoft Graph) for the non-compliant devices marked to retire and to post an adaptive card in Microsoft Teams. An overview of the first part is shown below in Figure 1 and is further explained below that figure.
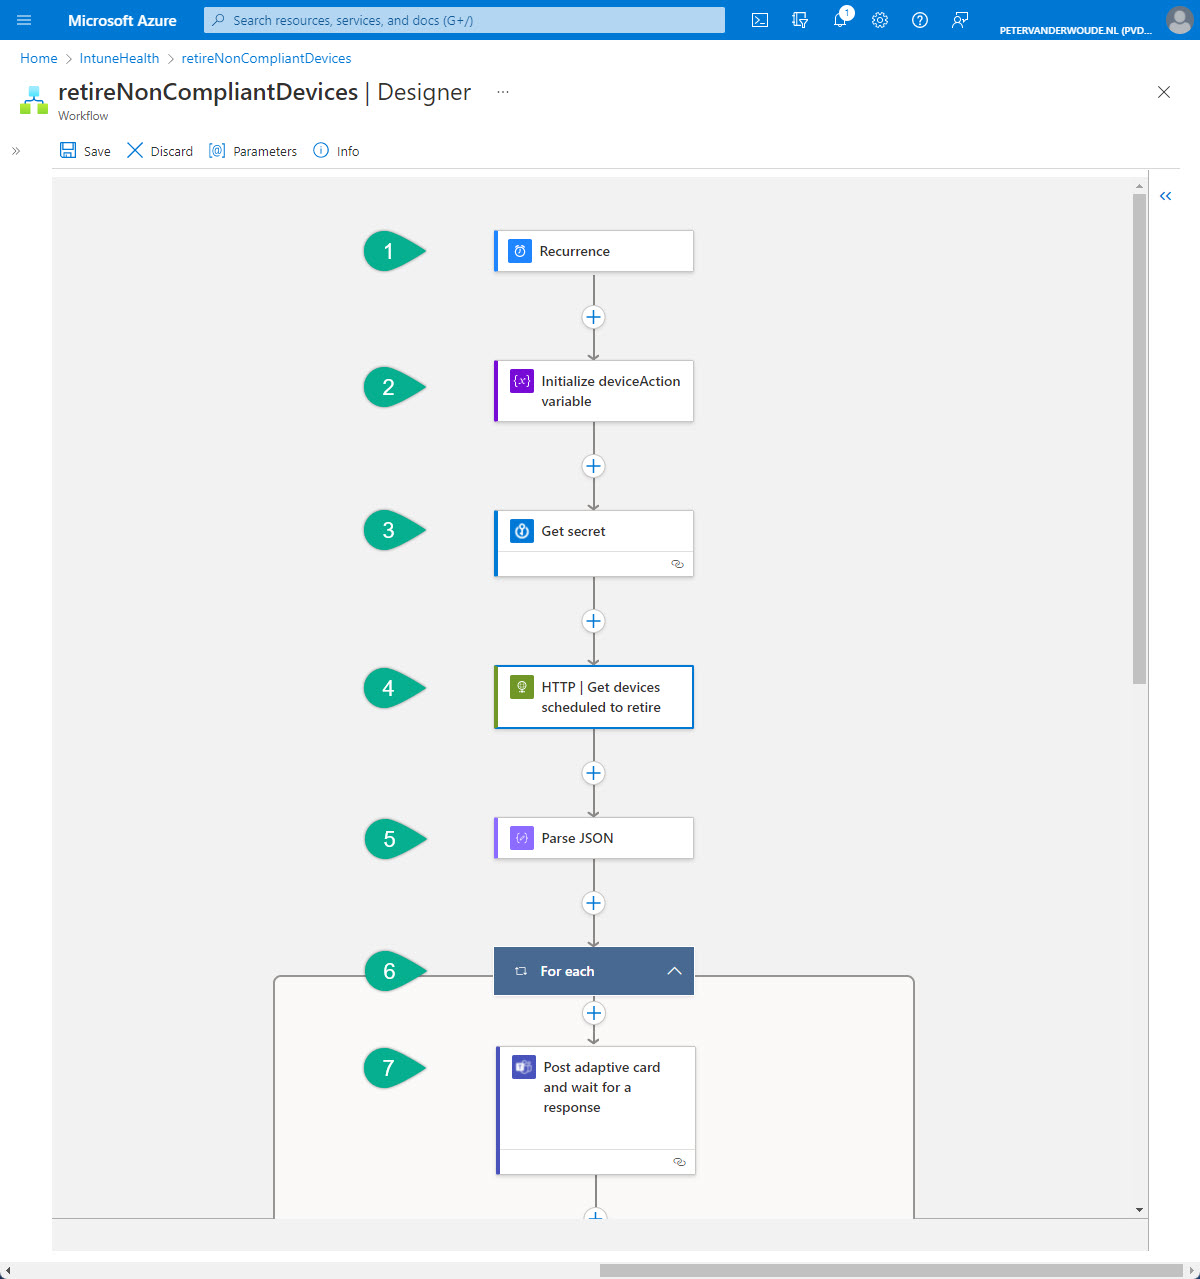
- The first step of the workflow is the Schedule – Recurrence trigger. That trigger will be used to trigger the workflow, based on a daily interval, and needs the following configurations of the properties.
- Interval: Specify 1 as value
- Frequency: Select Daily as value
- The second step of the workflow is the Variables – Initialize variable action. That action will be used to initialize the variable that will be used to set the action to should be performed on the non-compliant device and needs the following configurations of the properties.
- Name: Specify deviceAction as value
- Type: Select String as value
- The third step of the workflow is the Azure Key Vault – Get secret action. That action will be used to retrieve the secret – to request a token – from the Azure Key Vault and needs the following configurations of the properties.
- Name of the secret: Specify or select the name of the secret as value
Tip: To prevent the secret from being showed in the output, configure Settings > Secure Outputs to Yes.
- The fourth step of the workflow is the HTTP – HTTP action. That action will be used to query Microsoft Intune (via Microsoft Graph) for the non-compliant devices and needs the following configurations of the properties.
- Method: Select GET as value
- URI: Provide https://graph.microsoft.com/beta/deviceManagement/deviceCompliancePolicies/getDevicesScheduledToRetire as value
- Authentication: Select Active Directory OAuth as value
- Tenant: Provide Directory (tenant) ID – as shown in the first bullet of creating the app registration – as value
- Audience: Provide https://graph.microsoft.com/ as value
- Client ID: Provide Application (client) ID – as shown in the first bullet of creating the app registration – as value
- Credential Type: Select Secret as value
- Secret: Select Dynamic content > (Get secret) value as value
- The fifth step of the workflow is the Data Operations – Parse JSON action. That action will be used to specify the schema of the returned JSON content of the query and needs the following configurations of the properties.
- Content: Select Dynamic content > (HTTP) Body as value
- Schema: Provide the schema as shown below as value
{
    "properties": {
        "@@odata.context": {
            "type": "string"
        },
        "value": {
            "items": {
                "properties": {
                    "complianceState": {
                        "type": "string"
                    },
                    "deviceCompliancePolicyId": {
                        "type": "string"
                    },
                    "deviceCompliancePolicyName": {
                        "type": "string"
                    },
                    "deviceType": {
                        "type": "string"
                    },
                    "id": {
                        "type": "string"
                    },
                    "managedDeviceId": {
                        "type": "string"
                    },
                    "managedDeviceName": {
                        "type": "string"
                    },
                    "managementAgent": {
                        "type": "string"
                    },
                    "ownerType": {
                        "type": "string"
                    },
                    "retireAfterDateTime": {
                        "type": "string"
                    },
                    "roleScopeTagIds": {
                        "items": {
                            "type": "string"
                        },
                        "type": "array"
                    }
                },
                "required": [
                    "id",
                    "managedDeviceId",
                    "managedDeviceName",
                    "deviceType",
                    "complianceState",
                    "retireAfterDateTime",
                    "managementAgent",
                    "ownerType",
                    "deviceCompliancePolicyName",
                    "deviceCompliancePolicyId",
                    "roleScopeTagIds"
                ],
                "type": "object"
            },
            "type": "array"
        }
    },
    "type": "object"
}Note: An easy method to get the correct payload schema is by either doing a test run of the workflow, or by using the query in Graph Explorer, and using the response body as a sample payload to generate the schema.
- The sixth step of this workflow is the Control – For each control. That control will be used to loop through the non-compliant devices and needs the following configuration of the properties.
- Choose Dynamic content > (Parse JSON payload) value as value
- The seventh step is the Microsoft Teams > Post adaptive card and wait for a response action. That action will be used to post a message about the non-compliant devices (including the available actions for those devices) and needs the following configuration of the properties.
- Post as: Select Flow bot as value
- Post in: Select Chat with Flow bot as value
- Message: Provide the configuration as shown below as value to create an adaptive card that provides an overview of the non-compliant device to the IT administrator, including two actionable buttons (a button that will trigger the flow to retire the non-compliant device and a button that will trigger the flow to clear the non-compliant device)
- Updated message: Provide an updated message as value to indicated that the action was submitted
- Recipient: Specify the recipient as value
{
    "$schema": "http://adaptivecards.io/schemas/adaptive-card.json",
    "type": "AdaptiveCard",
    "version": "1.0",
    "body": [
        {
            "type": "TextBlock",
            "text": "Non-compliant device that require attention",
            "weight": "bolder",
            "size": "medium",
            "wrap": true,
            "id": "acTitle"
        },
        {
            "type": "TextBlock",
             "text": "Please verify the noncompliant device and take action",
             "weight": "bolder",
              "wrap": true,
              "id": "acSubHeader"
         },
        {
            "type": "TextBlock",
            "text": "The devices within the organization are marked to be retired after being noncompliant for over 10 days. Verify the details below.",
            "wrap": true,
            "id": "acDescriptionArea"
        },
        {
            "type": "FactSet",
            "facts": [
                {
                    "title": "Device name",
                    "value": "@{items('For_each')?['managedDeviceName']}"
                },
                {
                    "title": "Device platform:",
                    "value": "@{items('For_each')?['deviceType']}"
                },
                {
                    "title": "Device compliance name:",
                    "value": "@{items('For_each')?['deviceCompliancePolicyName']}"
                },
                {
                    "title": "Device compliance state:",
                    "value": "@{items('For_each')?['complianceState']}"
                },
                {
                    "title": "Retire after:",
                    "value": "@{items('For_each')?['retireAfterDateTime']}"
                }
            ],
            "id": "acFactSet"
        }
    ] ,
    "actions": [
       {
            "type": "Action.Submit",
            "title": "Retire device",
            "data": {
                "id": "retireDevice"
            }
        },
        {
            "type": "Action.Submit",
            "title": "Clear device",
            "data": {
                "id": "clearDevice"
            }
        }
    ]
}Important: The different values all contain dynamic content that is parsed from the JSON and retrieved from Microsoft Intune. Basically, all different properties of the non-compliant devices.
Performing specified action on non-compliant devices and posting an adaptive card
The second part of the workflow is to process the response to the adaptive card, to perform the specified action for the non-compliant devices marked to retire in Microsoft Intune (via Microsoft Graph) and to post an adaptive card in Microsoft Teams. An overview of that second part is shown below in Figure 2 and is further explained below that figure.
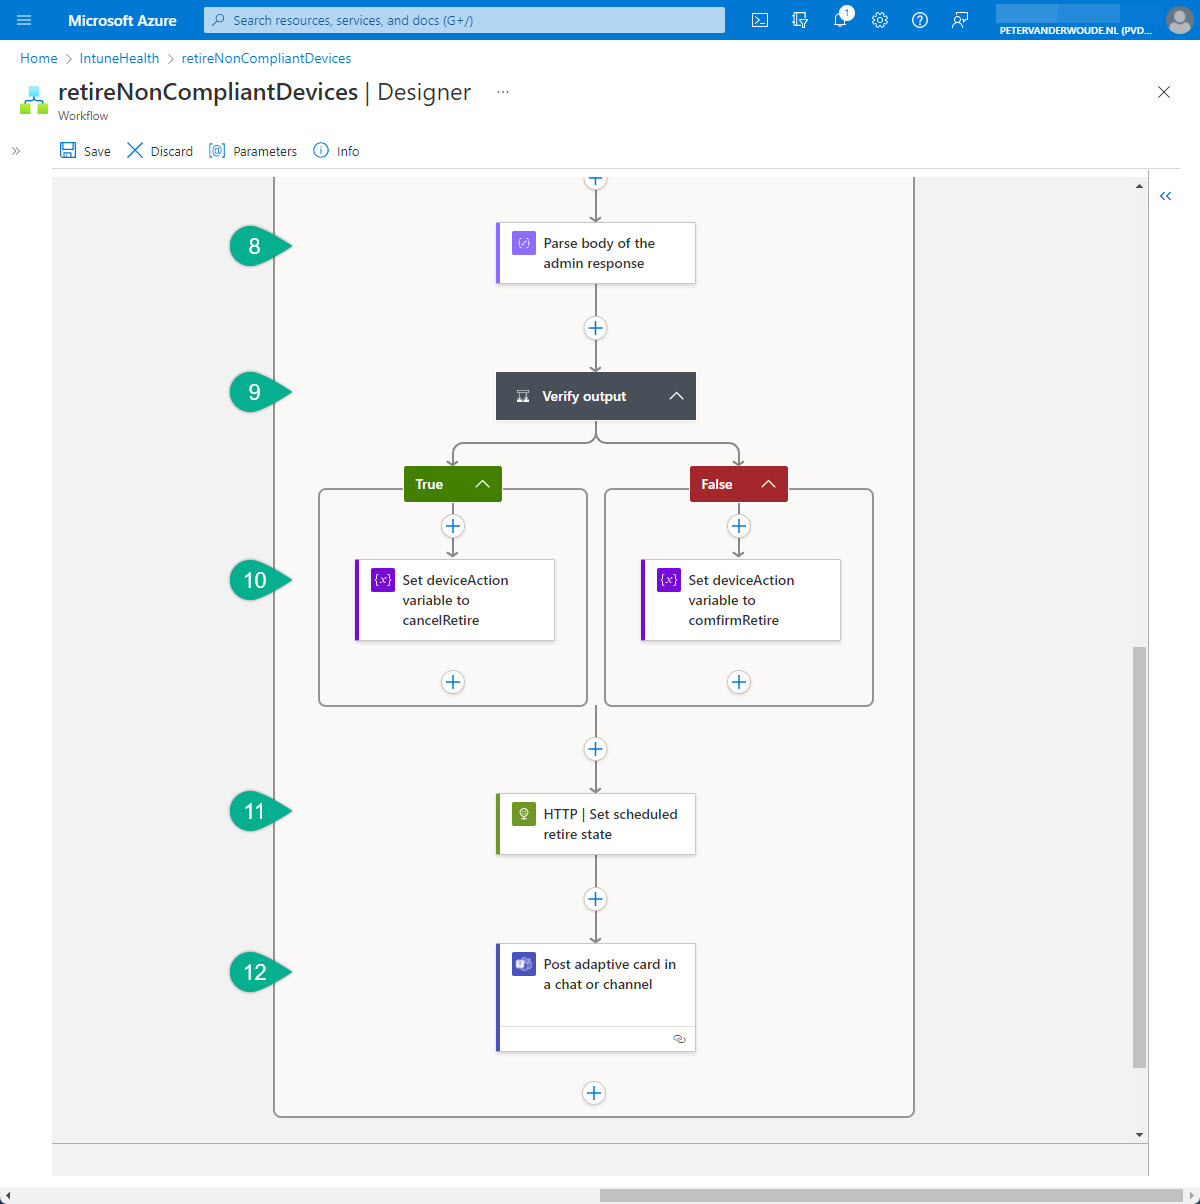
- The eigth step of the workflow is the Data Operations – Parse JSON action. That action will be used to specify the schema of the returned JSON content of the action triggered by the IT administrator and needs the following configurations of the properties.
- Content: Select Expression > Outputs(‘Post_adaptive_card_and_wait_for_a_response’)[‘body’] as value
- Schema: Provide the schema as shown below as value
Note: Keep in mind that the response of the adaptive card can’t be easily added as dynamic content (at this moment). Make sure to use an expression to add the information (as mentioned above).
{
    "properties": {
        "data": {
            "properties": {
                "id": {
                    "type": "string"
                }
            },
            "type": "object"
        },
        "messageId": {
            "type": "string"
        },
        "messageLink": {
            "type": "string"
        },
        "responder": {
            "properties": {
                "displayName": {
                    "type": "string"
                },
                "email": {
                    "type": "string"
                },
                "objectId": {
                    "type": "string"
                },
                "tenantId": {
                    "type": "string"
                },
                "userPrincipalName": {
                    "type": "string"
                }
            },
            "type": "object"
        },
        "responseTime": {
            "type": "string"
        },
        "submitActionId": {
            "type": "string"
        }
    },
    "type": "object"
}- The ninth step of this workflow is the Control – Condition action. That action will be used to verify the action triggered by the IT administrator and needs the following configurations of the parameter.
- Choose Dynamic content > (Parse JSON payload) submitActionId as value
- Select is equal to as value
- Provide Clear device as value
Note: The provided value is the title of the button that triggers the action on the non-compliant device.
- The tenth step is the Variables – Set variable action. That action (wel actually two actions) will be used to set the earlier created variable to the action that should be performed on the non-compliant device and needs the following configuration of the different values
- Name: Select deviceAction as value
- Value: Specify cancelRetire as value when true and specify confirmRetire as value when false
- The eleventh step of the workflow is the HTTP – HTTP action. That action will be used to use Microsoft Graph for performing the selected action on the non-compliant device and needs the following configurations of the properties.
- Method: Select POST as value
- URI: Provide https://graph.microsoft.com/beta/deviceManagement/deviceCompliancePolicies/setScheduledRetireState as value
- Body: Provide the body as shown below as value
- Authentication: Select Active Directory OAuth as value
- Tenant: Provide Directory (tenant) ID – as shown in the first bullet of creating the app registration – as value
- Audience: Provide https://graph.microsoft.com/ as value
- Client ID: Provide Application (client) ID – as shown in the first bullet of creating the app registration – as value
- Credential Type: Select Secret as value
- Secret: Select Dynamic content > (Get secret) value as value
{
  "managedDeviceIds": [
    "@{items('For_each')?['managedDeviceId']}"
  ],
  "state": "@{variables('deviceAction')}"
}- The twelfth step is the Microsoft Teams > Post adaptive card and wait for a response action. That action will be used to post a confirmation about the action performed on the non-compliant device and needs the following configuration of the properties.
- Post as: Select Flow bot as value
- Post in: Select Chat with Flow bot as value
- Recipient: Specify the recipient as value
- Adaptive Card: Provide the configuration as shown below as value to create an adaptive card that provides an overview of the action performed on the non-compliant device to the IT administrator
{
    "$schema": "http://adaptivecards.io/schemas/adaptive-card.json",
    "type": "AdaptiveCard",
    "version": "1.0",
    "body": [
        {
            "type": "TextBlock",
            "text": "Action performed on non-compliant device",
            "weight": "bolder",
            "size": "medium",
            "wrap": true,
            "id": "acTitle"
        },
        {
            "type": "TextBlock",
            "text": "The action details are below.",
            "wrap": true,
            "id": "acDescriptionArea"
        },
        {
            "type": "FactSet",
            "facts": [
                {
                    "title": "Device name",
                    "value": "@{items('For_each')?['managedDeviceName']}"
                },
                {
                    "title": "Performed action:",
                    "value": "@{body('Parse_body_of_the_admin_response')?['submitActionId']}"
                },
                {
                    "title": "Administrator:",
                    "value": "@{body('Parse_body_of_the_admin_response')?['responder']?['userPrincipalName']}"
                }            ],
            "id": "acFactSet"
        }
    ]
}Important: The response on the performed action – in step 11 – currently returns an error message, even when the action was successful. Make sure to catch that error and at the moment it might be wise to switch step 11 and 12 around, or to make step 12 aware of the status of step 11.
Experiencing the adaptive card to get a feeling with the result
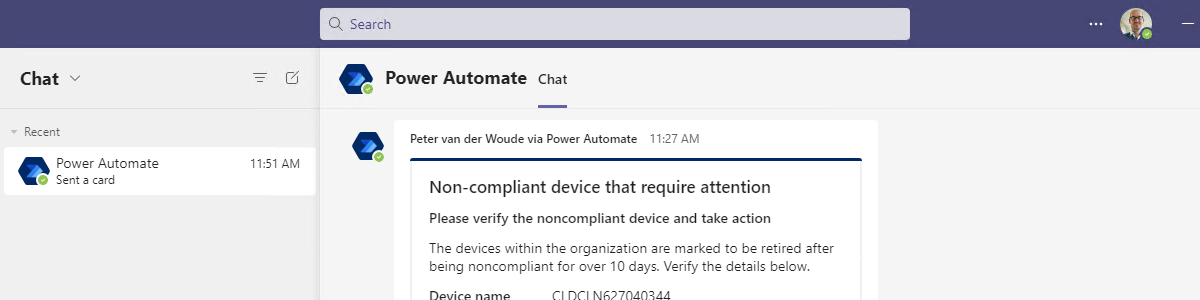
The best method to experience the adaptive card in Microsoft Teams, is by simply looking at it. So, to better mimic the behavior, the window to mark non-compliant devices for retire is made really small. That provides an easy example of the behavior. Once a non-compliant device is marked for retire, the IT administrator will get a message as shown below in Figure 3. That message provides information about the non-compliant device, followed with the buttons Retire device and Clear device.
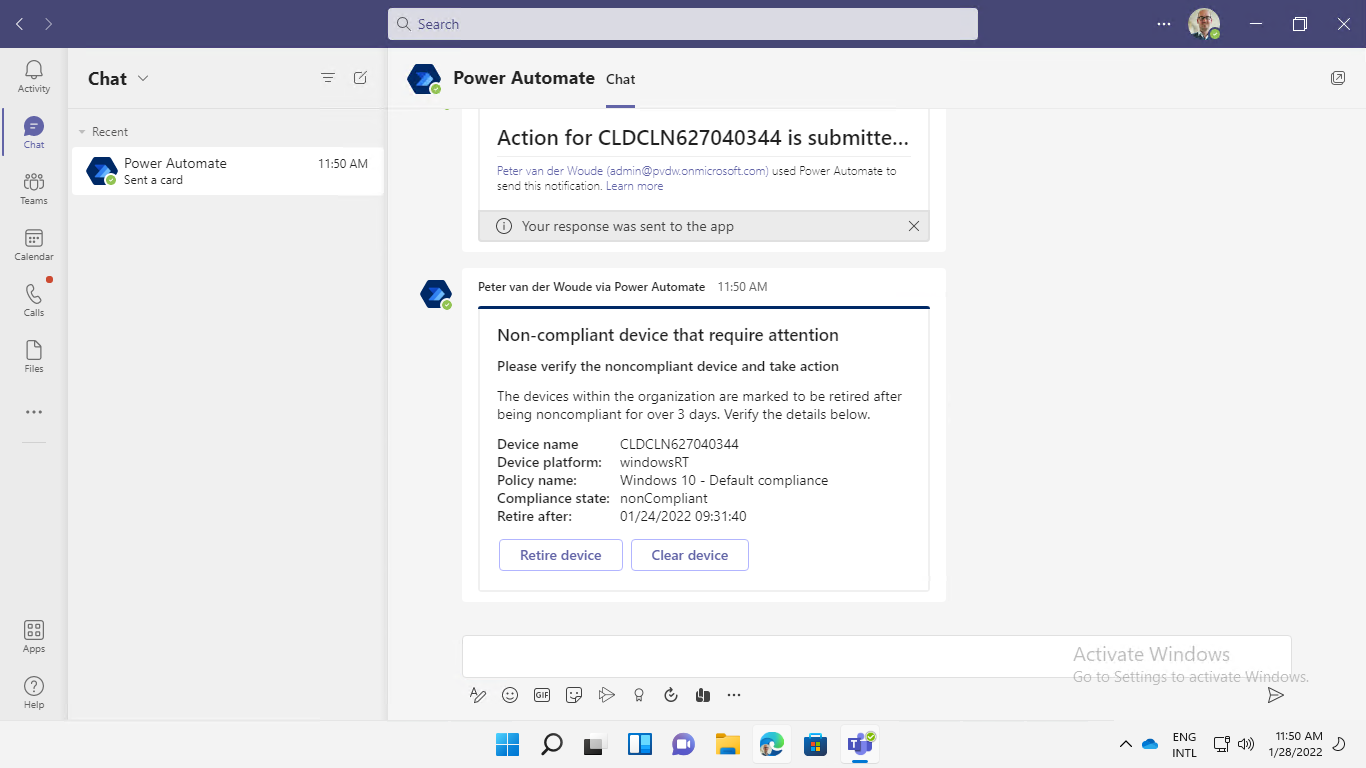
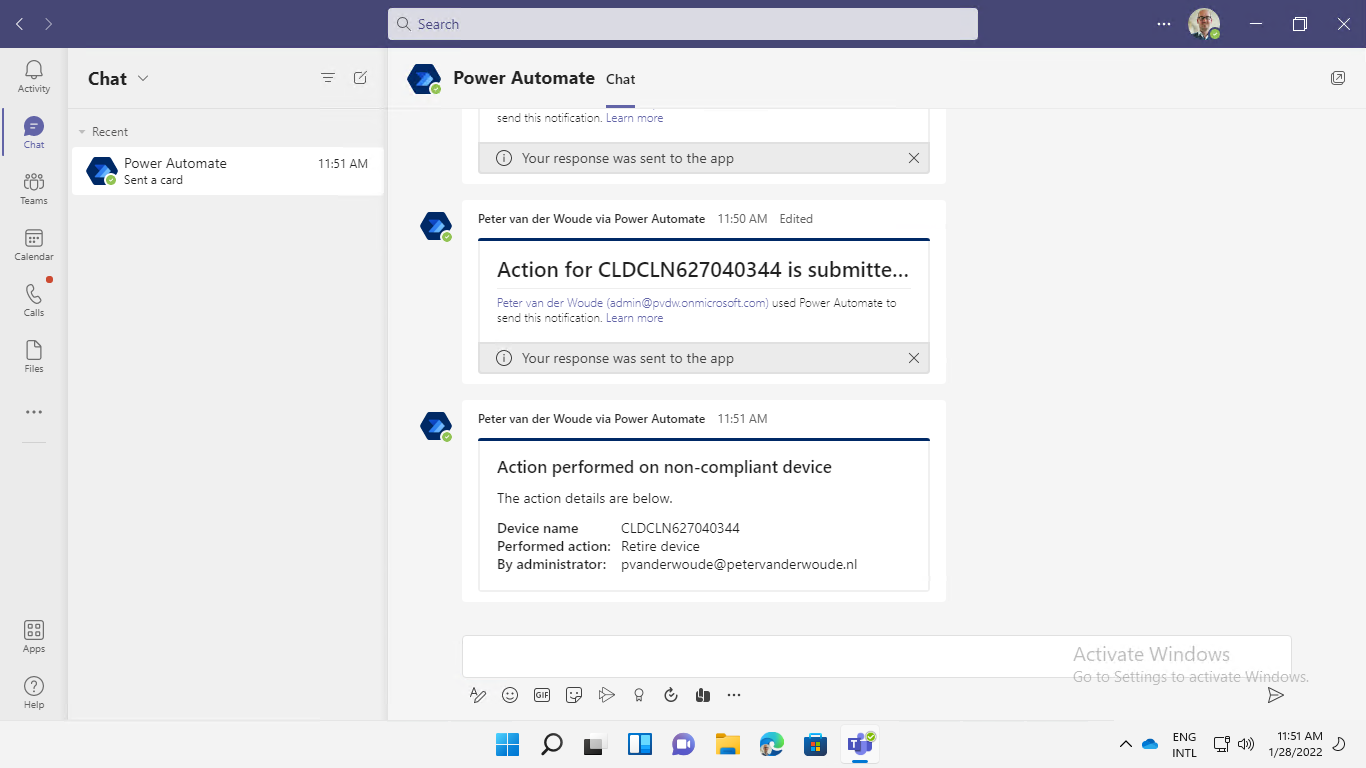
Once the IT administrator chooses the action that should be performed, the message will be updated, as shown below in Figure 4, stating that the action for the device is submitted. Immediately after that a message will follow providing the information about the action. That includes the action that was performed and the user that triggered the action.
More information
For more information about the different subjects that are used throughout this post, refer to the following docs.