
This week is another follow-up on the last couple of weeks. The last couple of weeks the focus was on monitoring the status of the different connectors, certificates and tokens, while this week the focus is on monitoring deployments. More specifically, on monitoring Windows Autopilot deployments. Especially when dealing with many (remote) Windows Autopilot deployments, it can be useful to retrieve some deployment triggers without constantly having to check the Microsoft Endpoint Manager admin center. That can help with getting a good feeling about the stability and with getting triggered when users deal with failed Windows Autopilot deployments (as not all users call IT about failures). This post walks through the main components that are required to query Windows Autopilot deployment status information in Microsoft Intune and to post that information via an adaptive card in a Microsoft Teams chat, by using an Azure Logic App. Especially the query that’s being used to retrieve the information, recieves some extra attention. Throughout this post the following components are described and shown.
- Creating a key vault to store the credentials
- Creating an app registration to provide the permissions
- Constructing the Windows Autopilot deployment status filter
- Creating a workflow to get the latest Windows Autopilot deployments
- Experiencing the adaptive card to get a feeling with the result
Note: On request, this time there are also some details about the Azure Key Vault to work with a managed identity.
Creating a key vault to store the credentials
The first action is to create a Key vault in Azure to provide a location to securely store the secret for retrieving a token in the workflow. That Key vault contains at least one important configuration that is required for the workflow. That configuration is that the Key vault needs to contain an access policy to provide access to the managed identity of the Logic app. The bullets below go through the minimal configuration that is required for usage within the workflow.
- Open the Azure portal, navigate to Key vaults to create a new Azure Key Vault
- Navigate to Access policies and add an access policy for the managed identity of the Logic app with at least the Secret Management Operations > Get permission
Tip: Use the List permission to make the stored secrets in the Key vault selectable within the workflow.
Note: Keep in mind that the Logic app must be created before it can be provided with the correct permissions.
Creating an app registration to provide the permissions
The second action is to create an App registration in Azure AD to provide the minimum required permissions to Microsoft Graph. That App registration contains two important configurations that are required for the workflow. Those configurations are that the App registration needs (1) the correct permissions and that (2) a client secret should be created for retrieving a token in the workflow. The bullets below go through the minimal configuration that is required and will make sure that the correct information is available when creating the workflow.
- Open the Azure portal, navigate to Azure Active Directory > App registrations to create a new App registration and save the Directory (tenant) ID and the Application (client) ID for usage within the workflow
- Navigate to API permissions, provide the app registration with at least the application API permissions of DeviceManagementManagedDevices.Read.All and grant admin consent for those permissions, to make sure that the workflow will have enough permissions
- Navigate to Certificates & secrets, create a new secret and save the value in the created Key vault
Tip: Only provide the App registration with the least permissions that are required to get the job done.
Constructing the Windows Autopilot deployment status filter
The third action is to construct the filter to only retrieve the most recent Windows Autopilot deployment statuses. The idea of this filter is to allign it with the recurrence of the workflow. That will make sure that the filtered status messages are only posted once. Besides that it might also be usefull to filter on the deployment state of those status messages. Either to filter out the deployments that are still in progress, or to specifically filter for failed (or succesful) deployments. Examples of both ideas are shown below.
https://graph.microsoft.com/beta/deviceManagement/autopilotEvents?$filter=deploymentEndDateTime%20ge%20@{formatDateTime(addDays(utcNow(),-1),'yyyy-MM-ddTHH:mm:ssZ')}https://graph.microsoft.com/beta/deviceManagement/autopilotEvents?$filter=deploymentEndDateTime%20ge%20@{formatDateTime(addDays(utcNow(),-1),'yyyy-MM-ddTHH:mm:ssZ')}%20and%20deploymentState%20eq%20'failure'Now let’s have a closer look at the examples, by going through the different components of the filters that are used to filter the resource. That information is shown below, after removing the encoded spaces (%20).
| Components | Description |
|---|---|
| $filter | The ‘filter’ parameter is used to imediately filter the resources |
| deploymentEndDateTime | The ‘deploymentEndDateTime’ property of the resource |
| ge | The ‘greater than or equal’ relational operator |
| @{formatDateTime(addDays(utcNow(),-1),’yyyy-MM-ddTHH:mm:ssZ’)} | The function – configured in the workflow – that takes the current date and time minus one day and is the value to compare with |
| and | (Optional) The ‘and’ conditional operator (add additional check) |
| deploymentState | (Optional) The ‘deploymentState’ property of the resource |
| eq | (Optional) The ‘equal’ equality operator |
| ‘failure’ | (Optional) The value to compare with |
Tip: The more that can be filtered at once, the lesser steps are needed, the cheaper the workflow will be.
Note: It’s not technically required to use %20 as a space within the uri, it can also be an actual space.
Creating a workflow to get the latest Windows Autopilot deployments
The third action is to create a workflow in an Azure Logic App. The workflow will use the created Key vault to retrieve the secret and will use the created App registration to query Microsoft Graph with the minimal required permissions. The idea of the example workflow is to query for the failed Windows Autopilot deployments (of the last day) in Microsoft Intune and to post an adaptive card in Microsoft Teams about those deployments. To get started, make sure that a Logic app and the related workflow are created. The main actions for that are described below.
- Open the Azure portal and navigate to Logic apps to create a new Logic app, by simply walking through the steps of specifying the Basics (Resource Group, Region and more), the Hosting (Storage, Plan and more), the Monitoring and the Tags. Once created, select the Logic app, navigate to Workflows and add a new Stateful workflow.
Once the framework (the Logic app and the workflow) is in place, it’s time to actually start with the configuration of the workflow. That workflow contains all the intelligence to query Microsoft Intune and to post in Microsoft Teams. An overview of the first part of that workflow is shown in Figure 1 and an overview of the second part of that workflow is shown in Figure 2. The details of the configurations of that workflow are explained below the different figures.

- The first step of the workflow is the Schedule – Recurrence trigger. That trigger will be used to trigger the workflow, based on a daily interval, and needs the following configurations of the properties.
- Interval: Specify 1 as value
- Frequency: Select Daily as value
- The second step of the workflow is the Azure Key Vault – Get secret action. That action will be used to retrieve the secret – to request a token – from the Azure Key Vault and needs the following configurations of the properties.
- Name of the secret: Specify or select the name of the secret as value
Tip: To prevent the secret from being showed in the output, configure Settings > Secure Outputs to Yes.
- The third step of the workflow is the HTTP – HTTP action. That action will be used to query Microsoft Graph for the latest Windows Autopilot deployment failures and needs the following configurations of the properties.
- Method: Select GET as value
- URI: Provide https://graph.microsoft.com/beta/deviceManagement/autopilotEvents?$filter=deploymentEndDateTime%20ge%20@{formatDateTime(addDays(utcNow(),-1),’yyyy-MM-ddTHH:mm:ssZ’)}%20and%20deploymentState%20eq%20’failure’ as value
- Authentication: Select Active Directory OAuth as value
- Tenant: Provide Directory (tenant) ID – as shown in the first bullet of creating the app registration – as value
- Audience: Provide https://graph.microsoft.com/ as value
- Client ID: Provide Application (client) ID – as shown in the first bullet of creating the app registration – as value
- Credential Type: Select Secret as value
- Secret: Select Dynamic content > (Get secret) value as value
Tip: The date and time to compare with can be added after %20 (which is a space) by selecting Expression > adding formatDateTime(addDays(utcNow(),-1),’yyyy-MM-ddTHH:mm:ssZ’) > clicking Update. That will simply add the function in the mentioned format.
Note: The specified uri will filter all the failed Windows Autopilot deployments of the last day. That will make sure that once everyday the failed deployments of the last day are shown. That interval can be adjusted, but make sure to match it with the configured interval in step 1. Otherwise failed deployments will get either lost or shown twice.
- The fourth step of the workflow is the Data Operations – Parse JSON action. That action will be used to specify the schema of the returned JSON content of the query and needs the following configurations of the properties.
- Content: Select Dynamic content > (HTTP) Body as value
- Schema: Provide the schema as shown below as value
{
    "properties": {
        "@@odata.context": {
            "type": "string"
        },
        "value": {
            "items": {
                "properties": {
                    "accountSetupDuration": {
                        "type": "string"
                    },
                    "accountSetupStatus": {
                        "type": "string"
                    },
                    "deploymentDuration": {
                        "type": "string"
                    },
                    "deploymentEndDateTime": {
                        "type": "string"
                    },
                    "deploymentStartDateTime": {
                        "type": "string"
                    },
                    "deploymentState": {
                        "type": "string"
                    },
                    "deploymentTotalDuration": {
                        "type": "string"
                    },
                    "deviceId": {
                        "type": "string"
                    },
                    "devicePreparationDuration": {
                        "type": "string"
                    },
                    "deviceRegisteredDateTime": {
                        "type": "string"
                    },
                    "deviceSerialNumber": {
                        "type": "string"
                    },
                    "deviceSetupDuration": {
                        "type": "string"
                    },
                    "deviceSetupStatus": {
                        "type": "string"
                    },
                    "enrollmentFailureDetails": {},
                    "enrollmentStartDateTime": {
                        "type": "string"
                    },
                    "enrollmentState": {
                        "type": "string"
                    },
                    "enrollmentType": {
                        "type": "string"
                    },
                    "eventDateTime": {
                        "type": "string"
                    },
                    "id": {
                        "type": "string"
                    },
                    "managedDeviceName": {
                        "type": "string"
                    },
                    "osVersion": {
                        "type": "string"
                    },
                    "targetedAppCount": {
                        "type": "integer"
                    },
                    "targetedPolicyCount": {
                        "type": "integer"
                    },
                    "userPrincipalName": {
                        "type": "string"
                    },
                    "windows10EnrollmentCompletionPageConfigurationDisplayName": {},
                    "windows10EnrollmentCompletionPageConfigurationId": {},
                    "windowsAutopilotDeploymentProfileDisplayName": {}
                },
                "required": [
                    "id",
                    "deviceId",
                    "eventDateTime",
                    "deviceRegisteredDateTime",
                    "enrollmentStartDateTime",
                    "enrollmentType",
                    "deviceSerialNumber",
                    "managedDeviceName",
                    "userPrincipalName",
                    "windowsAutopilotDeploymentProfileDisplayName",
                    "enrollmentState",
                    "windows10EnrollmentCompletionPageConfigurationDisplayName",
                    "windows10EnrollmentCompletionPageConfigurationId",
                    "deploymentState",
                    "deviceSetupStatus",
                    "accountSetupStatus",
                    "osVersion",
                    "deploymentDuration",
                    "deploymentTotalDuration",
                    "devicePreparationDuration",
                    "deviceSetupDuration",
                    "accountSetupDuration",
                    "deploymentStartDateTime",
                    "deploymentEndDateTime",
                    "targetedAppCount",
                    "targetedPolicyCount",
                    "enrollmentFailureDetails"
                ],
                "type": "object"
            },
            "type": "array"
        }
    },
    "type": "object"
}Note: An easy method to get the correct payload schema is by either doing a test run of the workflow, or by using the query in Graph Explorer, and using the response body as a sample payload to generate the schema.
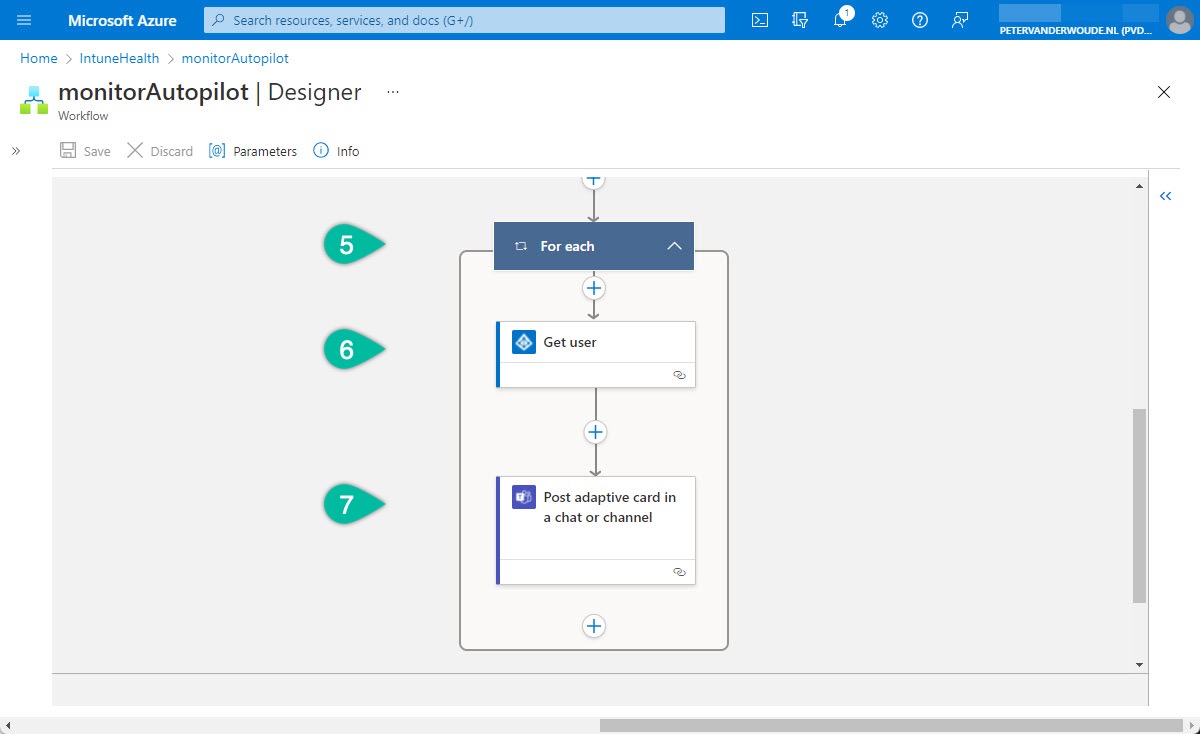
- The fifth step of this workflow is the Control – For each control. That control will be used to loop through the failed Windows Autopilot deployments and needs the following configuration of the properties.
- Choose Dynamic content > (Parse JSON payload) value as value
- The sixth step of this workflow is the Azure AD – Get user action. That action will be used to get the user account with the failed Windows Autopilot deployment and needs the following configurations of the properties.
- Choose Dynamic content > (Parse JSON payload) userPrincipalName as value
- The seventh and final step is the Microsoft Teams > Post adaptive card in a chat or channel action. That action will be used to post the failed Windows Autopilot deployments of the last day and needs the following configuration of the properties.
- Post as: Select Flow bot as value
- Post in: Select Chat with Flow bot as value
- Recipient: Specify the recipient as value
- Adaptive Card: Provide the configuration as shown below as value to create an adaptive card that provides an overview to the IT administrator, including two buttons (a button that links to the Microsoft Endpoint Manager admin center and a button that links to the Microsoft docs)
{
    "$schema": "http://adaptivecards.io/schemas/adaptive-card.json",
    "type": "AdaptiveCard",
    "version": "1.0",
    "body": [
        {
            "type": "TextBlock",
            "text": "Latest failed Windows Autopilot deployments",
            "weight": "bolder",
            "size": "medium",
            "wrap": true,
            "id": "acTitle"
        },
        {
            "type": "TextBlock",
             "text": "Please verify the latest Windows Autopilot deployments",
             "weight": "bolder",
              "wrap": true,
              "id": "acSubHeader"
         },
        {
            "type": "TextBlock",
            "text": "The last day there have been failed Windows Autopilot deployments within the organization. Verify the details below.",
            "wrap": true,
            "id": "acDescriptionArea"
        },
        {
            "type": "FactSet",
            "facts": [
                {
                    "title": "Device name",
                    "value": "@{items('For_each')?['managedDeviceName']}"
                },
                {
                    "title": "Device serial number:",
                    "value": "@{items('For_each')?['deviceSerialNumber']}"
                },
                {
                    "title": "Device OS version:",
                    "value": "@{items('For_each')?['osVersion']}"
                },
                {
                    "title": "User:",
                    "value": "@{body('Get_user')?['userPrincipalName']}"
                },
                {
                    "title": "Deployment profile:",
                    "value": "@{items('For_each')?['windowsAutopilotDeploymentProfileDisplayName']}"
                },
                {
                    "title": "Deployment start:",
                    "value": "@{items('For_each')?['deploymentStartDateTime']}"
                },
                {
                    "title": "Deployment end:",
                    "value": "@{items('For_each')?['deploymentEndDateTime']}"
                },
                {
                    "title": "Deployment state:",
                    "value": "@{items('For_each')?['deploymentState']}"
                },
                {
                    "title": "Enrollment state:",
                    "value": "@{items('For_each')?['enrollmentState']}"
                }
            ],
            "id": "acFactSet"
        }
    ] ,
    "actions": [
       {
           "type": "Action.OpenUrl",
           "title": "Take action",
           "url": "https://endpoint.microsoft.com/"
       },
       {
           "type": "Action.OpenUrl",
            "title": "Documentation",
            "url": "https://docs.microsoft.com/en-us/mem/autopilot/troubleshooting"
        }
    ]
}Important: The different values all contain dynamic content that is parsed from the JSON and retrieved from Azure AD.
Note: To add more details – for example more device details – add another additional step, similar to step 6 that is used to get the user name. By default only the id is available in the Widows Autopilot deployment status.
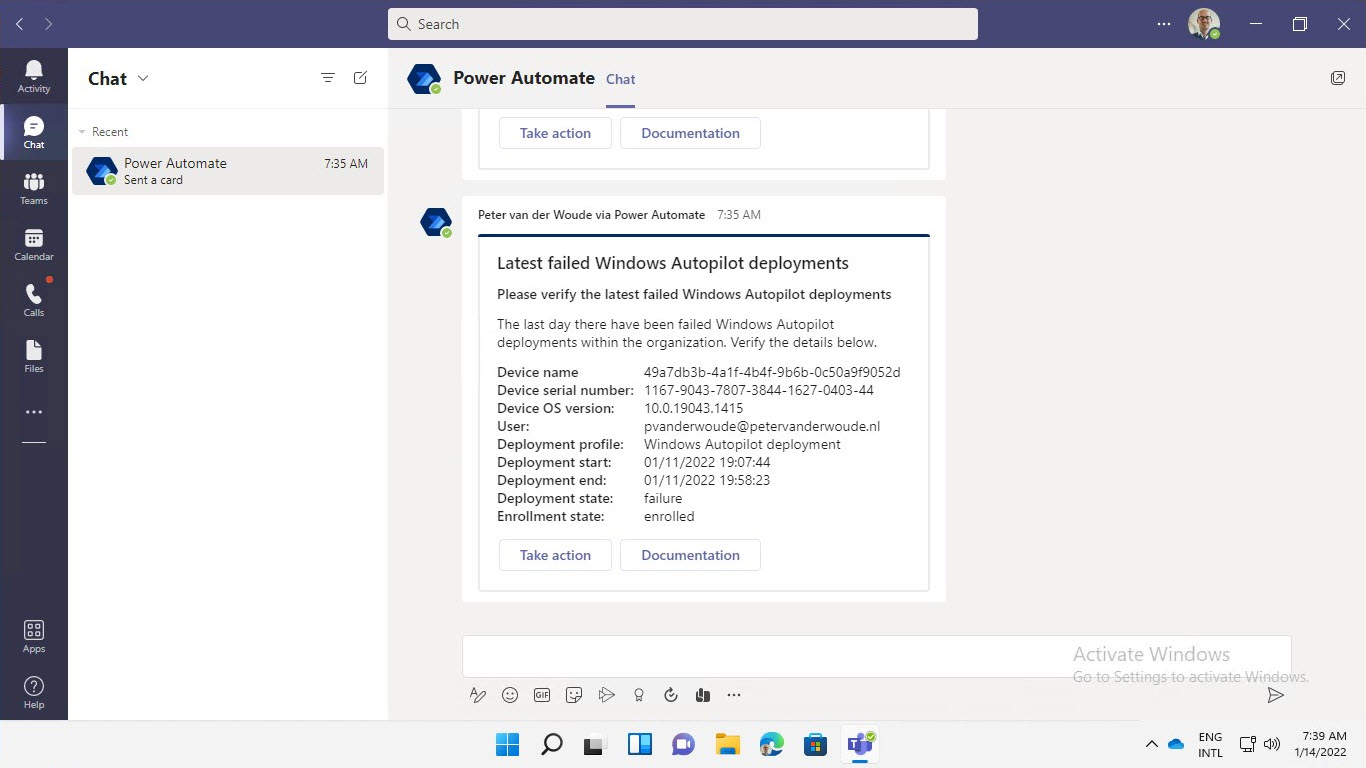
Experiencing the adaptive card to get a feeling with the result
The best method to experience the adaptive card in Microsoft Teams, is by simply looking at it. The minor challenge is that my labe environment doesn’t get daily Windows Autopilot deployment failures. So, to get a feeling with the result, the filtered period is a little bit stretched. That will make sure that the IT administrator gets a trigger even when the deployment failure was not of the last day. The experience for the IT administrator is shown below in Figure 3. The IT administrator recieves a message like that per failed deployment within that period of time. The message provides details about the device, the deployment and the user and it contains a button to take action (a link to Microsoft Endpoint Manager admin center) and a button for the documentation (a link to the Microsoft docs about troubleshooting Windows Autopilot deployments).
More information
For more information about the different subjects that are used throughout this post, refer to the following docs.
Hi,
first of all great work and nice blog. I did try to build it the same as you did but always get an error at the “Get User” action with the following output:
{
“statusCode”: 404,
“message”: “Resource not found”
}
I am connected to azuread with my admin user.
Do you have any idea why it is happening?
Best Regards,
Uli
Hi Uli,
Have you provided the correct input (userPrincipalName) for that step?
Regards, Peter
Hi Peter,
On the HTTP Get request i am receiving unauthorized, any ideas on this?
Many Thanks
Hi Jack,
And you have the correct permissions?
Regards, Peter
Hi Peter, Is there a way we can exclude the 6th step of Azure AD – Get User since that requires AAD read and write access which currently we do not have…..
Hi OP,
Yes, you can. Just keep in mind that you than also need to remove the reference to the username from the adapative card.
Regards, Peter
Hey Peter,
I’ve been looking at this and had an idea.. Users getting an email after they have completed the autopilot deployment with tips and tricks or links to internal support KBs etc… I guess we could use azure logic apps for this.. you think it would be possible?
Hi Adam,
Yes that should be possible. In the simplest way by replacing the Teams notication action with an email notification action.
Regards, Peter
My results on the posted card always show the device name as the azure ad device ID. Any idea why that is?
Hi KP,
That’s because it’s looking at the managedDeviceName. In the early stages that’s still the device ID.
Regards, Peter