
This week is another post about one of the new Intune Suite add-on capabilities. This time it’s all about Endpoint Privilege Management (EPM). At this moment EPM is still in preview, but once it becomes general available it will be licensed as part of the Microsoft Intune Suite. EPM enables organizations to provide standard user permissions to their users and still enable those users to complete tasks that require elevated permissions. Those tasks can include the installation of applications, updating device drivers, running diagnostics, and more. With that, EPM fits perfectly in the Zero Trust architecture of any organization. It enables the principle of using the least privilege, while still allowing users to run specifically approved tasks with elevated permissions. So, users remain productive and elevations are audited. This post will start with a brief introduction about EPM, followed with the different activities to get EPM up-and-running. This post ends with the user experience.
Important: EPM is free for using during the preview period. After that period, it becomes a licensed product as part of the Intune Suite, or as a standalone product. In both cases, it’s on top of Microsoft Intune Plan 1.
Introducing Endpoint Privilege Management
Before looking at the implementation of EPM, it’s important to be familiar with the product and the different configuration components. EPM is directly integrated into Microsoft Intune and completely configurable via Microsoft Intune admin center. After activating the configuration of EPM, the configuration of EPM contains two major parts.
- Elevation settings – The elevation settings are the starting point of EPM on Windows devices. Those settings are configured via an Elevation settings policy. That policy enables the IT administrator to enable EPM on the targeted devices and to configure the default elevation behavior on those devices. Besides that, it can be used for configuring the reporting behavior of elevations on those devices.
- Elevation rules – The elevation rules are the link between an application and an elevation action in EPM. Those rules are configured via an Elevation rules policy. That policy enables the IT administrator to configure the elevation behavior for specifically specified applications within the environment.
After enabling EPM via the elevation settings, the EPM agent will be installed on the device. Once the EPM agent is in place, it’s important to understand the difference between managed and unmanaged elevations. A managed elevation is any elevation that is facilitated by EPM and an unmanaged elevation is any elevation that happens without EPM. That can be the case when using the Windows default action of Run as administrator. In either case, however, the result will be same, the file will be started with full administrative permissions on the device.
Of course, EPM provides IT with a lot more control, but it’s still important to keep in mind what the effect and impact will be of any rule created for the EPM agent. Often it can also be useful to have multiple elevation rules in place, which potentially can conflict with each other. When that’s the case it’s important to remember the following logic:
- User takes precedence above device: Rules deployed to users take precedence over rules deployed to devices
- Most specific takes precedence: Rules with a hash defined are deemed most specific and take precedence, followed with the rule that has the most attributes defined
- Elevation behavior determines precedence: Rules with the elevation behavior of User Confirmed take precedence over rules with Support Approved, which takes precedence over rules with Automatic
Note: With conflicting elevation settings, the EPM client reverts to the default behavior until the conflict is resolved.
Enabling Endpoint Privilege Management
For using EPM, it first must be enabled for the tenant. To enable EPM for the tenant, follow the next two steps.
- Open the Microsoft Intune admin center portal navigate to Endpoint security > Endpoint Privilege Management
- On the Activate Endpoint Privilege Management for your tenant now page, review information and click Activate
Creating Windows elevation settings policy
After enabling EPM for the tenant, the next step is to deploy an Elevation settings policy. That policy is used to enable EPM on the device, to set the default behavior for elevation requests for any file that isn’t managed by an EPM elevation rule, and to configure the information that EPM reports back. That also means that a device must have an Elevation settings policy assigned, to enable EPM and it’s functionality. The following eight steps walk through the configuration of that policy.
- Open the Microsoft Intune admin center portal navigate to Endpoint security > Endpoint Privilege Management
- On the Policies tab of the Endpoint security | Endpoint Privilege Management page, click Create Policy
- On the Create a profile page, provide the following information and click Create
- Platform: Select Windows 10 and later as value
- Profile: Select Elevation settings policy as value
- On the Basics page, specify a valid name to distinguish the policy from other similar policies and click Next
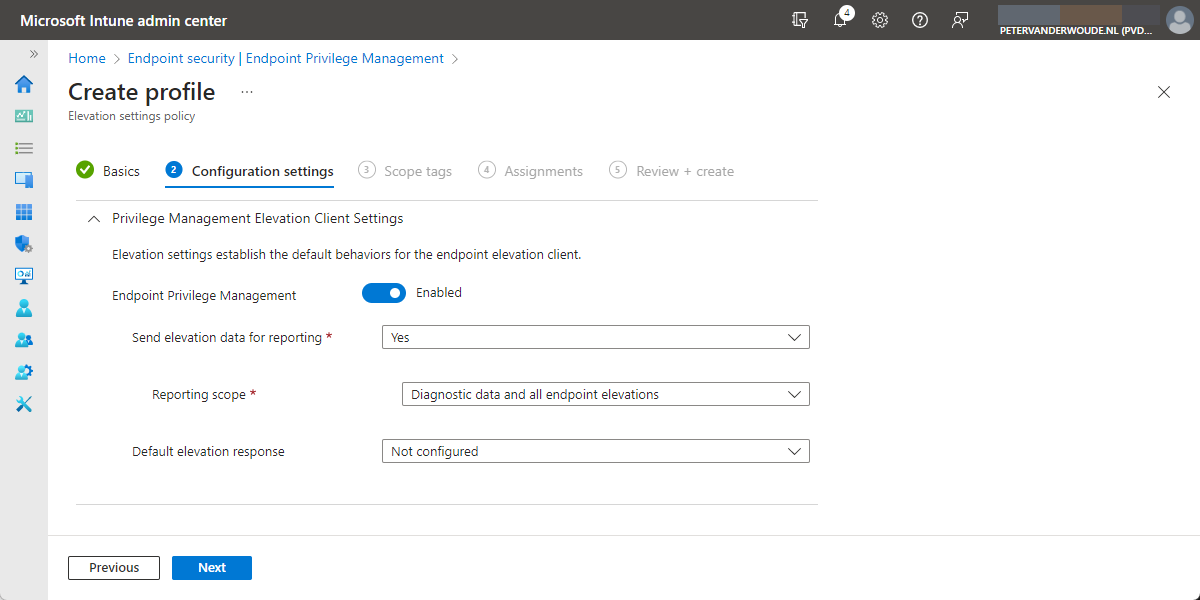
- On the Configuration settings page, as shown below in Figure 1, provide at least the following information and click Next
- With Endpoint Privilege Management switch the slider to Yes to enable EPM
- Send data to Microsoft: Choose between Yes or No, to have the device send diagnostic data or information about file elevations to Intune.
- Reporting scope: Choose between Diagnostic data and all endpoint elevations (that reports diagnostic data and details about all file elevations), Diagnostic data and managed elevations only (that reports diagnostic data and details about file elevations for only those that are managed by an elevation rule), and Diagnostic data only (that reports only diagnostic data) to configure what type of information a device reports to Intune
- Default elevation response: Choose between Not configured (that functions the same as deny all), Deny all requests (that denies the elevation request), and Require user confirmation (that allows the elevation request and can prompt for validation) to configure how the device manages elevation requests for files that aren’t directly managed by a rule
- Send data to Microsoft: Choose between Yes or No, to have the device send diagnostic data or information about file elevations to Intune.
- On the Scope tags page, configure the required scope tags and click Next
- On the Assignments page, configure the required assignment by selecting the applicable group and click Next
- On the Create + Review page, review the configuration and click Create
Note: On a Windows device, the assigned elevation settings policy will be available as a DAT-file in C:\Program Files\Microsoft EPM Agent\Policies\ClientSettings. That file is readable like a JSON-file. Besides that, a reference is stamped in the registry at HKLM\SOFTWARE\Microsoft\EPMAgent\Policies\ClientSettings.
Creating Windows elevation rules policy
After enabling EPM on the device, the next step is to deploy an Elevation rules policy. That policy can be used to deploy one or more rules for files that are managed for elevation by EPM. Each rule of this policy identifies a file to manage elevation requests for, and specifies the elevation type of the file. That means that a device doesn’t need to have an Elevation rules policy assigned, as it specific to the files in the environment. The following eight steps walk through the configuration of that policy for an example application (Visual Studio Code) based on the hash of the file.
- Open the Microsoft Intune admin center portal navigate to Endpoint security > Endpoint Privilege Management
- On the Policies tab of the Endpoint security | Endpoint Privilege Management page, click Create Policy
- On the Create a profile page, provide the following information and click Create
- Platform: Select Windows 10 and later as value
- Profile: Select Elevation rules policy as value
- On the Basics page, specify a valid name to distinguish the policy from other similar policies and click Next
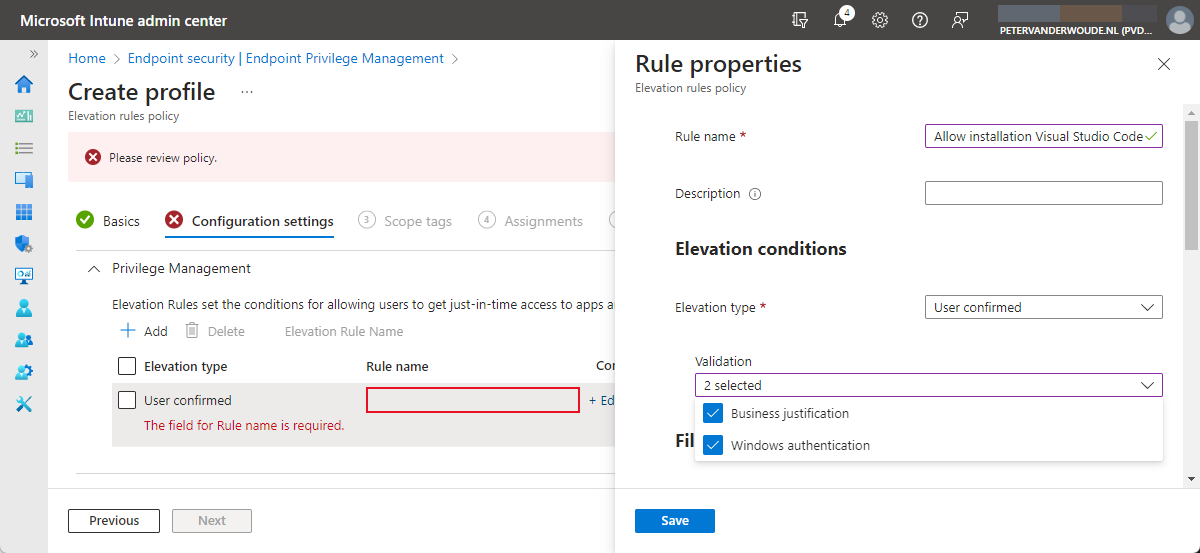
- On the Configuration settings page, as shown below in Figure 2 and Figure 3, add a new rule, provide at least the following information and click Next
- Rule name: Specify a valid and unique name to distinguish the rule
- Elevation type: Choose between User confirmed (that prompts the user to confirm their intent to run the file) and Automatic (that automatically runs with elevated permissions), to configure the elevation type:
- Validation: Select Business justification (that requires the user to enter a justification for running the file) and/or Windows authentication (that requires requires the user to authenticate using organization credentials)
- File name (2): Specify the name of the file and the extension
- Signature source (1): Choose Not configured, to not use a certificate to validate the integrity of the file
- File hash (3): Specify the hash of the file
Note: Use Get-FileHash, or the Endpoint elevation report (when using the reporting scope of Diagnostic data and all endpoint elevations) to easily retrieve the hash information of the file.
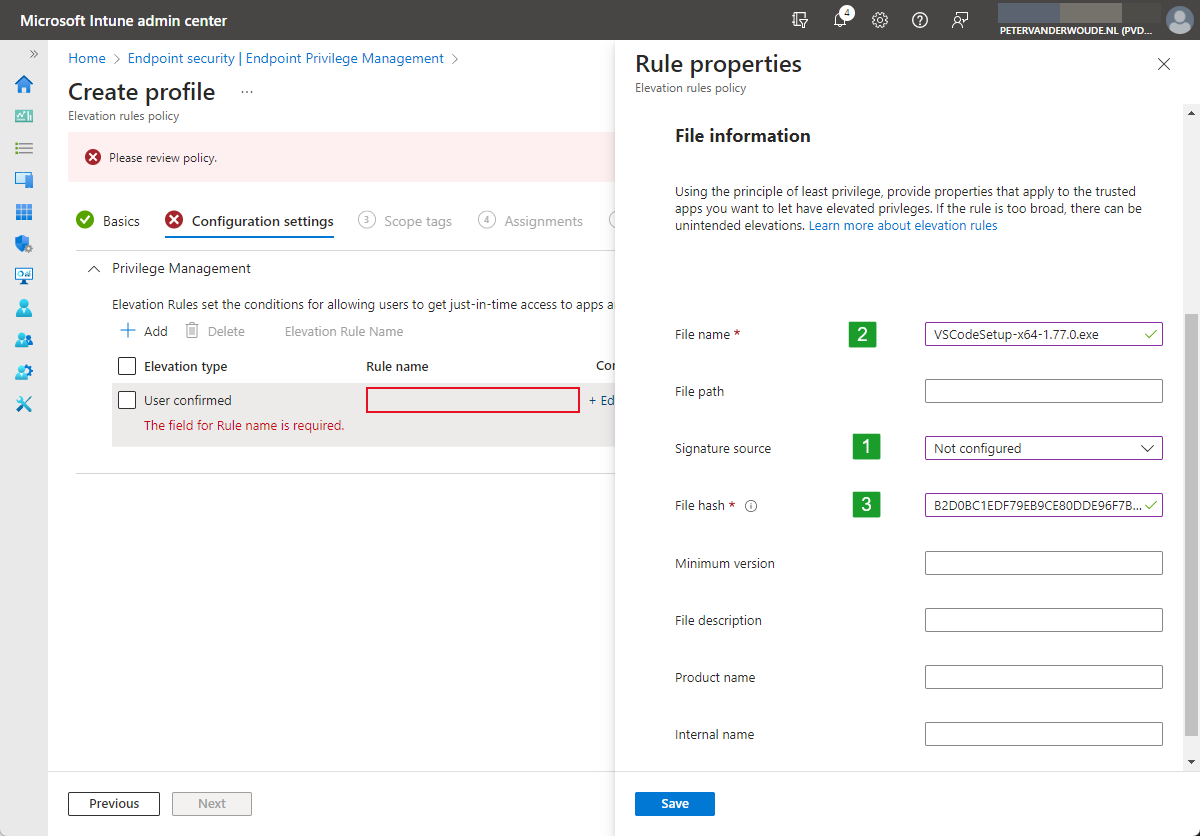
Note: Specify more details, to make sure that only the intended file can be used with elevated permissions.
- On the Scope tags page, configure the required scope tags and click Next
- On the Assignments page, configure the required assignment by selecting the applicable group and click Next
- On the Create + Review page, review the configuration and click Create
Note: On a Windows device, the assigned elevation rules policy will be available as a DAT-file in C:\Program Files\Microsoft EPM Agent\Policies\ElevationRules. That file is readable like a JSON-file. Besides that, a reference is stamped in the registry at HKLM\SOFTWARE\Microsoft\EPMAgent\Policies\ElevationRules.
Experiencing running with elevated access
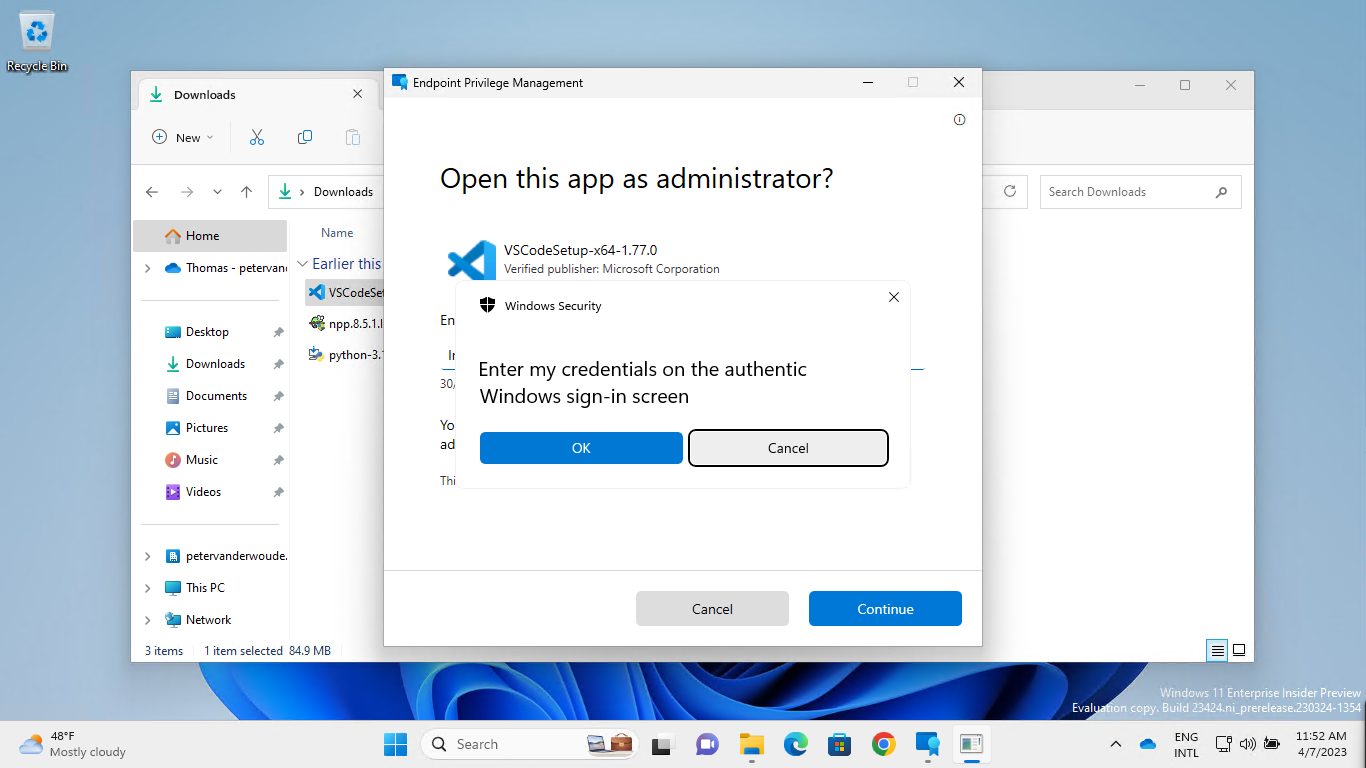
After enabling EPM and deploying specific elevation rules, it’s time to have a closer look at the user experience. The great part is that the experience is really straight forward. Once you’re familiar with it. Especially on devices running Windows 11. That’s because the option to run a file with elevated permissions is a bit hidden in the right-click context menu. The user must first click Show more options, before Run with elevated access becomes available. When the user has to provide a business justification, an experience as shown below in Figure 4 will be shown to the user.
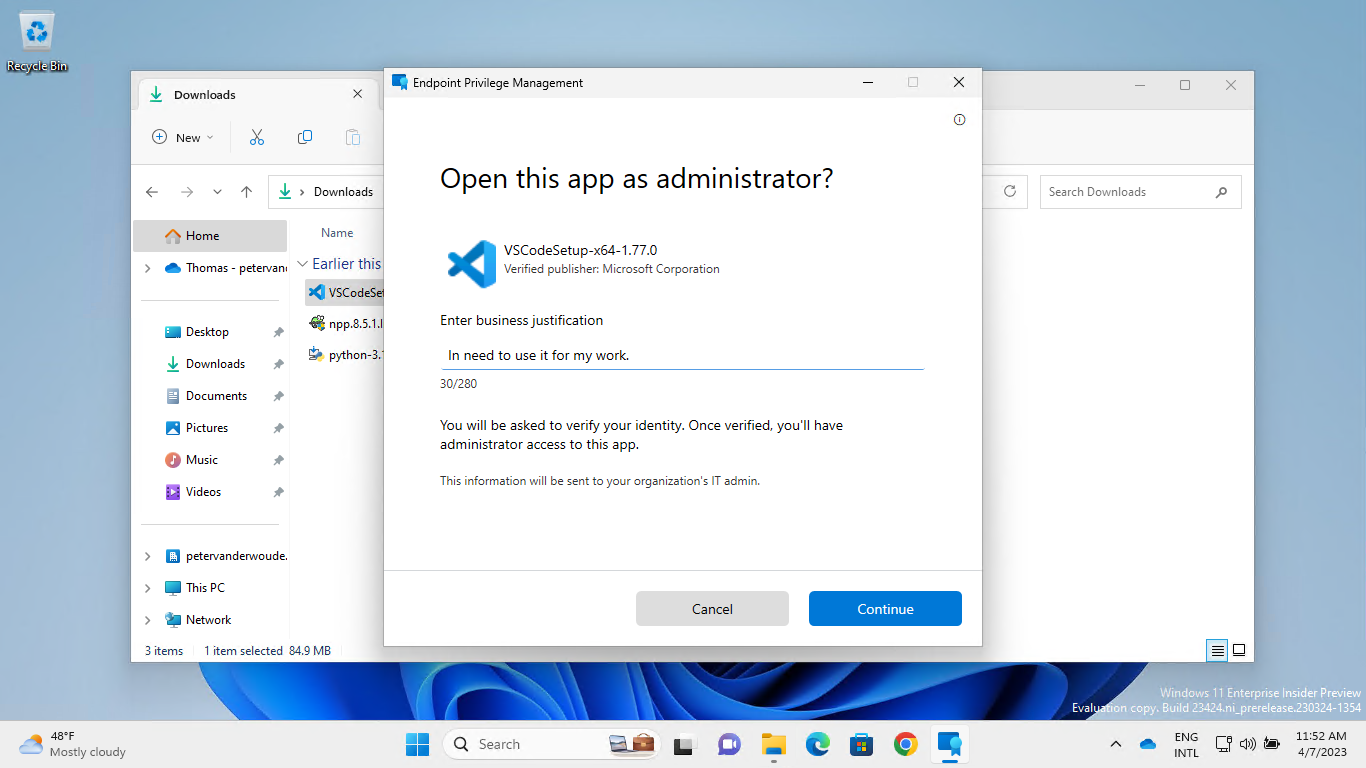
Note: When the file was downloaded from the Internet, make sure to unblock it before using the elevation.
When the user also has to provide a Windows authentication, the experience will continue as shown below in Figure 5.
For verifying the configuration on a Windows device, it’s possible to look at the locations that were mentioned with the different elevation policies. Those locations provide the DAT-files with the applied configuration. Besides that, there is also the EpmPolicySpy.exe tool (in the EpmTools folder) that can be used to verify the applied policies.
More information
For more information about Endpoint Privilege Management, refer to the following docs.
- Learn about using Endpoint Privilege Management with Microsoft Intune | Microsoft Learn
- Guidance for creating elevation rules with Endpoint Privilege Management | Microsoft Learn
- Configure policies to manage Endpoint Privilege Management with Microsoft Intune | Microsoft Learn
- Monitor your Endpoint Privilege Management policies for Microsoft Intune | Microsoft Learn
- Review the data that Endpoint Privilege Management collects when used with Microsoft Intune | Microsoft Learn
- Deployment considerations for Endpoint Privilege Management | Microsoft Learn
Hi Peter, many thanks for this guide. I’m trying to set up EPM on a test Win11 machine. I’ve installed the EPM agent manually as it says KB5022913 isn’t applicable.
I’m not seeing the rules policies I’ve created apply to the machine though. I’ve tried assigning them to the user and the device, but they’re doing nothing – 0 success, 0 error, 0 conflict, 0 not applicable, 0 in progress.
Have you seen this, or do you have any suggestions what to try, please?
Hi Iain,
You should use the Elevation settings policy for enabling the EPM agent.
Regards, Peter
Do you have any troubleshooting tips for when it doesn’t install after assigning the elevation settings policy. I’m finding that some machines (all of the same W11 build) install it, but some simply don’t!
Hi Iain,
Do you already see anything related to EPM? Like the installation folder?
Regards, Peter
Hey Peter – Do you know if Microsoft is planning to include MacOS devices for their EPM at some point?
Hi Jonathan,
To my knowledge there’s no public statement about that commitment yet.
Regards, Peter
Hi,
Thank you! It works fine.
Is it possible to always open a app (hyperlink advanced setting?) with ‘Run with elevated access’? Or a command line solution (bat-file)?
Kind Regards,
Hi Niels,
I haven’t really looked in to that, yet, but you might be able to mimic the right-click action command.
Regards, Peter
We have implemented an Endpoint Privilege Management settings policy which allows users to run EXE files with elevated access if they submit a business justification and their password.
If a user without local administrator rights navigates to windows\system32 folder and right clicks on CMD.EXE, then selects “Run with elevated access” they can then run a “net localgroup” command and add themselves as local administrator on their device.
This means that any user without local administrator rights can bypass the restriction put in place by the EPM settings policy. The same with MMC.EXE.
Secondly, the business justification feature does not record what a user types. I don’t see it in reports nor even in the local EPM logs. The reports are unreliable/ don’t appear for about a day from the elevated action anyway.
We have already discounted the Deny All route and having to whitelist every exe file. This is far too labour intensive and with users such as developers a nightmare in support. It doesn’t allow the authorisation of MSI files and other updating or admin tools that require admin rights. This feature is a long way from being fit for business use for anything but small businesses with a limited library of executables.
Hi Ted,
Thank you for the feedback. I recognize nearly all of those items. Please make sure that you also address these items with Microsoft.
Regards, Peter
So you were deploying a rule to let users run *any* exe with elevation? I’d strongly recommend reconsidering such an approach. You may as well give them full admin rights. A proper, least-privileged implementation of an EPM tool is to only allow elevation for specifically approved apps that are known to require it. 99% of apps don’t need elevation to run correctly. Find out the few exceptions in your environment and then create rules to specifically target those apps. If your goal is to let your users have full admin rights, but you just want auditing of what they do with those rights, Intune EPM isn’t the right tool for that.
How did you manage to configure such a rule?
As part of our rollout, we are moving everyone over to EPM instead of local admin accounts.
For a starting point, we just want to allow everything, in the same way they run now, except through EPM.
Then work to focus the scope over time.
Developing policies for all applications in the first instance would be too demanding for such a large scope of users.
Is there an known issue if I use EPM with “App Control for Business” without trusted apps (security graph) allow?
Hi Thilo,
It doesn’t immediately ring a bell. Can you provide a bit more details?
Regards, Peter
Hello Peter,
We use applocker and are looking to replace this with “app control for business (wdac)”. We have enabled managed installers and now we want to use the following settings: Use built-in controls, Enforce, Trust apps from managed installers.
I believe EPM is not a replacement for wdac but a config that runs next to wdac to allow users to run some tasks elevated. Do you have experience running wdac next to epm and what are best practices?
Greetings,
Lito
Hi Lito,
I would say that using EPM in combination with WDAC would be really challenging. Mainly because the idea of EPM is to give a user sometimes some additional permissions to perform specific actions (like installing apps). That will be challenging to manage with WDAC.
Regards, Peter
I must admit I found my method was to create a powershell that elevated permission, copied txt file to their appdata local folder (I use that as token to show that app was installed when intune needed something to detect) then created a scheduled task to run another powershell which was copied into same location as txt file the scheduled task then ran at a specific time after first task removing permissions and the token scheduled task along with the final powershell file – complex I know but couldn’t find another way at the moment. so I truly hope the EPM will evolve to work to assist not complicate, shame really as Intune and android seems to be more attractive at the moment I can control a lot more apps wise and user wise.
EPM should give you a lot more control and insights in elevation requests.
Regards, Peter
EPM agent seems not to install on ARM64 cpu windows devices. I don’t find info’s about CPU/Architecture requirements. I get error 2147749902 in epm configuration profile.
Hi Thilo,
I haven’t specifically heard of support for ARM64. Often when it’s not specifically mentioned, it’s not yet supported.
Regards, Peter