This week, for me, was all about deploying Windows Server 2012 (which is currently still in RC), with ConfigMgr 2012 SP1 (which is currently still in CTP) and MDT 2012 Update 1 (which is currently still in BETA). So it was one big test case, but it showed a lot of possibilities for the coming releases.
For those who follow me on twitter this post will contain a lot more information about the short tweets that I already did the last week. For instance, the need for running your own Build-and-Capture Task Sequence got a lot smaller with Windows Server 2012 (and Windows 8), because the default install.wim will install on the C-drive ánd ConfigMgr 2012 brings Offline Servicing. So when you’re used to deploy a thin image, you can use the default WIM -image and schedule the Updates on that image through ConfigMgr 2012 (without running a Build-and-Capture).
But what I really want to show in this post are the different possibilities for deploying Windows Server 2012 including some random Roles and Features. The three most used options are Powershell, DISM and MDT. The next examples will all install the same role (WDS Transport Server) and the same feature (BranchCache). Why these features? Well, actually just because they fitted nice together in a screenshot with the MDT –method.
Powershell
The first method that I want to show is deploying Windows Server 2012 and install Roles and Features via Powershell. This can be done quickly, by performing the following steps:
- Add a Configuration Manager Client Package (default)
- Add a x64 Boot Image (default)
- Add a Operating System Image of Windows Server 2012 (default install.wim)
- Create a Install an existing image package –Task Sequence, with the mentioned packages of the previous steps (no need for the steps State Migration, Include Updates and Install Updates).
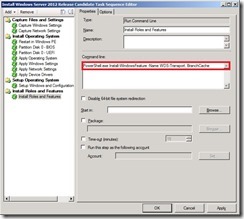
- Edit the new Task Sequence and add a Run Command Line –step (see picture). Now add the command line Powershell.exe Install-WindowsFeature –Name WDS-Transport, BrancheCache.
Note: To find the name of the features that you want to install, just use: Powershell.exe Get-WindowsFeature. Also good to know, in Powershell you don’t have to specify the top-level role/ feature before you can install a sub-level feature.
Dism
The second method that I want to show is deploying Windows Server 2012 and install Roles and Features via Dism. This can be done quickly, by performing the following steps:
- Add a Configuration Manager Client Package (default)
- Add a x64 Boot Image (default)
- Add a Operating System Image of Windows Server 2012 (default install.wim)
- Create a Install an existing image package –Task Sequence, with the mentioned packages of the previous steps (no need for the steps State Migration, Include Updates and Install Updates).
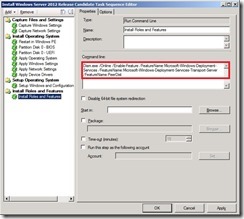
- Edit the new Task Sequence and add a Run Command Line –step (see picture). Now add the command line Dism.exe /Online /Enable-Feature /FeatureName:Microsoft-Windows-Deployment-Services /FeatureName:Microsoft-Windows-Deployment-Services-Transport-Server /FeatureName:PeerDist.
Note: To find the name of the features that you want to install, just use: Dism.exe /Online /Get-Features. Also good to know, in Dism you do have to specify the top-level role/ feature before you can install a sub-level feature.
MDT 2012 Update 1
The third method that I want to show is deploying Windows Server 2012 and install Roles and Features via MDT 2012 Update 1 (which is currently still in BETA). This can be done quickly, by performing the following steps:
- Install MDT 2012 Update 1
- Run Configure ConfigMgr Integration
- Add a Configuration Manager Client Package (default)
- Add a x64 Boot Image (default)
- Add a Operating System Image of Windows Server 2012 (default install.wim)
- Create a Microsoft Deployment Toolkit Package
- Create a Install an existing image package –Task Sequence, with the mentioned packages of the previous steps (no need for the steps State Migration, Include Updates and Install Updates).
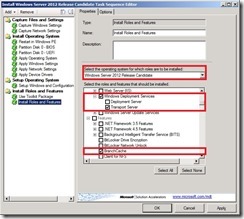
- Edit the new Task Sequence and add a Use Toolkit Package –step. Now add a Install Roles and Features –step. Here you can select the Operating System, the Roles and the Features (see picture).
Note: During my testing I noticed that this doesn’t work with Windows Server 2012 RC, yet, as I get an Unknown OS Current version error in my logs. I’ll assume that this is fixed with the full releases of both products.
1 thought on “Deploying Windows Server 2012 including Roles and Features with ConfigMgr 2012”