This week is a follow-up on last weeks post about customizing the Start menu layout on Windows 11 devices. This week, however, is focused on customizing the Taskbar layout on Windows 11 devices. Customizing the Taskbar layout enables organizations to create a standardized layout for their users. With the arrival of Windows 11, the configuration options for customizing the Taskbar layout have changed. Especially from a setting-by-setting perspective the options are now rather limited. This post does a quick breakdown of the Taskbar layout in Windows 11 and the different configurations that are available, per section. That breakdown is followed with a zoom-in on the actual configuration for creating the standardized layout. This post ends with showing the user experience with a customized Taskbar layout.
Important: My personal opinion is that – even more than for the Start menu layout – the Taskbar layout should be left untouched, when possible. In most cases the user will create their own Taskbar layout, when needed.
Introduction to the Taskbar in Windows 11
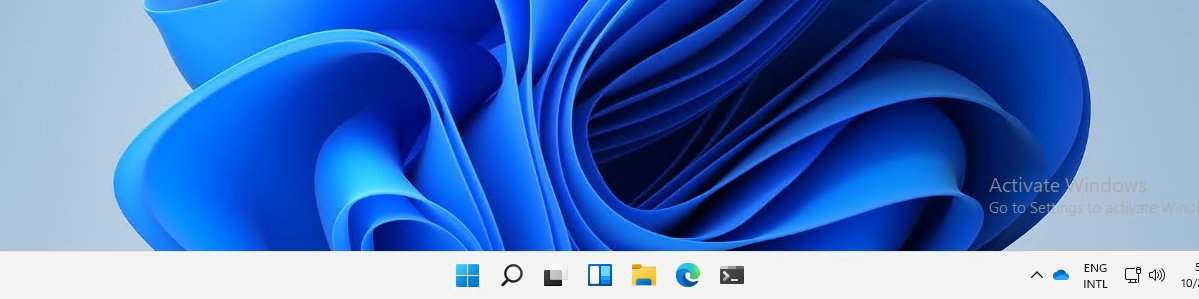
The Taskbar layout of Windows 11 has changed, compared to Windows 10. One of the most eye-catching changes, for the average user, is the position of the Start menu on the Taskbar. Starting with Windows 11 that default position is in the middle of the Taskbar. Not everything, however, is configurable. At least not when relying on default functionality that is available via MDM. That makes it important to breakdown the Taskbar layout in Windows 11 and to look at the configuration options. Figure 1 is used as a reference for the breakdown of the Taskbar layout (click on the image for a clear view).

Figure 1: Overview of the Taskbar layout in Windows 11

- Start (1): This section is referring to the positioning of the Start menu layout, the Items (2) and the Apps (3) on the device. The IT administrator cannot configure the position, unless using registry edits.
- Items (2): This section contains default Taskbar items for Search, Task view, Widgets and Chat. The IT administrator can prevent Chat from showing by using the Experience/ConfigureChatIcon policy. Other links only by using registry edits.
- Apps (3): This section contains the pinned apps, by default those apps are File Explorer, Microsoft Edge and Microsoft Store. The IT administrator can preconfigure a list of pinned apps on the device using the Start/StartLayout policy. Besides that, the IT administrator can prevent pinning apps to the Taskbar by using the Start/NoPinningToTaskbar policy and can hide recent jumplists from appearing on the Taskbar by using the Start/HideRecentJumplists policy.
- Notification area (4): This section contains the Taskbar corner items, the Taskbar corner overflow and the actual Notifications. The IT administrator cannot configure this section.
Important: For organizations that are still into OS deployments there are a few more options (as described by MVP Jörgen Nilsson) available for customizing the pinned apps. More options for specific groups of apps and for the specific registry keys to configure the location of Start and to configure the visibility of the different Taskbar items.
Creating a custom Taskbar layout in Windows 11
When looking at the configuration options for the Taskbar layout on Windows 11, all the settings are already available on Windows 10. The biggest change, however, is that the configuration options drastically decreased. Besides that, the main configuration of the Taskbar layout – that is used for pinning apps to the Taskbar – still relies on the Start/StartLayout policy. That policy was used in Windows 10 for configuring the Start menu layout and the Taskbar. For Windows 11, that’s only used for the Taskbar layout. There is, however, still a strong relation with the Start menu layout. When configuring the Taskbar layout, it’s no longer possible for the user to pin items to the Start menu layout. Another challenge is the configuration itself. Unless a configuration is available that was previously used on Windows 10, it requires manually creating a XML-file with the required configuration. That XML-file should be formatted as shown in the example below.
<?xml version="1.0" encoding="utf-8"?>
<LayoutModificationTemplate
    xmlns="http://schemas.microsoft.com/Start/2014/LayoutModification"
    xmlns:defaultlayout="http://schemas.microsoft.com/Start/2014/FullDefaultLayout"
    xmlns:start="http://schemas.microsoft.com/Start/2014/StartLayout"
    xmlns:taskbar="http://schemas.microsoft.com/Start/2014/TaskbarLayout"
    Version="1">
  <CustomTaskbarLayoutCollection PinListPlacement="Replace">
    <defaultlayout:TaskbarLayout>
      <taskbar:TaskbarPinList>
	<taskbar:DesktopApp DesktopApplicationID="MSEdge" />
        <taskbar:DesktopApp DesktopApplicationID="Microsoft.Windows.Explorer" />
	<taskbar:UWA AppUserModelID="Microsoft.WindowsTerminal_8wekyb3d8bbwe!App" />
      </taskbar:TaskbarPinList>
    </defaultlayout:TaskbarLayout>
 </CustomTaskbarLayoutCollection>
</LayoutModificationTemplate>Note: The PinListPlacement="Replace" is added to the <CustomTaskbarLayoutCollection> node to make sure that the created Taskbar layout replaces the existing Taskbar layout.
Within that example the nodes in the table below are the most important. Those nodes describe the apps that will be pinned to the Taskbar. After adding those apps to the Taskbar, the user will still be able to pin apps to the Taskbar.
| Node | Description |
|---|---|
| <taskbar:UWA> | This node can be used for adding Universal Windows Platform (UWP) apps. To add an UWP app to the Taskbar, use the Application User Model ID (AUMID) of the UWP app (by using AppUserModelID). |
| <taskbar:DesktopApp> | This node can be used for adding desktop apps. To add a desktop app to the Taskbar, use the AUMID of the desktop app (by using DesktopApplicationID). When no AUMID is available, use a link to the desktop app instead instead (by using DesktopApplicationLinkPath). |
Configuring a custom Taskbar layout in Windows 11
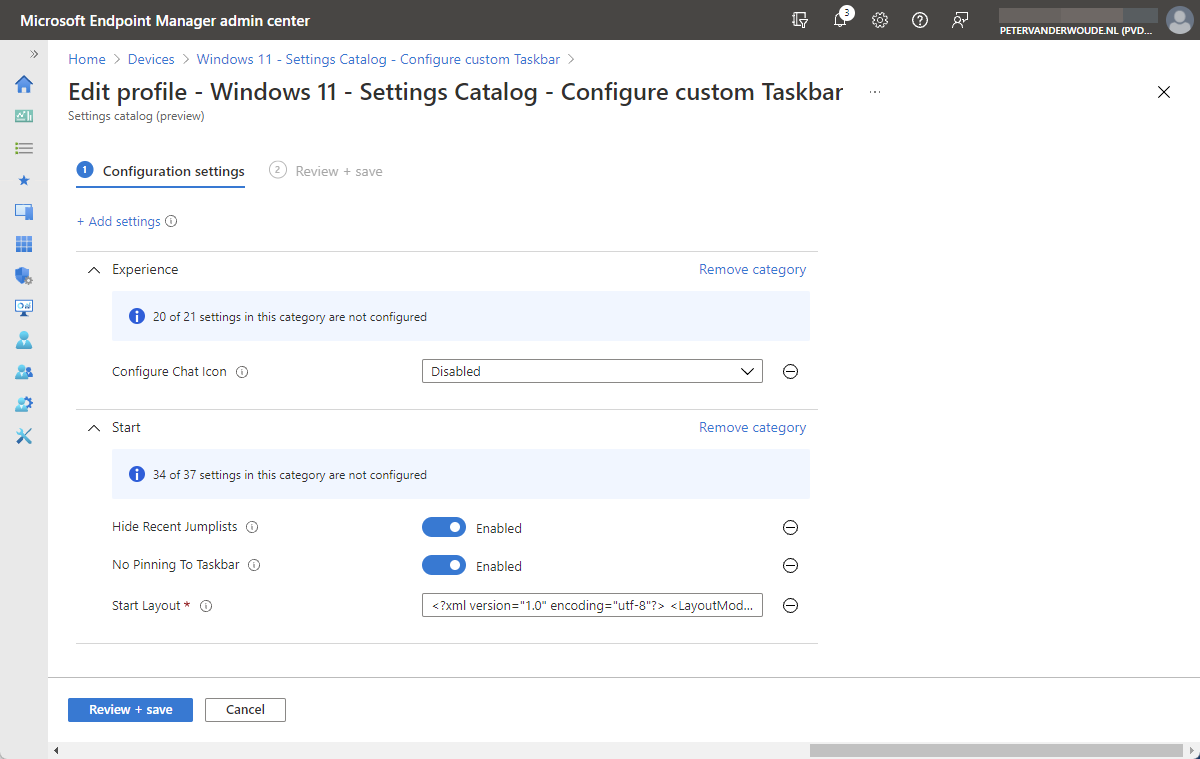
When looking at actually applying a custom Taskbar layout on Windows 11, the Start/StartLayout policy can be used. That policy can override the entire existing layout, including apps that are pinned by default and apps already pinned by the user. The configuration of that policy can be achieved by using the Settings Catalog. The following 8 steps walk through the creation of the Settings Catalog profile, with the required settings.
Bonus: As a bonus the steps below also provides the required configurations to configure the other available Taskbar layout settings for Windows 11. Those configurations are the Start/NoPinningToTaskbar policy, the Start/HideRecentJumplists policy and the Experience/ConfigureChatIcon policy.
- Open the Microsoft Endpoint Manager admin center portal and navigate to Devices > Windows > Configuration profiles
- On the Windows | Configuration profiles blade, click Create profile
- On the Create a profile blade, provide the following information and click Create
- Platform: Select Windows 10 and later to create a profile for Windows 10 devices
- Profile: Select Settings catalog to select the required setting from the catalog
- On the Basics page, provide the following information and click Next
- Name: Provide a name for the profile to distinguish it from other similar profiles
- Description: (Optional) Provide a description for the profile to further differentiate profiles
- Platform: (Greyed out) Windows 10 and later
- On the Configuration settings page, as shown below in Figure 1, perform the following actions and click Next
- Click Add settings and perform the following in Settings picker
- Select Experience as category
- Select Configure Chat Icon as setting
- Select Start as category
- Select Hide Recent Jumplists, No Pinning To Taskbar and Start Layout as setting
- Configure the selected settings with the following values
- Select Disabled with Configure Chat Icon to remove the Chat icon from the Taskbar
- Switch the slider with Hide Recent Jumplists to Enable to hide the recent jumplists from the Taskbar
- Switch the slider with No Pinning To Taskbar to Enable to prevent pinning apps to the Taskbar
- Provide the value with Start Layout

Figure 2: Settings catalog profile for the Taskbar layout on Windows 11
- On the Scope tags page, configure the required scope tags and click Next
- On the Assignments page, configure the assignment and click Next
- On the Review + create page, verify the configuration and click Create
Important: When applying a new, or adjusted, Taskbar layout, the existing layout of the user will be overwritten.
User experience with a custom Taskbar layout in Windows 11
The user experience is interesting to look at. Figure 3 provides an overview of an adjusted Taskbar layout on Windows 11. That provides an overview of some of the most notable adjustments. Those adjustments are the removal of the Chat item and a few custom apps in File Explorer, Microsoft Edge and Windows Terminal.

Figure 3: Example of the customized Taskbar layout of Windows 11
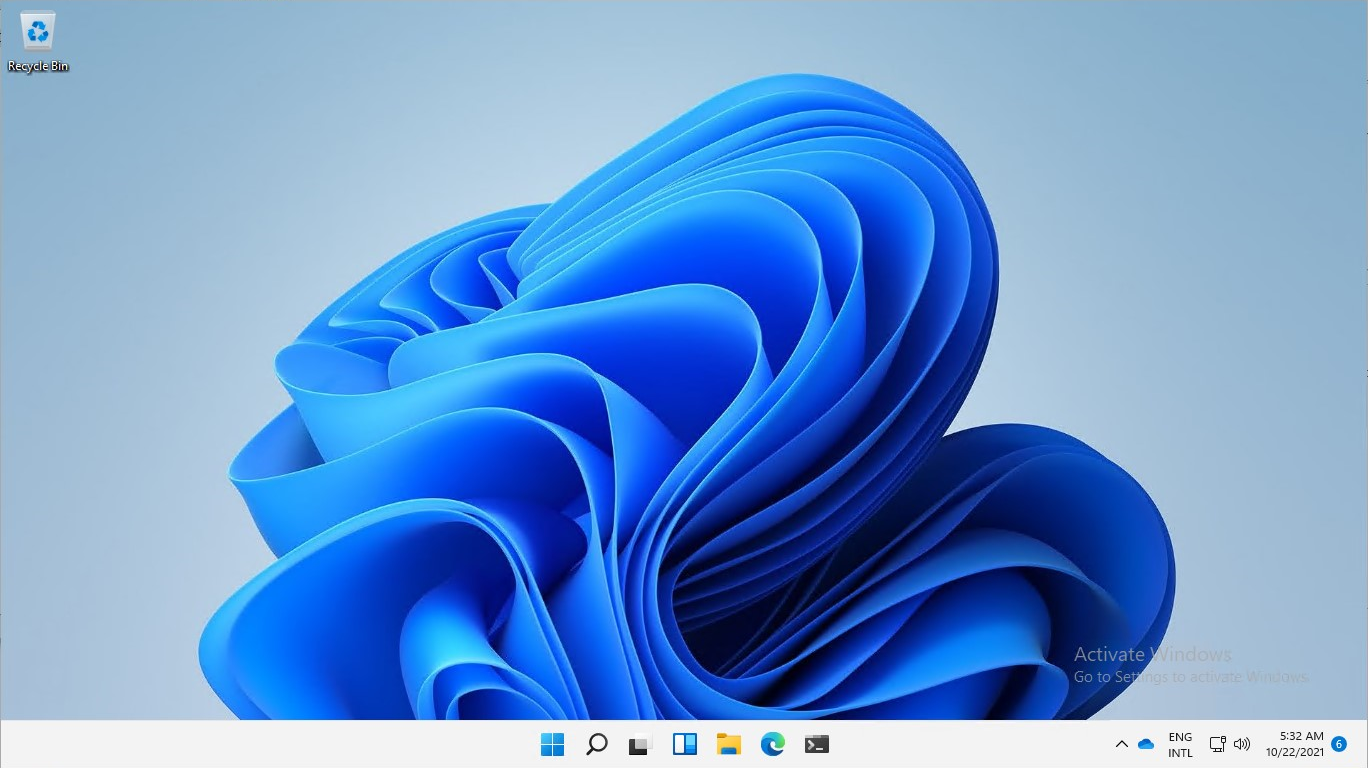
Important: After applying a custom Taskbar layout, the user won’t be able to pin apps to Start anymore.
More information
For more information about customizing the Taskbar on Windows 11, refer to the following docs.