Inspired by a previous post about the option to Schedule Updates for an already existing Operating System Image in ConfigMgr vNext, I created a little batch-file to do something similar without the GUI of ConfigMgr vNext. Of course, I do know that the ‘best practice’ for ConfigMgr 2007 is to just run another Build and Capture Task Sequence, but in some cases this can come in handy. One thing is for sure, this updates a Windows 7 Image within fifteen minutes.
Background Story
Now lets start with a little background story, to explain why in some situations there might be the need for this batch-file. Every month there are new Software Updates released by Microsoft. During the Software Updates Deployment the, for the organization needed, updates get selected and downloaded to the Software Update Package. In other words, the, for the organization needed, updates are already downloaded and available. To update the existing image with the newest updates, the ‘best practice’ is to deploy the newest updates and run another Build and Capture Task Sequence. Sometimes, especially at smaller companies, this is considered as a lot of extra work/ effort and because of that, it is often forgotten. Even though an up-to-date Windows 7 Image deploys a lot faster then a Windows 7 Image that still has to install a lot of Software Updates. So to help out the people that are just to busy (you can actually fill in anything you want, I just like to think that they are to busy), I created this batch-file that will do everything.
Input Locations
Well… after this all being said, lets take a look at the two most important inputs that we need for this batch-file:
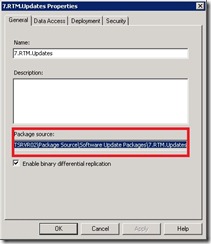
- The current setup of the batch-file assumes that there is a Software Updates Package for all Windows 7 (x86 and x64) updates. The Package source of this package is used as input for this batch-file. This location can be found in the Properties of the Software Updates Package (see the first picture) in the ConfigMgr Console. By doing this, it is not needed to re-download the Software Updates, it’s only needed to gather the Software Updates together from all the subdirectories.
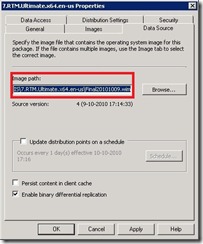
- Another important input for the batch-file is the location of the Windows 7 Image, which has to be updated. For this the Image path can be used, which can be found in the Properties of the Operating System Image (see the second picture) in the ConfigMgr Console. Don’t forget that it is still needed to update the Distribution Point(s) after the batch-file has run!
Batch-file
As we know now a little background story and we know where the most important parts of the input comes from, lets take a look at the batch-file that will make it happen.
REM =========================================
REM ARGUMENT -1- TempPartition = %1
REM ARGUMENT -2- UpdatesPackageSource = %2
REM ARGUMENT -3- Architecture = %3
REM ARGUMENT -4- WimFileAndLocation = %4
REM ARGUMENT -5- FromDate MM-DD-YYYY = %5
REM ===================================================REM ===================================================
REM Make (temporary) directories for updates and mounting
REM ===================================================MD %1\TEMP\Mount
MD %1\TEMP\UpdatesREM ======================================================
REM Copy new updates of %3 -architecture and of > %5 -date to temporary directory
REM ======================================================FOR /R %2 %%P IN (*%3.cab) DO (
XCOPY "%%P" %1\TEMP\Updates /H /C /Y /D:%5
)REM ======================================================
REM Mount image, add updates, commit and unmount
REM ======================================================DISM /Mount-Wim /WimFile:%4 /Index:1 /MountDir:%1\TEMP\Mount /LogPath:%1\DISM.Log
DISM /Image:%1\TEMP\Mount /Add-Package /PackagePath:%1\TEMP\Updates /LogPath:%1\DISM.log
DISM /Unmount-Wim /MountDir:%1\TEMP\Mount /Commit /LogPath:%1\DISM.logREM ======================================================
REM Remove (temporary) directories again
REM ======================================================RD %1\TEMP /S /Q
The biggest part will explain itself, with or without the comments, but it also shows here that I am using five variables. This is to make it easier adjustable for different Windows 7 Images, Package source location, architectures and dates. These variables are used in the following way:
- %1 – Presents the volume that can be used to store the temporary folders.
- %2 – Presents the full location of the Software Updates Package source.
- %3 – Presents the architecture of the Operating System.
- %4 – Presents the full location of the Operating System Image, including the name of it.
- %5 – Presents the date of the oldest Software Updates that have to be added (Format: MM-DD-YYYY).
Now lets end this post with how to run this batch-file:
[NameOfBatchFile].BAT [DriveLetter:] [SoftwareUpdatesPackageSourceLocation] [Architecture] [WIMLocation\WIMName] [DateLatestNeededUpdates]
This looks like great information, but I would like an example of syntax for the architecture. Is it just "x86" or "x64"? Will this work for Windows XP? Thanks so much for sharing!
The syntax for the architecture is x86 or amd64. Also it doesn’t work for Windows XP, as you can’t use DISM with Windows XP.
Great post to offline patching
Can it be used with UNC paths like this?
mybatchfile.BAT \\srvwsus\updates x86 \\srvsccm\images\win7.wim 10-1-2010
Correct, you can just use UNC paths.